
Chromebook and Linux are popular and versatile OS. Initially, the Chromebook was made keeping in mind the students, but now it becomes a full-fledged OS after joining the Android Play Store. Millions of Android apps can be installed and used in the Chromebook to do many more productive tasks. On the other hand, Linux offers some powerful and useful alternative software for users who have come from Windows or any other system. GIMP (alternative of adobe photoshop), Darktable (a Lightroom alternative), and lots of software out there in the various Linux software repositories can help the users adopt the open-source system instead of Windows or Mac OS.
Install Linux on Chromebook
So if you are a Chromebook user and want to have dual OS side by side with the Linux system for a more productive job or want to get a different flavor, then this is the right place for you to know how to install Linux on Chromebook to unlock its full potentiality. Here I will be proceeding with a natural step by step tutorial on How to install Linux on Chromebook easily.
Here I will be using Crouton to install Linux on Chromebook, which uses the chroot command to run the Linux distros on top of the Chrome OS, another derivative of the Linux kernel. This is just like dual booting without rebooting the system instead of opening both the OS side by side in a Chrome, Window manager. This is amazingly easy to use and powerful of having both the system alongside.
But if you like to install Linux on Chromebook as a traditional dual boot, I would like to recommend you to see ChrUbuntu instead. Using Crouton is much more comfortable to follow and works on almost all types of Chromebooks.
Before following these tips and tutorials, you must take a full backup of all the files on google drive and make a “Chrome OS restore image” file. So that if any unwanted things happen during the process, you can restore your full system.
1. Enable Linux Apps with Crostini
The official way of installing Linux in your Chromebook is called Crostini, enabling Linux OS to run in a separate app on your Chrome OS desktop. Since this Linux app stays inside the container, which is Chrome OS, in this case, anything that goes awry in your Linux will not impinge on your Chrome OS.
Since this Linux is in Beta mode, some features will not work properly, such as accelerated graphics or audio in Linux apps. Besides, not all Chromebooks present this Linux beta option in which you will have to install it using the other two methods. To install Linux Crostini, you need to,
Step – 1: Click on the bottom right corner of the time menu and select the settings icon (gear icon).
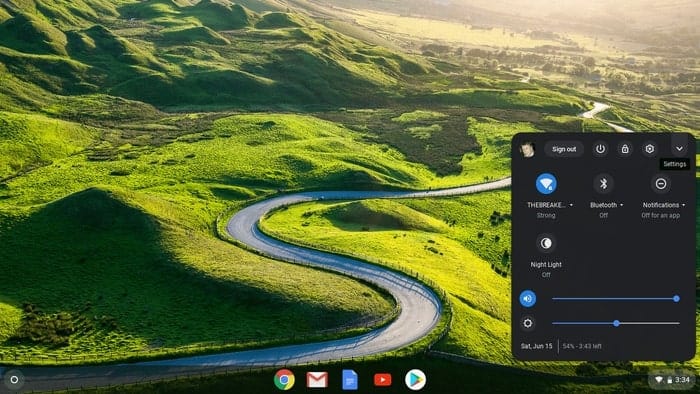
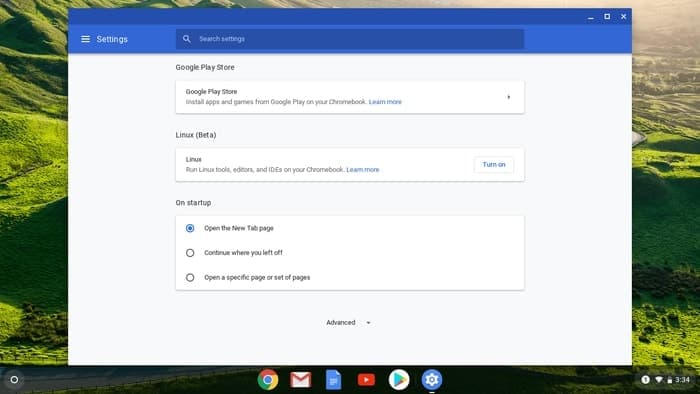
Step – 2: Scroll down to the Linux settings and turn it on. Suppose you don’t see this option meaning that your Chromebook does not support it.
Step – 3: Install the Linux beta followed by you will be greeted with a Linux terminal in which you have to type two commands one after another, such as
sudo apt update
sudo apt upgrade
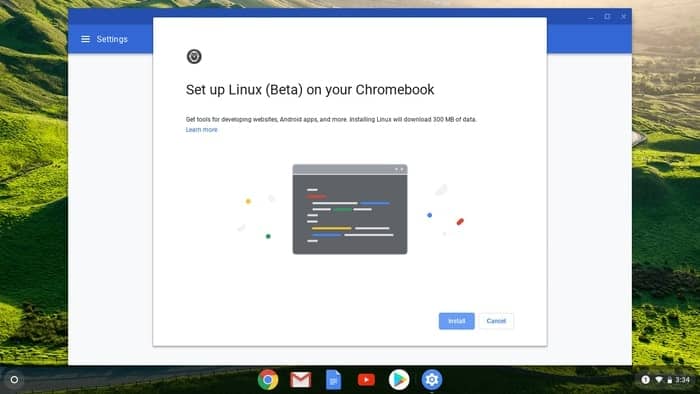
Step – 4: This will make sure that your Linux app is up to date, and therefore, it will launch the apps in which you can download the Steam.
2. Install Linux Desktop with Crouton
To have a fully-fledged Linux experience, or if your Chromebook doesn’t have Crostini, you can install Linux by using a chroot environment called Crouton. In this case, the operating system for Linux is Ubuntu. Although this process is less time consuming and easy to install, this mode will switch the entire Chrome OS to developer mode, which means that you need to back up all your data if they are not synced into your cloud.
Steps to Getting Started
- Backup all the user’s files into google drive.
- Make a Chrome OS recovery image and learn how to recover the chrome os.
- After making a Chrome OS restore an image, learn how to write it on an SD card or flash drive for later use.
- Learn how to get into the developer mode for your specific Chromebook model using google search.
Don’t skip any of those noted steps. Though installing Linux on the Chromebook is easy and straightforward, but it always good to have all the necessary tools before the factory flash of the Chromebook. When you take your Chromebook into developer mode for the first time, it will remove all the system data and files from the system. That means you have to start from scratch. Don’t get afraid, follow the instruction, and have fun.
Step 1: Enable Developer Mode
As I have said earlier, it will wipe all the data. And I believe you have followed “Steps Before Getting Started.” This is some general information about putting the Chromebook into developer mode. But it is wise to have google search with your Chromebook specific model.
- First of all, you have to take your Chromebook into recovery mode by pressing and holding the Esc, Refresh keys, and the Power button altogether.
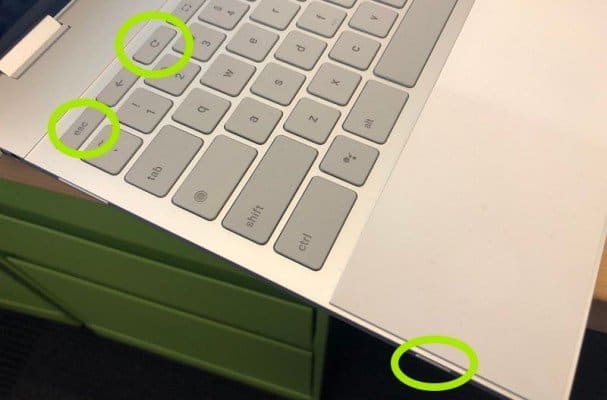
- When the recovery mode comes up, press Ctrl+D to turn on Developer Mode.
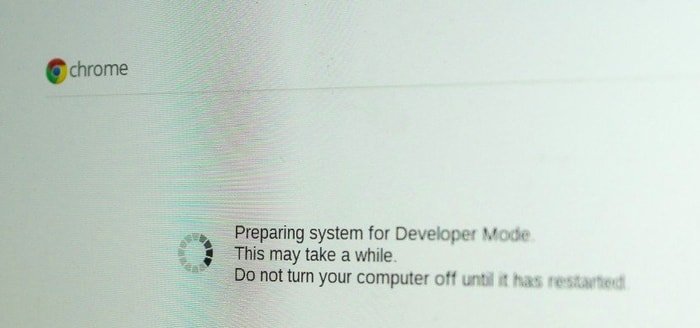
- Now press Enter and wait a minimum of 15 minutes and so. It will reboot and go through a process of enabling developer mode.
- During the enabling process, it will wipe out all the local information.
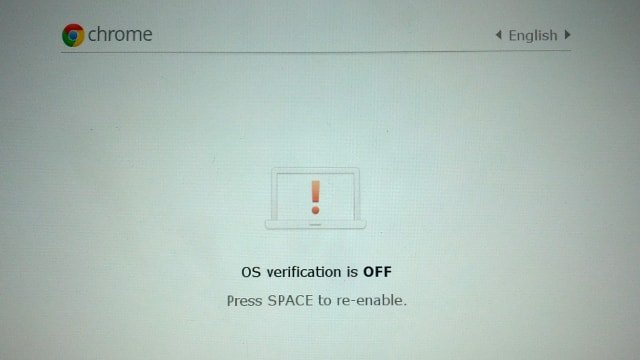
- After the completion of the process, it will come up with a red exclamation screen. Don’t do anything until it reboots into Chrome OS.
Step 2: Install Crouton
Before going to install Crouton, let us know what it is? Crouton is a piece of software as chroot kind, developed by Google hardware engineer who loves Chromebook, which is used to create an environment on Chromebook, like android and google play on Chromebook, to install Linux based OS like Ubuntu, Linux Mint, and others using the same hardware specification as used by Chrome OS.
Though there are many other ways to install Linux on Chromebook, this one is easy and straightforward to install, uninstall or modify. Now it’s time to go to step 2 to install Linux on Chromebook.
- Download Crouton from the official Github Page and save it to download the folder.
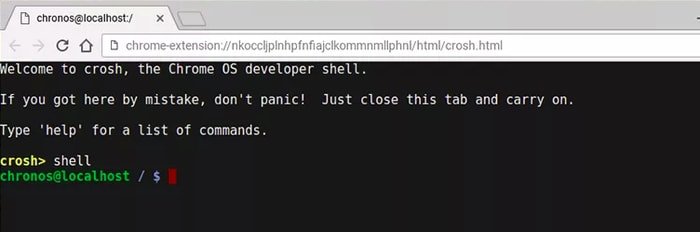
- Open the Terminal by pressing Ctrl+Alt+T on your Chromebook.
- Run the following command into Terminal to enter the Ubuntu shell :
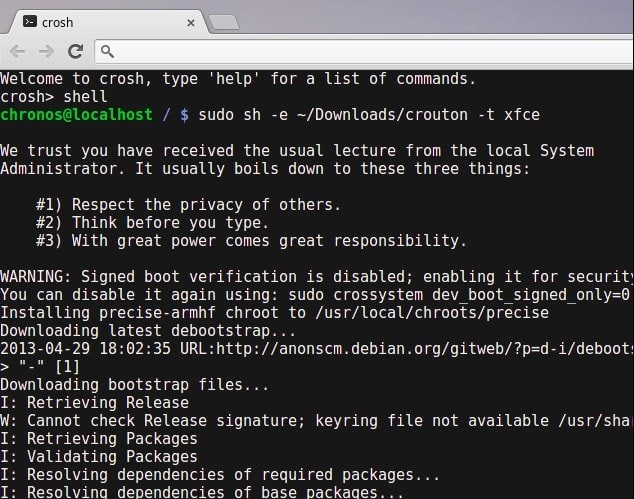
shell
- Run the following command into the Terminal to install Crouton :
sudo sh -e ~/Downloads/crouton -t xfce
OR
If you are using the Crouton Integration extension, run the following command :
sudo sh ~/Downloads/crouton -t xiwi,xfce
- If you’re doing this on a Chromebook Pixel, Asus flipbook, or any touchscreen Chromebook, then change it to :
sudo sh -e ~/Downloads/crouton -t touch,xfce
- As the developer mode increases the system’s security vulnerability, you can encrypt the desktop password for extra security measurement by using the -e flag. You can get more information regarding this from the official GitHub page.
- It will take some time to install Crouton. It will prompt a new username and password for the new Ubuntu installation when it is completed. Enter the user credentials as it asked.
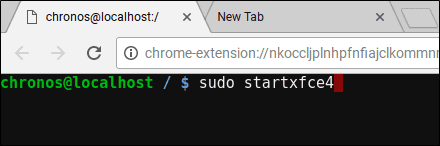
- After finishing the installation, run the following command to start the Ubuntu Linux desktop environment :
sudo startxfce4
- Up to this time, I have shown how to install the Ubuntu Xfce desktop environment. But if you want to install the Unity desktop environment, just replace “xfce” with the “unity” without the quote in the above command. And while starting the desktop environment, replace it with “startunity” without the quote. Moreover, if you like to install KDE, LXDE, and any other Linux desktop environment, See the Crouton GitHub page for more information.
Step 3: Optimize The Linux Desktop Environment
- You can switch back and forward between chrome os and ubuntu by using Ctrl+Alt+Shift+Back and Ctrl+Alt+Shift+Forward for ARM-based Chromebook and Ctrl+Alt+Back and Ctrl+Alt+Forward for an Intel-based Chromebook. For the latter command, you have to press Ctrl+Alt+Refresh to bring up the desktop.

- Just log out as a standard PC if you want to exit the Ubuntu Linux desktop. Again run sudo startxfce4 to start the Linux desktop environment.
- This version of the Ubuntu Linux desktop does not come with lots of software. Even some of the essential apps, you will not find here. So you have to install all those vital software manually by using specific commands into the Terminal.
sudo apt-get update
sudo apt-get install bash-completion ttf-ubuntu-font-family software-center synaptic
- Disable the screensaver if you are using XFCE to avoid graphics issues in Chrome OS.
- Use the Download folder as it is shareable for both the system.
- It will take more than 30 seconds to boot up as it’s in developer mode. You can skip the developer mode message by pressing Ctrl+D.
Extra Tips: Remove the Linux Desktop Environment
If you want to remove the Ubuntu Linux desktop environment and go back into the regular chrome OS, press the spacebar while rebooting the system and re-enabling the OS verification prompt. This will uninstall Crouton and restore your Chrome OS.
Some alternative ways to remove Linux. Run the following command into the Terminal:
- Type cd /usr/local/chroots and press Enter
- Type sudo delete-chroot * and press Enter
- Type rm -rf /usr/local/bin and press Enter
So that’s it. Now you have a fully functional and effective Ubuntu Linux desktop along with Chrome OS. You can switch back or forward to the different systems by using a keystroke.
3. Dual-Boot Chrome OS with Linux
If you prefer Linux over Chrome OS and do not want to have Chrome OS, this option is perfect. It means that you will have to partition the drive and dual-boot it with Chrome OS. To perform dual-boot, you can use the tool called chrx, which, by default, installs GalliumOS. This process also needs to switch the Chromebook into a developer mode. The installation processes are as follow:
Step – 1: Press Ctrl+Alt+T to open the terminal and type shell, followed by press enter. Then run the following command to prepare the installation.
cd ; curl -0s https://chrx.org/go && sh go
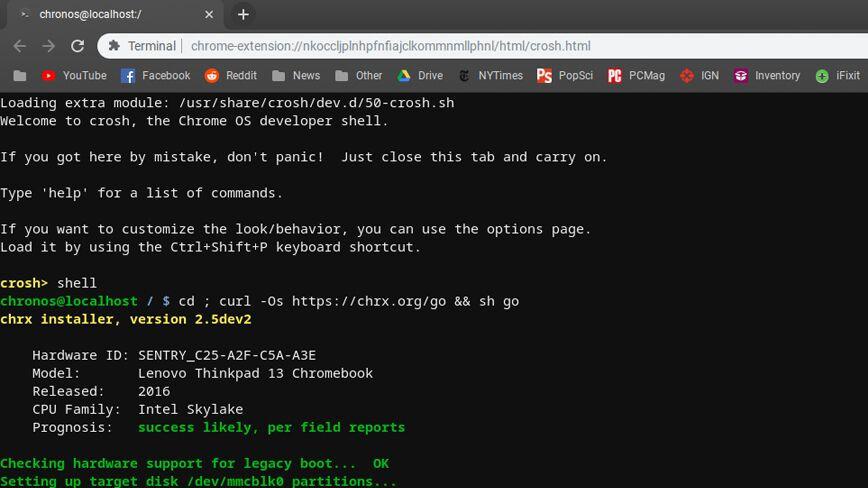 Step – 2: The chrx installer will tell you what to do next step by step while partitioning your drive. The Chromebook will reboot, and you have to press Ctrl+L at start-up to boot your preferred Linux distro.
Finally, Insight
What method did you follow to install Linux on Chromebook? Do you like this tutorial? If you face any problems during this process, please let me know in the comment section. Is this tutorial on installing Linux on Chromebook helpful? Mind if you do me a sweet favor and tap the Social Share Button if you learned something new? It’d mean so much to me. Thanks again for spending part of your day here. Hope to see you come back. 🙂
it keeps saying the password is incorrect. what is the password supposed to be? (I just finished the copy and paste step after typing shell
I tried to use the command after shell and here’s what it said sh: 0: Can’t open /home/chronos/user/Downloads/crouton
what are the rules/steps for a school chromebook?
My Chromebook has only 16gb drive. Should I add another m2 sata before I install the Linux?
With this storage, you are good to go for installing Linux on Chromebook.
Well that all seemed to work well until the “sudo startxfce4” command when it failed and said (quite a lot- see below)….
…any ideas welcome! 🙂
Build Date: 25 October 2018 04:16:21PM
xorg-server 2:1.19.6-1ubuntu4.1~16.04.2 (For technical support please see https://www.ubuntu.com/support)
Current version of pixman: 0.33.6
Before reporting problems, check https://wiki.x.org
to make sure that you have the latest version.
Markers: (–) probed, (**) from config file, (==) default setting,
(++) from command line, (!!) notice, (II) informational,
(WW) warning, (EE) error, (NI) not implemented, (??) unknown.
(++) Log file: “/tmp/Xorg.crouton.1.log”, Time: Sat Jul 27 15:54:51 2019
(==) Using system config directory “/usr/share/X11/xorg.conf.d”
Error org.freedesktop.DBus.Error.ServiceUnknown: The name org.chromium.LibCrosService was not provided by any .service files
method return time=1564239291.442411 sender=:1.13 -> destination=:1.58 serial=632 reply_serial=2
boolean true
MESA-LOADER: failed to retrieve device information
gbm: failed to open any driver (search paths /usr/lib/arm-linux-gnueabihf/dri:${ORIGIN}/dri:/usr/lib/dri)
gbm: Last dlopen error: /usr/lib/dri/exynos_dri.so: cannot open shared object file: No such file or directory
failed to load driver: exynos
EGL_MESA_drm_image required.
(EE)
Fatal server error:
(EE) AddScreen/ScreenInit failed for driver 1
(EE)
(EE)
Please consult the The X.Org Foundation support
at https://wiki.x.org
for help.
(EE) Please also check the log file at “/tmp/Xorg.crouton.1.log” for additional information.
(EE)
Error org.freedesktop.DBus.Error.ServiceUnknown: The name org.chromium.LibCrosService was not provided by any .service files
method return time=1564239291.662909 sender=:1.13 -> destination=:1.60 serial=633 reply_serial=2
boolean true
(EE) Server terminated with error (1). Closing log file.
/usr/bin/xinit: giving up
/usr/bin/xinit: unable to connect to X server: Connection refused
/usr/bin/xinit: server error
Unmounting /mnt/stateful_partition/crouton/chroots/xenial…
I am having the same issue! receiving this message and have not found a solution! someone pls help
Did you find a work around? I am H.A. I gotta the same issue!
this is a shot in the dark, but you might have jus installed it wrong, if those lines you showed are correct then what happened is that the system tried to access something that was not provided by its files, and then tried to access some other folders but for some reason could not do it.
tying to switch to the other OS just brings up a dev mode OS, an solutions?
Idk what happened but its not taking my password. Is there a way to fix this? Maybe turn off the password? Please help.
Installed. All is well. But looking in the Ubuntu software center app store. Steam shows up but when clicking on it, a prompt comes up saying “not found. There isn’t a software package called steam in your current software sources.” Where do I go from here?
Security Feature Note: When you are attempting to setup your password, you will NOT see anything as you type. It is accepting your input though. Just keep typing normally; this is a security feature.
the cpu and ram would not be affected as much but might be a little slower than normal
for me it said it couldnt open crouton downloads
same, I’m trying to fix this, update you later
@Chris
Did you type in the command ‘Shell’ before using the commands?
it says it doesnt understand the command sudo?
I tried to follow the instructions using the “-e” flag, i.e., using the syntax: “sudo sh ~/Downloads/crouton -e -t touch,xfce” which then brings a message to enter a password. However, at that point the entry point freezes and I cannot enter a password. How do I fix this. The machine I’m using is a brand new ACER Chromebook R11 with a celeron quad core processor, 4GB RAM and 32 GB drive. Thank you for your help.
I have the same problem, hopefully, this can be fixed.
Its typing your password you just cant see it. Type it then hit enter.
What password are we supposed to type?
type a password you can remember, because you will need it to log in and enter sudo commands
Will this work on a school managed chromebook?
Probably not, if they are like mine and have administrator mode off along with a number of things disabled.
If I’m not mistaken, both OSs are running at the same time. Isn’t it? If true, could be the RAM or CPU usage be affected?
Thanks
Hi,
Excellent tutorial.
Worked first shot, no hint.
Congrat!