
Using Linux through the terminal shell is always fast, secure, and time-saving. Moreover, if you’re a power Linux user, you would definitely be willing to do all the operational tasks through the command line interface-based methods instead of the GUI-based methods. Using the GUI-based systems has made Linux so easy to use and user-friendly, but you won’t feel that professional feeling that you get in CLI. However, if you’re using a Linux server without any Linux desktop environment, I’m sure you need to execute a lot of terminal commands to operate the server. Not only in Linux server, but you can also use the terminal method to connect WiFi from the terminal shell in desktop environments as well.
Connect to WiFi from the Terminal in Ubuntu Linux
In Linux, you can do pretty much everything through the terminal shell with proper access. For connecting WiFi from the terminal shell in Ubuntu Linux, you need to know your WiFi name and the password and basic knowledge of Linux.
In this post, we will see how to connect wifi from the terminal in Ubuntu/Debian Linux. Here, we will see CLI and semi-CLI methods of connecting WiFi on Linux from the terminal shell.
Method 1: Netplan Method to Connect WiFi from Terminal
The Netplan is the basic network configuration and setup tool on Ubuntu for setting up all network settings. You can use the Netplan tool and configure it through the terminal shell to connect WiFi from the terminal shell.
Step 1: Identify the NIC Details
To connect WiFi on any machine, obviously, we will need to know the name of the network. In networking, the Wifi name is identified by SSID (Service Set Identifier). Then you might also need to ensure that there is an active WIFI adapter installed on your Linux machine. You can run the following command supplied below to scan all the available wifi networks adapters around you. Run the following command on the terminal shell to print the wifi adapter name on your machine.
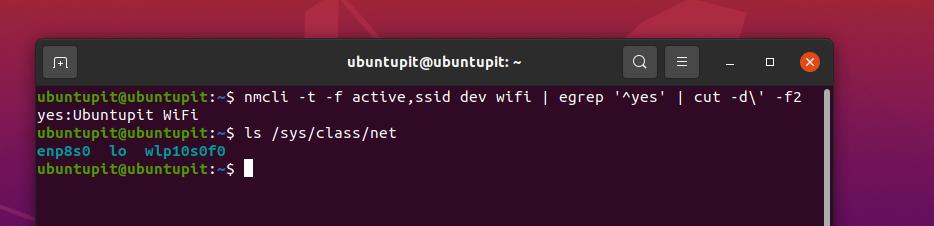
ls /sys/class/net
nmcli -t -f active,ssid dev wifi | egrep '^yes' | cut -d\' -f2
The following command would show you the available networks on the shell screen. Later, we will use the SSID name on the netplan configuration script to connect WiFi from the terminal shell.
Step 2: Edit the Netplan on Ubuntu
Since we already know our WiFi SSID name, and we have the functional Wifi adapter, it’s time to connect Wifi to our system through the terminal. The following simple and straightforward command will let you edit the Netplan configuration script to add our SSID and other credentials. Here, I’m using the Nano script editor, and you can use any of your favorite tools to edit the Netplan script.
sudo nano /etc/netplan/50-cloud-init.yaml
When the script opens, please copy and paste the following script lines inside your network configuration script. Please maintain the alignment and indentation as it is given below in the picture to avoid errors while we try connecting wifi from the terminal shell in Linux.
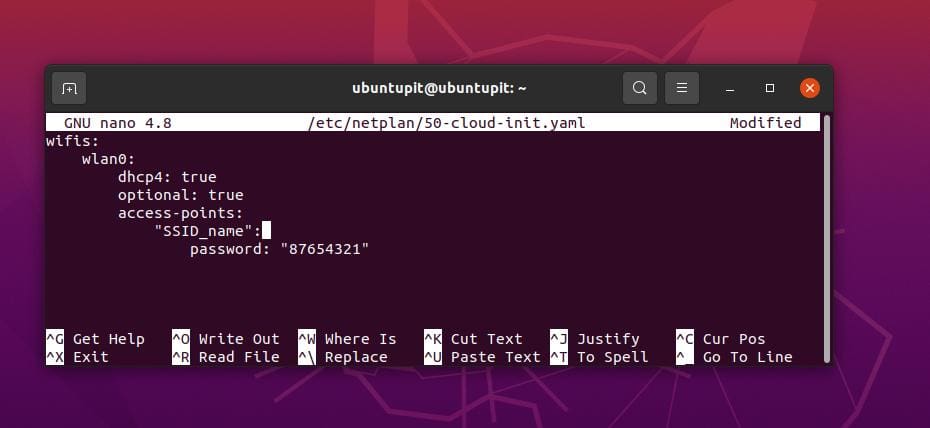
wifis:
wlan0:
dhcp4: true
optional: true
access-points:
"SSID_name":
password: "WiFi_password"
Here is the extended view of the entire Netplan configuration script that you can observe for a better understanding. If you’ve been using any other network configuration, please make a backup of the script for restoring it to the default. Please make sure that you’ve correctly scripted the file for connecting WiFi via terminal.
# This file is generated from information provided by the datasource. Changes
# to it will not persist across an instance reboot. To disable cloud-init's
# network configuration capabilities, write a file
# /etc/cloud/cloud.cfg.d/99-disable-network-config.cfg with the following:
# network: {config: disabled}
network:
ethernets:
eth0:
dhcp4: true
optional: true
version: 2
wifis:
wlan0:
dhcp4: true
optional: true
access-points:
"SSID_name":
password: "WiFi_password"
Now, you might face issues after you reboot or sign out from the machine. To avoid configuring the entire process every time, please generate a Netplan plan and apply it to your Ubuntu machine.
sudo netplan generate
sudo netplan apply
If the Netplan Apply command doesn’t work, you can try the following command given below.
sudo netplan --debug apply
Step 3: Find If There Are Any Issues!
In Linux, if you already have existing setups for network/WiFi configuration, you might face issues connecting Wifi from the terminal shell. Please execute the following system control command on your terminal shell to start the Wi-Fi Protected Access tool on your Ubuntu machine.
sudo systemctl start wpa_supplicant
If the above commands don’t work, please shut down your PC and apply the Netplan settings again on your machine.
shutdown now
sudo netplan generate
sudo netplan apply
Sometimes, your WiFi might be working fine and still be connected on your Ubuntu machine without showing the status; in that case, it might just need a system repository update to refresh the Netplan settings. You might not forget to check your WiFi adapters on your machine if you fail to connect Wifi from the terminal on Linux.
Finally, when you become successful in establishing a Wifi connection to your Ubuntu machine from the terminal, you may now run the following command to check the IP status on your machine.
$ ip a
Method 2: Connect Wifi on Ubuntu From Terminal via nmtui
The nmtui is the short form of Network Manager Text User Interface on Linux. It can be used for managing wireless networks on your surface. The nmtui tools work in a semi-CLI method. In this method, you need to use the terminal-based command line, but it also requires the cursor pointer to selecting and operating the tool.
Step 1: Executive Network Manager UI
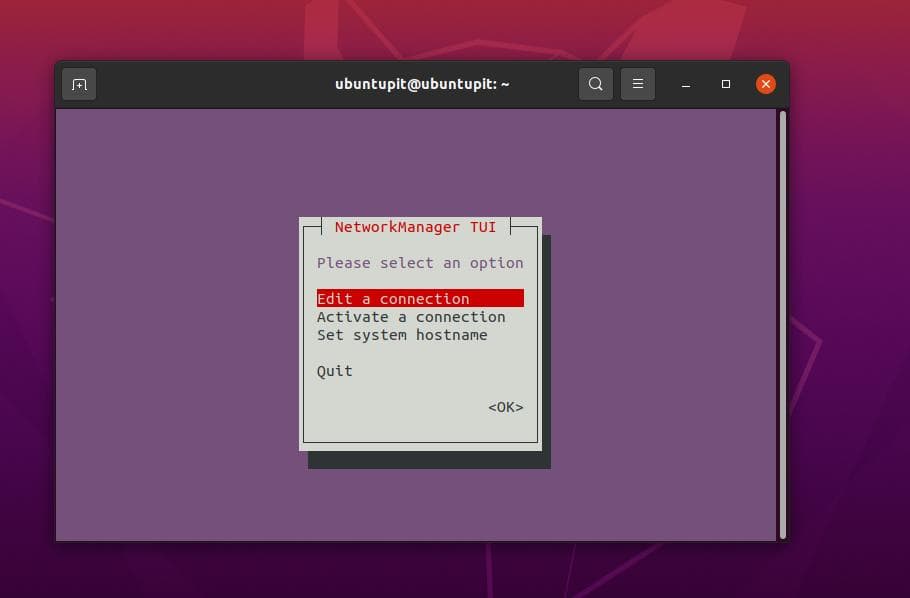
In this method, we will see how to connect Wifi on Linux from the terminal via nmtui. First, you need to type nmtui on your terminal shell to run the Network Manager Text User Interface tool on your system.
nmtui
The command will show you a drop-down menu for selecting the Network settings. From the menu, please select the ‘Activate a connection’ to select your SSID from the terminal.
Step 2: Select WiFi SSID
In the next step, you would see the list of Wifi networks (SSIDs) available around you on the terminal shell. Please use the mouse cursor or the arrow keys from your keyboard to select your SSID, then hit the enter button to select the network.
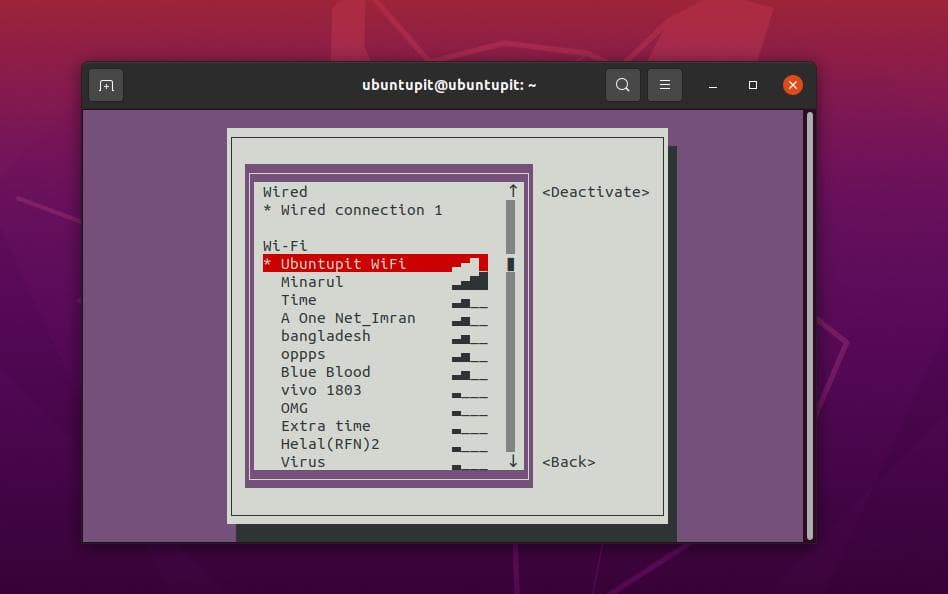
In the next step, the terminal shell will ask you to input the password of the SSID so that your Linux desktop can be connected to the network. If your Wifi does not have a password, it won’t ask for the password. If everything goes right, it will show you a ‘connecting’ message on the screen and will connect shortly.
Step 3: Checking the Connection
Since now, we have seen methods of connecting the Wifi network on Ubuntu from the terminal shell. It’s time to check if the network works or not. Running the Ping command for checking the internet connection is a universal method to check the internet stability, response time, and latency. We can perform the following Ping command on the terminal shell to hit Ping to Google DNS.
ping google.com
To check all the known Wifi networks on your system, please execute the following Nmcli command given below.
nmcli con show
If you need to switch from one Wifi network to another network, you can execute the NMCLI command given below.
nmcli con down ssid/uuid
Final Words
In the entire post, we have seen two methods of connecting Wifi on Ubuntu Linux from the terminal shell and the how-to check the connection. If you’re a professional Linux user, I would highly suggest you use a LAN cable for better internet stability. If you’re using an internet connection with a Static IP, please go through this post to see how to connect a Stactci IP on Linux.
I hope this post has been useful and informative for you. Please share it with your friends and the Linux community if you find this post useful and informative. You can also write down your opinions regarding this post in the comment section.
the nmtui worked for me. i am in tty1 now working forward to gui after updates. thank you Mehedi Hasan
I don’t have any of those tools installed, and I can’t install them because I don’t have WiFi
Thanks for the guide. I didn’t know about nmtui before!
Thanks for sharing this, It is really helpful.
Great guide, really easy to follow. worked for my arm32 ubuntu server setup!!!! :):)