
Raspberry Pi is a low-cost mini-computer that has made computing and programming much easier for most people, including students and hobbyists. This mini-computer can do everything that a desktop computer can do, from browsing the internet to making exciting projects and programs. And one of these amazing projects is making a Raspberry Pi Face Recognition. While this project can be a lot interesting, it’s not very easy to make. So, I would recommend you to follow the article step by step.
Raspberry Pi Face Recognition
Making a face recognition program might have been a very difficult and advanced thing once. But with Raspberry Pi, nothing’s too hard! In this article, I have used the Open Source Computer Vision Library (OpenCV) to do the project.
This repository was designed to work with computational efficiency and real-time applications. Hence, it’s ideal for our real-time face recognition program. This article will guide you step by step through the whole project. So, stick by the end to have your own Raspberry Pi Face Recognition!
Requirements
You will need the following things to make a Raspberry Pi face recognition system:
- Raspberry Pi V4
- Noir Camera
- OpenCV
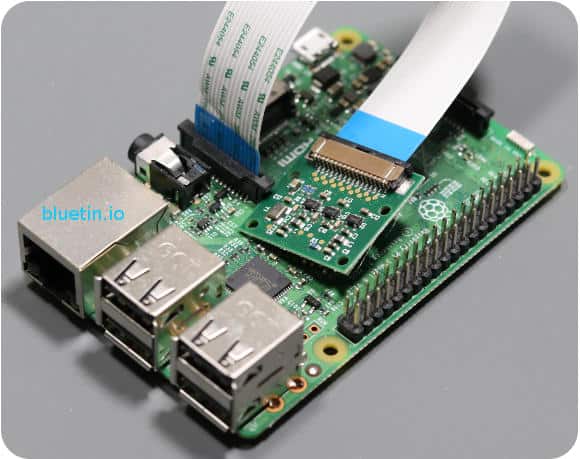
Raspberry Pi Connections
Make sure to create the following connections before you start coding:
- Make connections between the Raspberry Pi and Ribbon cable from Display
- Attach the SDA to the SDA pin of your Pi
- Put the SCL from Display to the SCL pin
- Attach the camera’s ribbon cable to the Raspberry Pi
- Put the GND from the display into the Pi GND
- Connect the Raspberry Pi 5V and display’s 5V
Step 1: Install OpenCV on Raspberry Pi
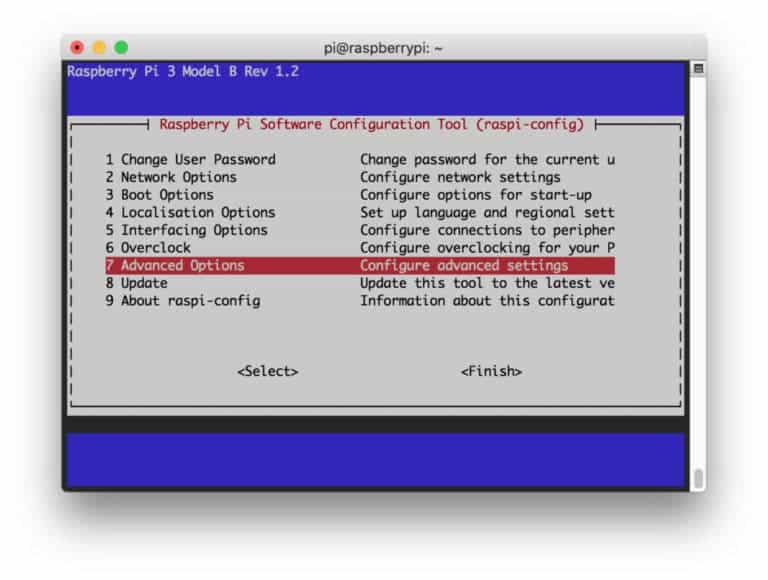
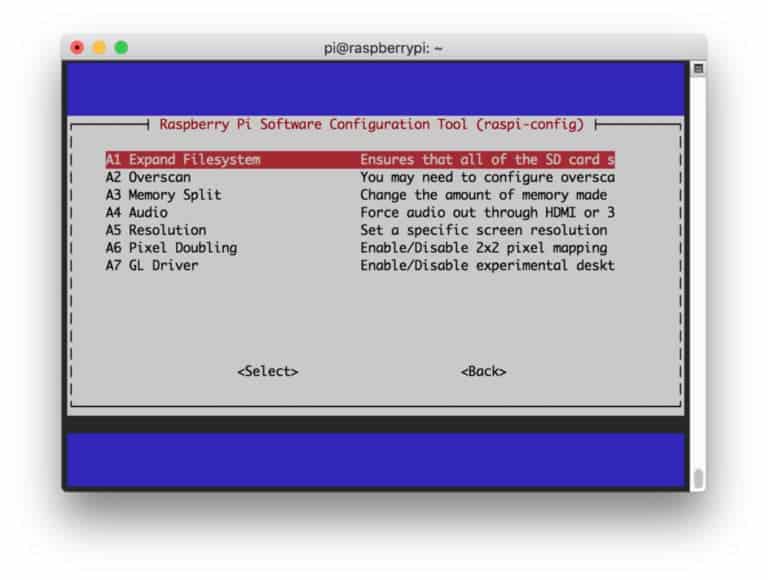
The first step is to install OpenCV on your Pi device. To do that, start your Raspberry Pi and open an SSH connection. To include all the available space on the micro-SD card, expand your filesystem.
$ sudo raspi-config
Then select the “Advanced Options” from the menu and “Expand Filesystem” afterward:
After that, hit the “<Finish>” button and reboot your Raspberry Pi.
$ sudo reboot
Step 2: Confirm OpenCV Installation
Once you are done rebooting, there should be a ready OpenCV virtual environment on your Pi. Now, you should confirm if OpenCV is correctly installed in your Pi. Run the “source” command every time you open a new terminal so that the system variables are set up correctly.
source ~/.profile
Now, enter your virtual environment:
workon cv
The (cv) text means that you are in the cv virtual environment.
(cv) pi@raspberry:~$
To enter in your Python Interpreter:
python
You will see a “>>>” appear in the interpreter. To import the OpenCV library:
import cv2
If there are no error messages, you can be sure that the OpenCV is installed properly.
Step 3: Download OpenCV
Now, download your installed OpenCV. You will have to download both OpenCV and OpenCV contrib. The contrib comes with modules and functions that you will need in this experiment.
$ cd ~
$ wget -O opencv.zip https://github.com/opencv/opencv/archive/4.0.0.zip
$ wget -O opencv_contrib.zip https://github.com/opencv/opencv_contrib/archive/4.0.0.zip
Now, unzip the archives:
$ unzip opencv.zip
$ unzip opencv_contrib.zip
Step 4: Install Dependencies
Now, install the necessary OpenCV dependencies on your Raspberry Pi to make it work properly:
$ sudo apt-get update && sudo apt-get upgrade
$ sudo apt-get install build-essential cmake pkg-config
$ sudo apt-get install libjpeg-dev libtiff5-dev libjasper-dev libpng-dev
$ sudo apt-get install libavcodec-dev libavformat-dev libswscale-dev libv4l-dev
$ sudo apt-get install libxvidcore-dev libx264-dev
$ sudo apt-get install libgtk2.0-dev libgtk-3-dev
$ sudo apt-get install libfontconfig1-dev libcairo2-dev
$ sudo apt-get install libgdk-pixbuf2.0-dev libpango1.0-dev
$ sudo apt-get install libhdf5-dev libhdf5-serial-dev libhdf5-103
$ sudo apt-get install libqtgui4 libqtwebkit4 libqt4-test python3-pyqt5
$ sudo apt-get install libatlas-base-dev gfortran
$ sudo apt-get install python2.7-dev python3-dev
$ sudo apt-get install python3-pil.imagetk
Step 5: Install pip
In this step, you will have to install a package manager for python called “pip”.
$ wget https://bootstrap.pypa.io/get-pip.py
$ sudo python3 get-pip.py
Step 6: install Numpy
After that, install a python library called “Numpy”.
$ pip3 install numpy
Step 7: Test The Camera
Now that you have installed all the necessary things, including OpenCV, it’s time to check if your camera is functioning properly. You should already have a Picam installed on your Raspberry Pi. Enter the following code on your Python IDE:
import numpy as np
import cv2
cap = cv2.VideoCapture(0)
cap.set(3,640) # set Width
cap.set(4,480) # set Height
while(True):
ret, frame = cap.read()
frame = cv2.flip(frame, -1) # Flip camera vertically
gray = cv2.cvtColor(frame, cv2.COLOR_BGR2GRAY)
cv2.imshow('frame', frame)
cv2.imshow('gray', gray)
k = cv2.waitKey(30) & 0xff
if k == 27: # press 'ESC' to quit
break
cap.release()
cv2.destroyAllWindows()
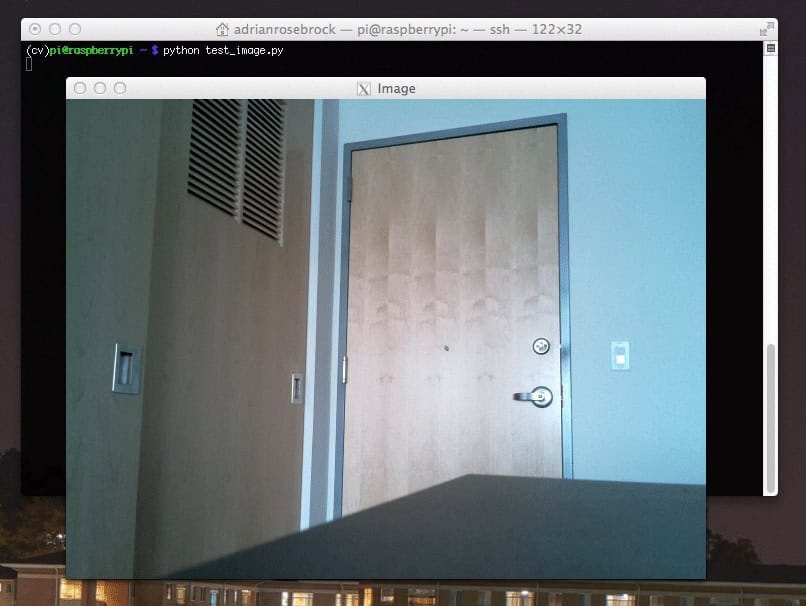
This code works by capturing the video stream generated by your PiCam that displays both Gray mode and BGR color mode. Then execute the code with the following command:
python simpleCamTest.py
Now, press the [ESC] key to finish the program. Make sure to click on the video window before finishing it. You should now see your camera working properly and showing results. If your camera shows “Assertion failed” error messages, then use the following command to fix that:
sudo modprobe bcm2835-v4l2
Step 8: Face Detection
You should know that the first step to completing our face recognition project is to make the PiCam capture a face. Surely, it has to detect a face first in order to recognize it in the future.
The face detection algorithm requires images with the face as well as without the face to train the classifier and save structures from those. Fortunately, the OpenCV you downloaded beforehand comes with a detector and trainer. Also, it already has some pre-trained classifiers like face, eyes, hands, etc. To create a face detector with OpenCV, use the following codes:
import numpy as np
import cv2
faceCascade = cv2.CascadeClassifier('Cascades/haarcascade_frontalface_default.xml')
cap = cv2.VideoCapture(0)
cap.set(3,640) # set Width
cap.set(4,480) # set Height
while True:
ret, img = cap.read()
img = cv2.flip(img, -1)
gray = cv2.cvtColor(img, cv2.COLOR_BGR2GRAY)
faces = faceCascade.detectMultiScale(
gray,
scaleFactor=1.2,
minNeighbors=5,
minSize=(20, 20)
)
for (x,y,w,h) in faces:
cv2.rectangle(img,(x,y),(x+w,y+h),(255,0,0),2)
roi_gray = gray[y:y+h, x:x+w]
roi_color = img[y:y+h, x:x+w]
cv2.imshow('video',img)
k = cv2.waitKey(30) & 0xff
if k == 27: # press 'ESC' to quit
break
cap.release()
cv2.destroyAllWindows()
Now, you will have to call the classifier function with some scale factors, parameters, and a minimum size of the face that it will detect.
faces = faceCascade.detectMultiScale(
gray,
scaleFactor=1.2,
minNeighbors=5,
minSize=(20, 20)
)
This code works by detecting faces on an image. Now, you might want to mark the faces using a shape as a rectangle. Use the following code to do that:
for (x,y,w,h) in faces:
cv2.rectangle(img,(x,y),(x+w,y+h),(255,0,0),2)
roi_gray = gray[y:y+h, x:x+w]
roi_color = img[y:y+h, x:x+w]
So, this is how it works:
If the classifier finds any faces in the picture, it shows the face’s positions as a rectangle as commanded where it uses “h” as its height and “w” as the width and the left up corners (x,y). That pretty much sums up our rectangle (x,y,w,h).
Now that you are done with the locations, create an “ROI” for face and show the result with imshow() function. Run it on the python environment using the Raspberry Pi Terminal:
python faceDetection.py
And the result:

Step 9: Saving Data
In this part, you have to create a dataset where your program is going to save the gathered data about Ids of the face that it has detected. To do that, create a directory (I am using FacialRecognition):
mkdir FacialRecognition
Now, create a subdirectory with the name “dataset”.
mkdir dataset
Then, use the following code:
import cv2
import os
cam = cv2.VideoCapture(0)
cam.set(3, 640) # set video width
cam.set(4, 480) # set video height
face_detector = cv2.CascadeClassifier('haarcascade_frontalface_default.xml')
# For each person, enter one numeric face id
face_id = input('\n enter user id end press <return> ==>  ')
print("\n [INFO] Initializing face capture. Look the camera and wait ...")
# Initialize individual sampling face count
count = 0
while(True):
ret, img = cam.read()
img = cv2.flip(img, -1) # flip video image vertically
gray = cv2.cvtColor(img, cv2.COLOR_BGR2GRAY)
faces = face_detector.detectMultiScale(gray, 1.3, 5)
for (x,y,w,h) in faces:
cv2.rectangle(img, (x,y), (x+w,y+h), (255,0,0), 2)
count += 1
# Save the captured image into the datasets folder
cv2.imwrite("dataset/User." + str(face_id) + '.' + str(count) + ".jpg", gray[y:y+h,x:x+w])
cv2.imshow('image', img)
k = cv2.waitKey(100) & 0xff # Press 'ESC' for exiting video
if k == 27:
break
elif count >= 10: # Take 10 face sample and stop video
break
# Do a bit of cleanup
print("\n [INFO] Exiting Program and cleanup stuff")
cam.release()
cv2.destroyAllWindows()
Note that we are going to save each of the captured frames as a file on the “dataset” subdirectory:
cv2.imwrite("dataset/User." + str(face_id) + '.' + str(count) + ".jpg", gray[y:y+h,x:x+w])
After that, You have to import the “os” library to save the above file. The files’ name will follow a structure like this:
User.face_id.count.jpg,/pre>
The code mentioned above will capture only 10 images for every id. You can surely change that if you want.
Now, try running the program and capture some ids. Make sure to run the code each time you change the user or the existing photo.
Step 10: Trainer
In this step, you will have to use an OpenCV function to train the OpenCV recognizer with the data from your dataset. Start by making a subdirectory to store the trained data.
mkdir trainer
Then run the following code:
import cv2
import numpy as np
from PIL import Image
import os
# Path for face image database
path = 'dataset'
recognizer = cv2.face.LBPHFaceRecognizer_create()
detector = cv2.CascadeClassifier("haarcascade_frontalface_default.xml");
# function to get the images and label data
def getImagesAndLabels(path):
 imagePaths = [os.path.join(path,f) for f in os.listdir(path)]
 faceSamples=[]
 ids = []
 for imagePath in imagePaths:
  PIL_img = Image.open(imagePath).convert('L') # convert it to grayscale
  img_numpy = np.array(PIL_img,'uint8')
  id = int(os.path.split(imagePath)[-1].split(".")[1])
  faces = detector.detectMultiScale(img_numpy)
  for (x,y,w,h) in faces:
            faceSamples.append(img_numpy[y:y+h,x:x+w])
            ids.append(id)
 return faceSamples,ids
print ("\n [INFO] Training faces. It will take a few seconds. Wait ...")
faces,ids = getImagesAndLabels(path)
recognizer.train(faces, np.array(ids))
# Save the model into trainer/trainer.yml
recognizer.write('trainer/trainer.yml') # recognizer.save() worked on Mac, but not on Pi
# Print the numer of faces trained and end program
print("\n [INFO] {0} faces trained. Exiting Program".format(len(np.unique(ids))))
Make sure that you have installed the PIL library on your Raspberry Pi. If you don’t have that, run the following command:
pip install pillow
Here, I am using the LBPH face recognizer that comes included with the OpenCV package. Now, follow this line:
recognizer = cv2.face.LBPHFaceRecognizer_create()
All your photos will be taken to the “dataset” directory by the “getImagesAndLabels” function. It will return 2 arrays named “Ids” and “faces”. Now, it’s time to train the recognizer.
recognizer.train(faces, ids)
Now, you will see the “trainer.yml” named file saved in the trainer directory.
Step 11: Face Recognition
It’s time for the final action. After this step, your recognizer can guess a returning id if the face was captured before. So, let’s write our final code:
import cv2
import numpy as np
import os
recognizer = cv2.face.LBPHFaceRecognizer_create()
recognizer.read('trainer/trainer.yml')
cascadePath = "haarcascade_frontalface_default.xml"
faceCascade = cv2.CascadeClassifier(cascadePath);
font = cv2.FONT_HERSHEY_SIMPLEX
#iniciate id counter
id = 0
# names related to ids: example ==> Marcelo: id=1,  etc
names = ['None', 'Markian', 'Bell', 'Grace', 'A', 'Z']
# Initialize and start realtime video capture
cam = cv2.VideoCapture(0)
cam.set(3, 640) # set video widht
cam.set(4, 480) # set video height
# Define min window size to be recognized as a face
minW = 0.1*cam.get(3)
minH = 0.1*cam.get(4)
while True:
    ret, img =cam.read()
    img = cv2.flip(img, -1) # Flip vertically
    gray = cv2.cvtColor(img,cv2.COLOR_BGR2GRAY)

    faces = faceCascade.detectMultiScale(
        gray,
        scaleFactor = 1.2,
        minNeighbors = 5,
        minSize = (int(minW), int(minH)),
       )
    for(x,y,w,h) in faces:
        cv2.rectangle(img, (x,y), (x+w,y+h), (0,255,0), 2)
        id, confidence = recognizer.predict(gray[y:y+h,x:x+w])
        # Check if confidence is less them 100 ==> "0" is perfect match
        if (confidence < 100):
            id = names[id]
            confidence = "  {0}%".format(round(100 - confidence))
        else:
            id = "unknown"
            confidence = "  {0}%".format(round(100 - confidence))

        cv2.putText(img, str(id), (x+5,y-5), font, 1, (255,255,255), 2)
        cv2.putText(img, str(confidence), (x+5,y+h-5), font, 1, (255,255,0), 1)

    cv2.imshow('camera',img)
    k = cv2.waitKey(10) & 0xff # Press 'ESC' for exiting video
    if k == 27:
        break
# Do a bit of cleanup
print("\n [INFO] Exiting Program and cleanup stuff")
cam.release()
cv2.destroyAllWindows()
The program works as a recognizer. predict () function takes different portions of the captured face as different parameters and returns to the saved owner while showing the id.
If it doesn’t recognize the face, it will show “unknown” on the picture.
So, Voila!

Finally, Insights
So, this is how you make a Raspberry Pi face recognition. Make sure to follow this article step by step to get the best result! Now, besides this face recognition classifier, you can also make eye recognition or smile recognition using different classifiers and functions. I have researched through all the related articles on the internet and came up with this one. So, I really hope this guide has helped you with the projects. And I hope that it’s successful for you. Don’t forget to mention your thoughts in the comment section!