
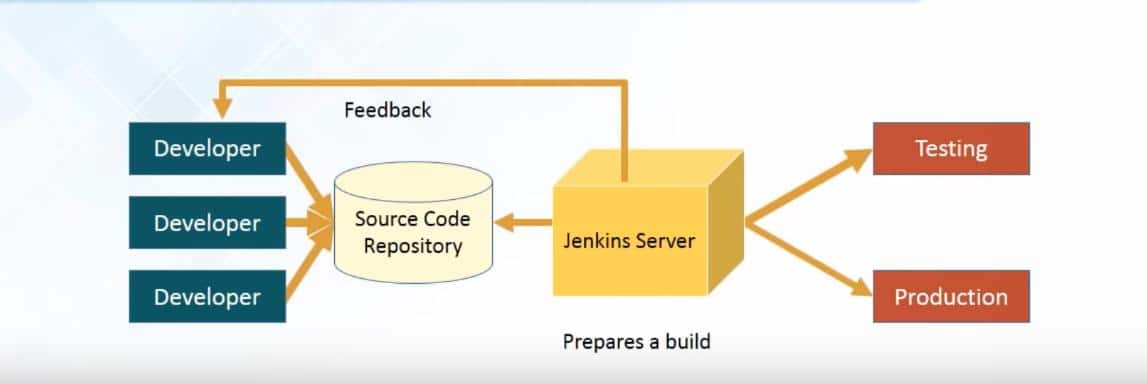
Jenkins is not a regular server like Apache or Nginx; it’s a free and open-source server for the developers, programmers, coders, and checkers. Those who are familiar with the concept of GitHub might know the Jenkins server. Jenkins server is a continuous integration server that can help developers build, compile, test, and store codes on the repository. Linux users can decentralize their own codes, among others, through the Jenkins server. The Jenkins server can notify the developer when it finds any error inside the code.
In the past, developers had to store the code at the code repository, where remotely located developers had to store, marge, and evaluate the codes. This lengthy process might cause a delay in progress. It could also make new bugs. Earlier, developers had to wait for a long time to start a new project until the previous test result came out. Now they can immediately begin another project after one task is done. Installing Jenkins server On Linux can save much time effort of the developers.
Features of Jenkins Server
When it finds any bug inside the Jenkins server’s source code, you don’t need to take the whole code down; you can fix the code’s specific errors. Jenkins allows users to develop multiple codes simultaneously. On the Jenkins server, you can edit the source codes.
Submitting code to one repository from multiple developers was never more comfortable and reliable before Jenkins. Jenkins server only passes the verified codes. You can not upload incorrect codes to the Jenkins repository. When you upload any incorrect code on the Jenkins server, it automatically sends feedback to the developer.
Jenkins’s primary goal is to introduce more features and functions to make the platform more user friendly so that developers can submit codes anytime they want. You can use a lot of plugins on the Jenkins server to make your works easier. Jenkins supports GIT, Maven, Nagios, Selenium, Puppet, and Ansible.
If you want to integrate a particular tool, you need to make sure that the specific plugin is installed. You can find and install the plugins from the relevant plugin options. You can also find the plugins manually and install them. A few features of the Jenkins server are enlisted below.
- Easy to Install
- Many Plugins
- Distributed System
- Jenkins Dashboard
- Fix Code Errors Anytime
- Build History
- Manage My Views
- Credentials
- HTML Publisher
- Notification Plugins
Install Jenkins Server On Linux
You can manage the system logs, system information, load statistics, CLI interface, set a goal, and other tasks from the Jenkins server on Linux. In the Jenkins server, you don’t need to build the whole code to test the project; you can test any individual parts of the code to ensure that your code’s smaller parts are working correctly. Jenkins uses TCP/IP protocol to communicate with other servers.
You can build, test, release, and deploy your code through the Jenkins server. You can use either hosted and non-hosted solutions to complete the continuous integration method. You can find installed and available plugins on the dashboard. You can find freestyle projects, Maven projects, Pipeline projects, external projects, multi-configurational projects, and other types of projects in the Jenkins server.
After you finish writing your code, you can review, test, and upload it to the repository. If you think your code was not good enough, you can make changes, edit build information, and delete the build.
1. Jenkins Server on Ubuntu Linux
Installing the Jenkins server on Ubuntu and other Debian Linux distributions are the most straightforward process. First, you need to install the Java packages on your Ubuntu machine. Later, you need to download the Jenkins packages on your system and install them through the terminal command shell.
Step 1: Install the Java Packages
First, let’s install the Java packages on our Ubuntu machine to install the Jenkins server. You can follow the given terminal command-lines to install Java on Ubuntu.
sudo apt update
sudo apt install openjdk-8-jre
sudo apt install openjdk-8-jre-headless
You can now check the version of Java to make sure that you have installed the Java correctly.
java -version
Step 2: Download the Jenkins Server on Ubuntu
Now, you can use the following wget command to download the Jenkins server on your Ubuntu Linux.
wget -q -O - https://pkg.jenkins-ci.org/debian/jenkins-ci.org.key | sudo apt-key add -
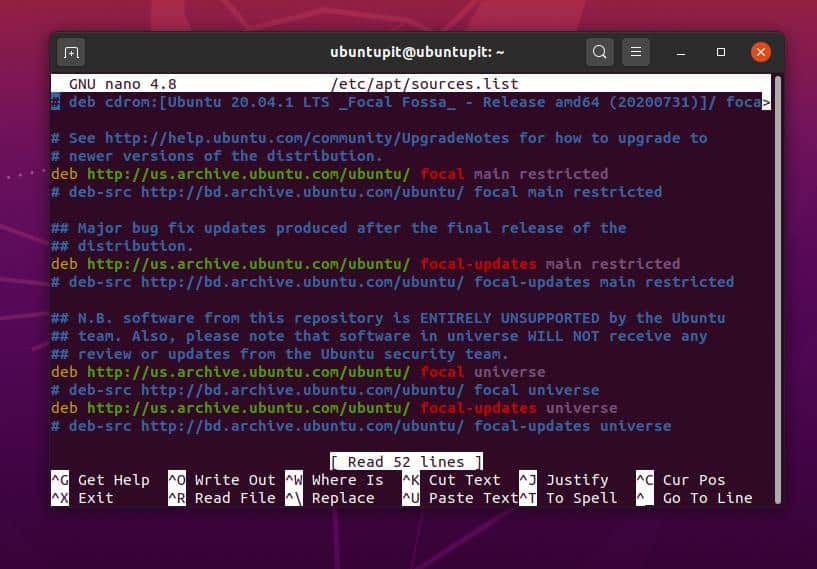
Now, open the package source list on your Ubuntu system to add the Jenkins server inside the package list. Use the following command-line given below to edit the script.
sudo nano /etc/apt/sources.list
Then add the Debian package inside the library file.
deb https://pkg.jenkins.io/debian binary/
After the download is finished, run the following aptitude command-lines given below to update your system and install the Jenkins server on Ubuntu Linux.
sudo apt update
sudo apt install jenkins

After the Jenkins server is installed, you can now start the Jenkins server on your Linux system.
sudo systemctl start jenkins
Step 3: Allow Firewall Settings for the Jenkins Server
After the Jenkins server is installed successfully on your Ubuntu system, you need to configure the Jenkins server’s firewall settings. As we are using Ubuntu Linux, we will use the UFW firewall. By default, the Jenkins server uses port 8080 to establish the connection. You can use the following command-lines to allow the UFW firewall to set the rules.
sudo ufw allow 8080
sudo ufw status
You can also allow the OpenSSH networking tool for the Jenkins server.
sudo ufw allow OpenSSH
sudo ufw enable
Make sure that you have allowed your localhost or other IP address for the Jenkins server.
https://your_server_ip_or_domain:8080
To make your personal codes secure and safe, you can set a password by editing the Jenkins configuration script. You will find the configuration script in the var/lib/jenkins/secrets/ directory.
sudo cat /var/lib/jenkins/secrets/initialAdminPassword
2. Install Jenkins on Fedora Linux
In Fedora Linux, you can install the Jenkins server by downloading the Jenkins packages and its repositories on your system. Later, you have to install the package on your Fedora Linux. We will use the DNF command tool to install the Jenkins server on Fedora Linux.
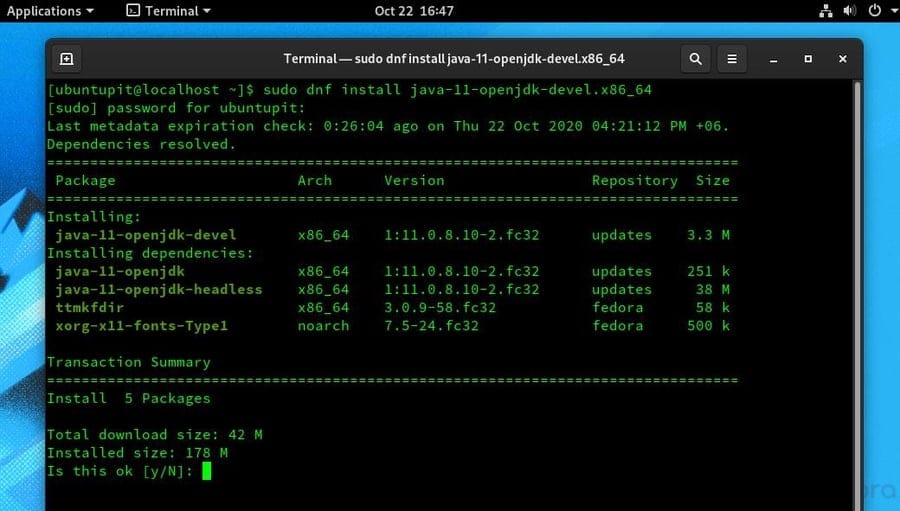
Step 1: Install Java on Fedora Linux
As Java is a prerequisite service to install the Jenkins server, you first need to get the java. If you don’t have Java installed inside your machine, please install the Java services first on your system.
sudo dnf install java-11-openjdk-devel.x86_64
Step 2: Install Jenkins Server
After Java is installed successfully, you may now use the following wget commands to download and import the Jenkins repository on your system.
sudo wget -O /etc/yum.repos.d/jenkins.repo https://pkg.jenkins.io/redhat-stable/jenkins.repo
sudo rpm --import https://pkg.jenkins.io/redhat-stable/jenkins.io.key
sudo dnf upgrade
sudo dnf install jenkins java-devel.
You can now run the following system control commands to start and check the Jenkins server’s service status on your Linux machine.
sudo systemctl start jenkins
sudo systemctl status jenkins
Step 3: Firewall Settings for the Jenkins Server
As we know that, by default, the Jenkins server uses port 8080. So, we need to assign port 8080 for the Jenkins server on Linux. You can also make 8080 as a permanent port for the Jenkins server.
YOURPORT=8080
PERM="--permanent"
SERV="$PERM --service=jenkins"
Now, use the following command-lines to add the firewall rules for the Jenkins server on Fedora Linux.
firewall-cmd $PERM --new-service=jenkins
firewall-cmd $SERV --set-short="Jenkins ports"
firewall-cmd $SERV --set-description="Jenkins port exceptions"
firewall-cmd $SERV --add-port=$YOURPORT/tcp
firewall-cmd $PERM --add-service=jenkins
firewall-cmd --zone=public --add-service=http --permanent
firewall-cmd --reload
After everything is done correctly, you are good to go. Finally, the web address for the Jenkins server should be your_localhost:8080.
https://localhost:8080
3. Jenkins Server on CentOS
Jenkins Server uses the Red Hat package repositories for CentOS. However, sometimes it may cause some errors while you try to install it. We will see how you can avoid the errors and install the Jenkins server on your CentOS.
Step 1: Install the Java Packages
First, CentOS users need to install the Java services on their Linux system to install the Jenkins server. You can use the following command-lines to install the Java services on your system.
yum -y update
yum install java-1.8.0-openjdk
You can now check the version Java to make sure that Java is successfully installed inside your system.
java -version
Step 2: Install Jenkins Server
In this step, we need to use the following wget command to download the Jenkins server and the package dependencies on the CentOS.
wget -O /etc/yum.repos.d/jenkins.repo https://pkg.jenkins.io/redhat-stable/jenkins.repo
Now, run the following yum command to configure to interact Java with the Jenkins server.
yum install jenkins java-1.8.0-openjdk –y
If you find any error while configuring Java with the Jenkins server, you can manually set the configurations. To edit the configuration script, use the following nano command to open and edit the file.
sudo nano /etc/yum.repos.d/jenkins.repo
Now, copy and paste the following script codes inside the configuration file. Once the configuration is done, save and exit the file.
[jenkins]
name=Jenkins-stable
baseurl=https://pkg.jenkins.io/redhat
gpgcheck=1
Use the following system control command-lines to start and enable the Jenkins server on your Linux system.
systemctl start jenkins
systemctl enable jenkins
3. Firewall Settings for CentOS
CentOS users can use the following Firewalld command-lines to allow the 8080/TCP port for the Jenkins server. The following firewall command includes both zone and port parameters. After the firewall configuration setting is done, you can now reload the firewall settings. Use the following Firewalld command-lines to allow the 8080 port on your CentOS system.
sudo firewall-cmd --permanent --zone=public --add-port=8080/tcp
firewall-cmd --zone=public --add-service=http --permanent
sudo firewall-cmd --reload
Additionally, you can also add the GNU Privacy Guard to your Jenkins server to make it more secure. Use the following command to add a GNU key for your Jenkins server.
sudo rpm --import https://pkg.jenkins.io/redhat-stable/jenkins.io.key
4. Jenkins Server on OpenSUSE
Installing the Jenkins server on SuSE and OpenSuSE Linux requires the Java packages pre-installed inside the system. First, we will install Java later; we will install the Jenkins server and configure the firewall settings on our SuSE Linux.
Step 1: Install Java on SUSE Linux
SUSE and OpenSUSE Linux users can run the following install verbose hash (IVH) command to get the Java. Before installing the Java services, you should update your system repositories and system database.
sudo zypper ref
sudo zypper update
rpm -ivh jre-8u251-linux-i586.rpm
Step 2: Install Jenkins Server on SUSE Linux
Use the following zypper commands given below to download the Jenkins server on SUSE and OpenSUSE Linux. Then use the following zypper command-line to install the Jenkins server on your SUSE Linux.
sudo zypper addrepo -f https://pkg.jenkins.io/opensuse-stable/ jenkins
zypper install jenkins
After the Jenkins server is installed inside your Linux system, you can now start the Jenkins services. You can also run the following system control command to monitor the status of the Jenkins server.
sudo systemctl start jenkins
sudo systemctl status jenkins
Step 3: Firewall Services for Jenkins on SUSE Linux
SuSE and OpenSuSE Linux users can use the following Firewalld commands to add port 8080 to their network configuration list. It will tell the network to allow your Jenkins server. After configuring the firewall services, don’t forget to reload the firewall services.
firewall-cmd --zone=public --add-port=8080/tcp --permanent
firewall-cmd --zone=public --add-service=http --permanent
firewall-cmd --reload
You can also set an authorization username and password to your Jenkins server by editing the Jenkins server’s configuration script. You will find the script in the /var/lib/jenkins/secrets/ directory of your Linux filesystem.
sudo more /var/lib/jenkins/secrets/initialAdminPassword
5. Install Jenkins Server on Red Hat Linux
Red Hat Linux users need to use the YUM command to install Java and the Jenkins server on their system. Then, we will configure the firewall settings through the Firewalld tool.
Step 1: Install Java on Red Hat Linux
As the Jenkins server requires the Java package and its dependencies, we need to download the Java packages on our Red Hat Linux. Follow the terminal command-line given below to get java on Red Hat Linux. You can notice that we are using the devel package, which is a Debian-based package.
sudo yum install java-11-openjdk-devel
Step 2: Download and Install Jenkins Server on Red Hat Linux
Red Hat Linux users can install the Jenkins server on the system by downloading the Jenkins repository. First, you need to download the Jenkins repository from the official store. Then you have to import the repositories to the package list. You can use the following terminal shell command-lines given below to download, store, and import the package repository.
sudo wget -O /etc/yum.repos.d/jenkins.repo https://pkg.jenkins.io/redhat-stable/jenkins.repo
sudo rpm --import https://pkg.jenkins.io/redhat-stable/jenkins.io.key
Now run the following yum command to install the Jenkins server on your Red Hat Linux enterprise.
yum install jenkins
Step 3: Firewall Settings for Jenkins Server
Red Hat Linux users can use the following Firewalld command to permanently add the port 8080 to allow the Jenkins server. Then reload the firewall settings.
firewall-cmd --permanent --add-port=8080/tcp
firewall-cmd --reload
6. Install Jenkins Server on Arch Linux
To demonstrate installing the Jenkins server on Arch Linux, we will use the Manjaro Linux. First, we will install the Java services then we will install the Jenkins server on Manjaro Linux.
Step 1: Install Java on Manjaro
To install the Java services inside the Manjaro Linux, we need to run the following Pacman command below your terminal shell. After the installation is done, you can check the version of Java.
sudo pacman -S jre11-openjdk-headless jre11-openjdk jdk11-openjdk openjdk11-doc openjdk11-src
java -version
Step 2: Install Jenkins Server
In this step, we will download the Jenkins server from the official site of Jenkins. You can download the Jenkins server for Manjaro or Arch Linux from here.

Once the download is finished, open the Downloads directory and install it using the following Pacman command.
cd Downloads/
ls
sudo pacman -U jenkins-2.263-1-any.pkg.tar.zst
Step 3: Firewall Settings on Manjaro Linux
Here, we will install the UFW firewall tool to manage the firewall rules on our Arch Linux. First, use the following package manager commands to install the UFW tool on your Manjaro Linux.
sudo pamac install ufw
Now, enable and run the UFW tool.
sudo systemctl enable ufw.service
sudo ufw enable
Finally, all the 8080/TCP port for the Jenkins server on Manjaro Linux.
sudo ufw allow ssh
sudo ufw allow in 8080/tcp
Extra Tips: Use the Right Java, and Enjoy the Jenkins on Docker
Using the Jenkins server could be challenging for them, who are completely new to Linux and Jenkins. However, in this step, I will describe a few common issues you might face using the Jenkins server on your Linux system.
1. Make Sure You Have Given the Access Permission
If you fail to load some programs or codes on your Jenkins serve, please ensure that you have given that specific file’s access permission for the Jenkins server on your Linux system. You can use the following change mode command to change access permission to the files.
chmod 755 /home/UbuntuPIT/New_TES//code/SG_V1.0/Voice-data.pl
You can also use the following terminal command to add an entire directory to the Jenkins server.
mkdir -p /srv/UbuntuPIT/jenkins/jobs/project/workspace
2. Use the Correct Version of Java
If you find any error in running the Jenkins server on your Linux system, please ensure that you have installed the correct Java version. Jenkins requires java 8 and 11 version. Unfortunately, the Jenkins server doesn’t support Java 9, 10, and 12.
3. Use Jenkins on Docker
As the Docker Hub is an excellent software repository for the open-source community, why would there not be a docker image of the Jenkins server available for the Docker users? Yes, you can now pull a Docker image to load the Jenkins server on your Docker engine. Use the following command to pull the LTS version of the Jenkins server.
docker pull jenkins/jenkins:lts
You can also pull the latest and hebdomadal updated version of the Jenkins server from the Docker Hub.
docker pull jenkins/jenkins
Removing Jenkins Server from Linux
Due to the incorrect Java version, broken packages, corrupted version of Jenkins, you may need to remove the Jenkins server from your Linux system. Removing the Jenkins server from Linux distributions requires package commands according to the operating system.
To remove the Jenkins server, first, you have to stop all the Jenkins services running on your Linux system.
sudo service jenkins stop
If you are a Debian and Ubuntu Linux user, you can run the aptitude command-lines given below to remove the Jenkins server from your Ubuntu machine.
sudo apt-get remove jenkins
sudo apt-get remove --auto-remove jenkins
sudo apt-get purge jenkins
Arch and Arch-based Linux users can use the following Pacman command to remove the Jenkins server.
pamac remove jenkins
pacman -R jenkins
Using Red Hat, CentOS, or Fedora Linux, you can run the following commands to remove the Jenkins server from your Linux machine.
sudo service jenkins stop
sudo yum remove jenkins
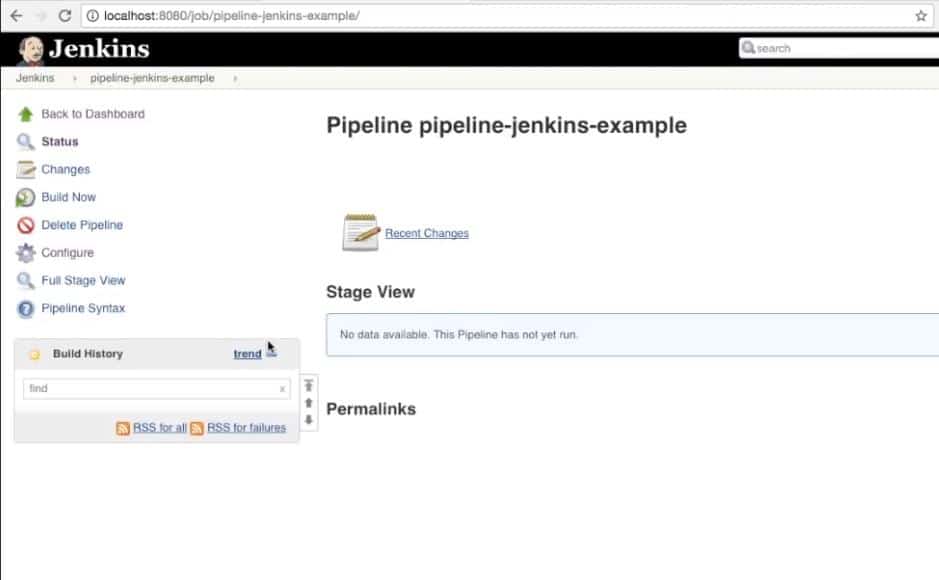
Getting Started with the Jenkins Server
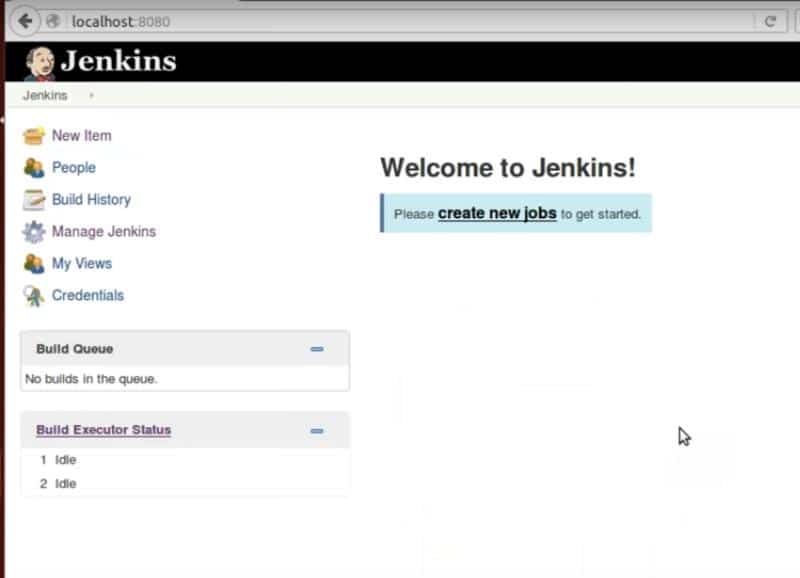
Here comes the outcome of installing the Jenkins server on various Linux distributions. After the installation processes are done, you can open your web browser and type the following localhost address and use port 8080 to load the Jenkins server.
localhost:8080
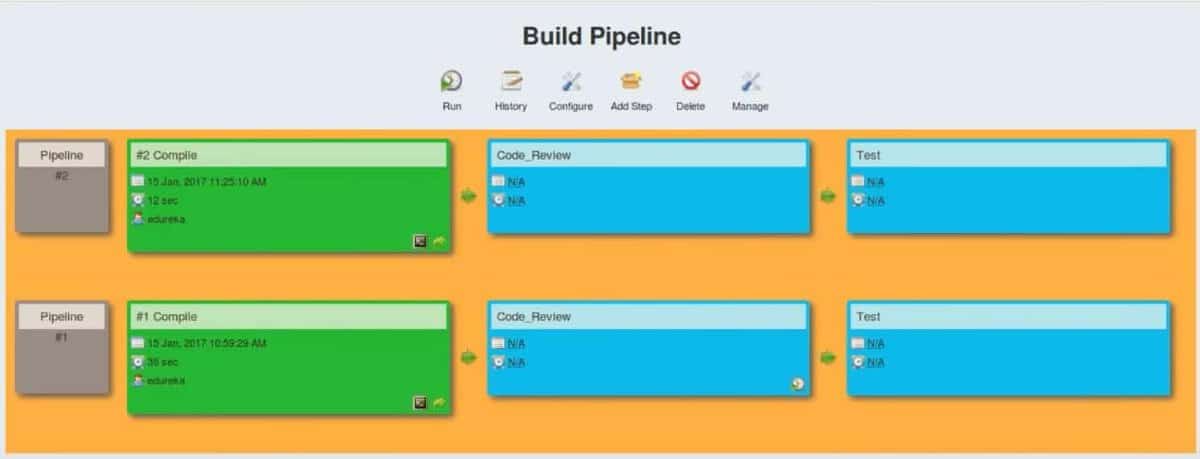
You can share your codes with the Git users via the Jenkins server. You can also use the pipeline feature to build, configure, compile, and test a code.
When your codes get passed in every step, you will see the green color in every step. You can also run multiple pipelines at a time on your Jenkins server on Linux.
Final Thoughts
Those who are gettings are confused with the concept of the Hadoop HDFS filesystem and the Jenkins server; they might know that Hadoop is a distributed file management system, where the Jenkins server is specifically built for developers and coders. You can use Hadoop to manage live and big data where Jenkins server focuses on making more open source codes and programs. It would help if you also remembered that there are differences between Jenkins, Docker, and ansible.
Many multinational software companies are now using Jenkins to make their software production faster and reliable. Even you can use the Jenkins server on your Android mobile. In the entire post, I have described how you can install the Jenkins server on your Linux distribution. You can also run the Jenkins server on Docker and Linux-based systems.
Please share this post with your friends and the Linux community if you find this post informative and useful. You can note down your opinions in the comment section regarding this post.