If you’re an engineering student or a robotics fanatic, I’m sure you’ve heard a lot about the Raspberry Pi and Pi projects. The regular Raspberry Pi boards and Pi projects are more often for robotics and simulations. The Pi board 3B, 4B, and higher versions are similar to a single-board computer (SBC). There are many differences between the Raspberry Pi regular boards and the Pi Pico boards.
You can build and run projects on the Raspberry Pi Pico boards; on the other hand, you can run a Linux OS to get the full PC experience on traditional Pi boards. However, you can get the Fuzix OS on a Pico board. The Fuzix OS is a very tiny 8-bit OS perfect for a small Pico board.
Features of the Pico Board
We picked the Pi Pico board because not many people are talking about this tiny board. But this board has some magnificent potential to run many super cool and experimental projects.
To make your projects better, you can use add-ons with the Pico boards available on the market. Please note that configuring only hardware and assembling the devices won’t run your project; you will need to have a piece of excellent knowledge and experience in programming skills for SBC.
Here are the features and specifications of the Pico board. In the below paragraph, we will see the port and I/O details.
- The Raspberry Pi Pico board comes with the RP2040 microcontroller chip
- It has a Dual-core CPU that can process data at the clock speed of 133 MHz
- With a 2BM of flash memory, it has 265KB of on-chip memory SRAM
- The CPU and the other elements are very low power consumption; you can run it with a power supply of 5V via MicroUSB or 1.8 – 5.5V via VSYS
- It has a USB port that supports USB 1.1 Generation
- You will have an accurate clock and temperature sensor on board with the Pico board
Raspberry Pi Pico Projects
In Raspberry 3B or 4B Pi boards, we can see there are many ports like USB, LAN, HDMI, and other microSD card slots. But there are not that many ports in the Raspberry Pi Pico boards like the 3B boards. The Pico boards are tiny and handy to use. The Pi Pico boards are more comparable to the Arduino Nano boards. In a Raspberry Pi Pico board, we can see the below-mentioned ports.
- GPIO (General-purpose input/output) ports
- RPI and ADC Pins for sensors
- SPI (Serial Peripheral Interface) Pins
- UART(universal asynchronous receiver-transmitter) Pins
- PWM (Pulse Width Modulation) Pins
- I2C (Inter-Integrated Circuit) Pins
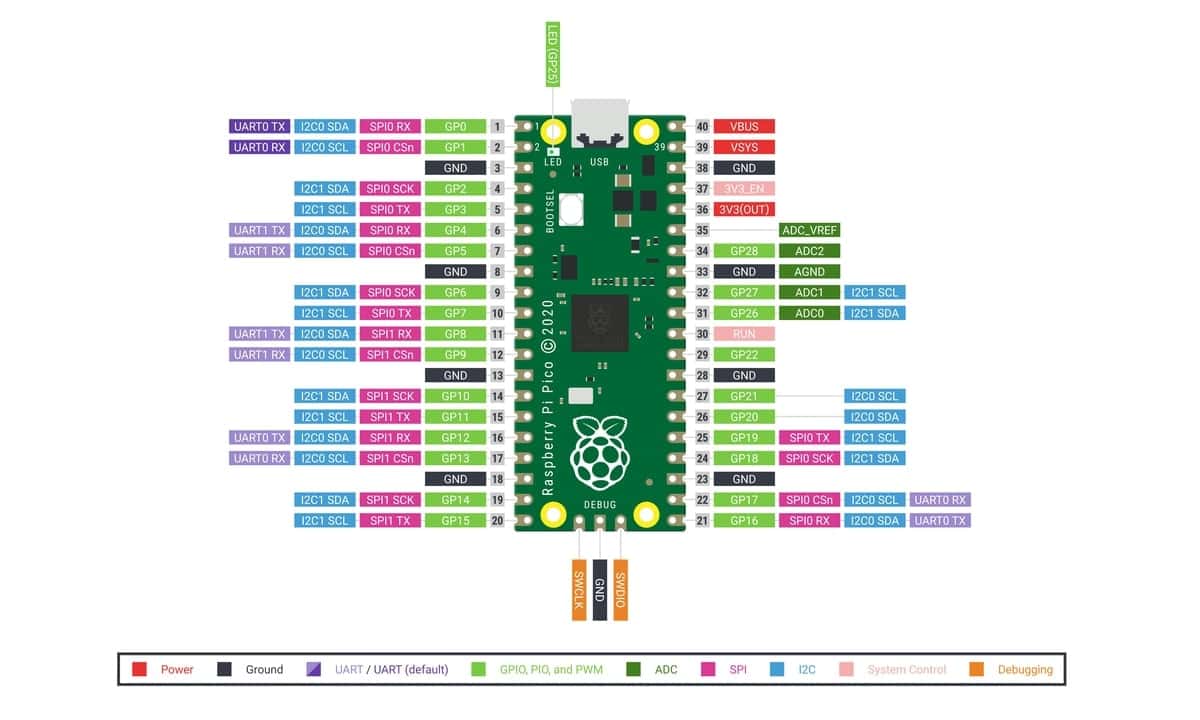
All types of communications and functions are done with the above-listed pins on the Pi Pico boards. If you’re more interested in the pinout details of the Pico board, you can go through this URL to get the pinout details. In this post, we will see the top ten best Raspberry Pi Pico projects that we can make.
1. Raspberry Pi Pico Project: 8-Bit Emulator
The 8-bit emulator is a chip-based programming kit. With a Raspberry Pi Pico board, you can create an 8-bit emulator to run simple and easy-going 8-bit programs in the emulator. Creating an 8-bit Emulator is one of the coolest things for learning how the emulator works and how you can program them with your very own code.
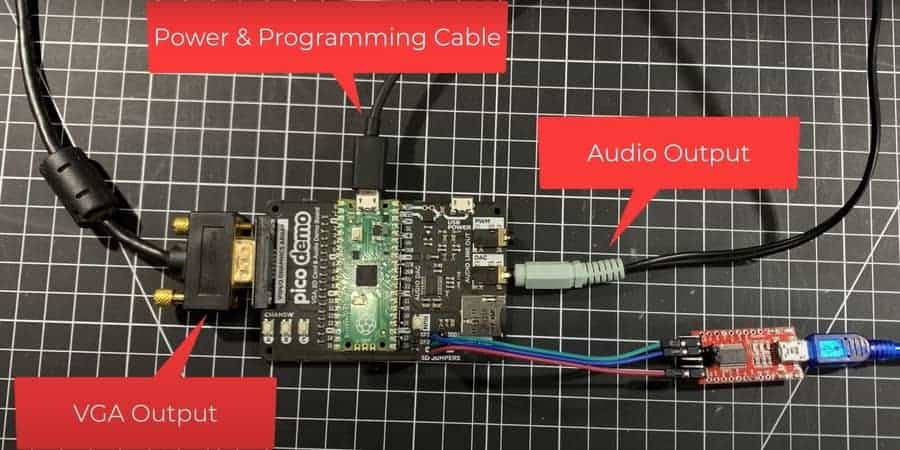
With the help of a Raspberry Pi pico board, you can build your ultimate 8-bit emulator and play laser games, old-fashioned block games, and learn to code. The Pi boards are all you will need; no extra components will require to build it. You can get the 8-bit emulator code on GitHub.
2. Simon Game
The Simon Game is a famous LED flashing module that we can build with a Raspberry Pi Pico board and some other easy-to-collect components. Most robotics and microcontrollers are aware of using Pi boards and Arduino boards to make LED light and sound effects.
To build the Simon game with a Pico board, you will need the below-mentioned components.
- Raspberry Pi Pico
- Push-buttons
- NeoPixel stick
- Momentary switches
- Breadboards
- Jumper wires
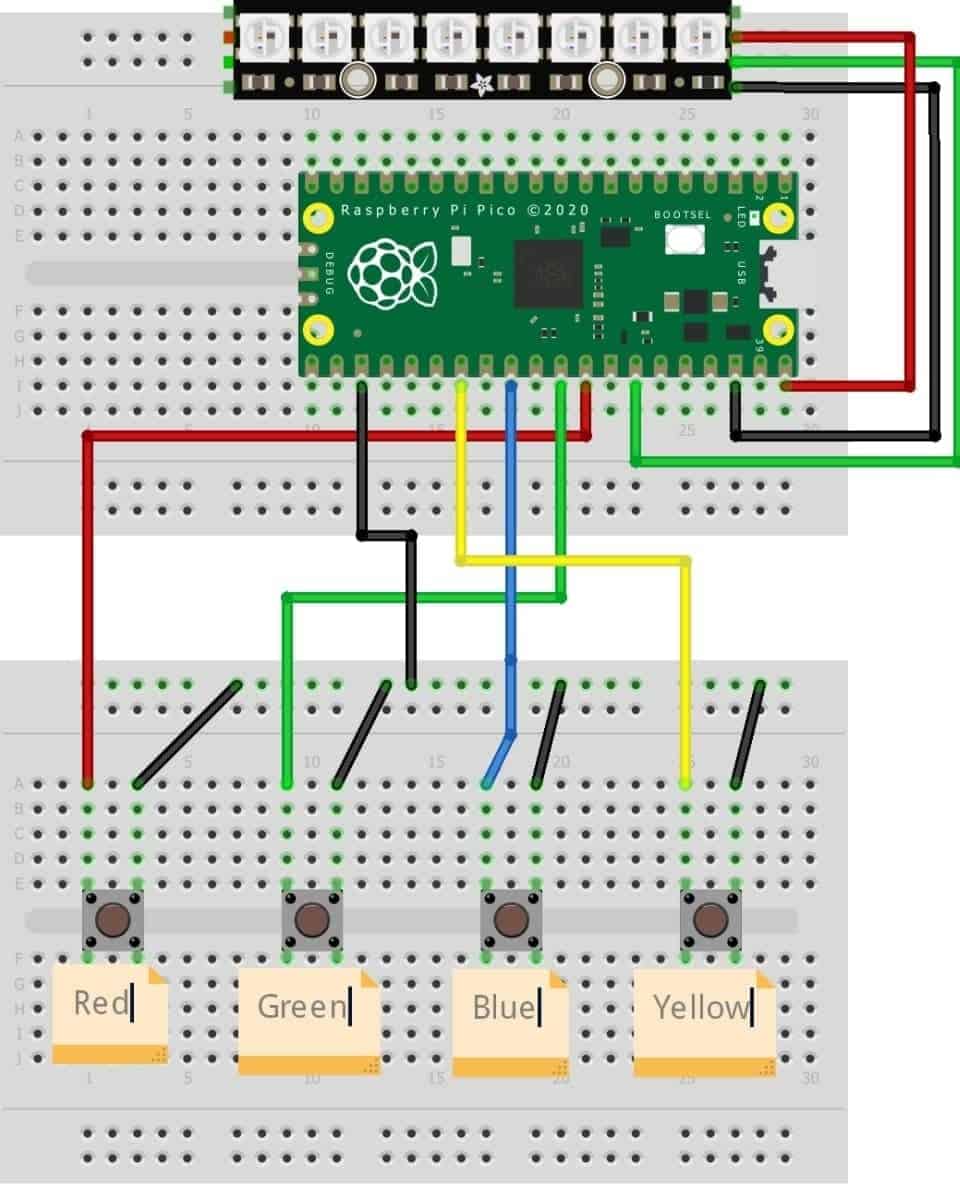
Here, you can see the basic schematic of the Simon project with a Raspberry Pi pico board. After connecting the circuits, you will need to do the coding to make the game live.
3. Dog Ball Launcher
You can make your own mini ball launcher for your dogs. This machine will throw small balls in your yard so that your pet dog can catch them and have fun with their balls. If you’re a pet lover and like to play around with your pet dogs, this project is absolutely for you.
Here are the main components that you will need to make this dog ball launcher on your own.
- Raspberry Pi Pico
- Servo Motors
- Motor Couplings
- Motor Controller
- Ball Sensor
- Power Jack Socket
- Switch
- Tape
- PCB
- Balls
- Power Adapter
- PETG Filament
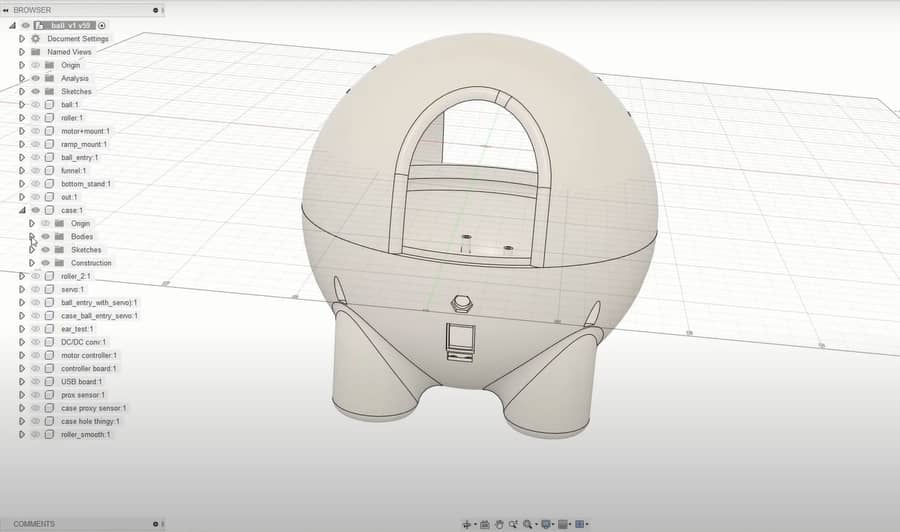
You can get the in-depth process of making this Raspberry Pi pico project from this youtube video tutorial.
4. Control Your Lights with Pico
Making home automation tools is very popular nowadays. Suppose you are a robotics enthusiast and you have an interest in working on Home Automation. In that case, you can absolutely use a Raspberry Pi Pico board for doing your light-controlling module.
With the Raspberry Pi Pico board and some hardware components, you can make your own gadget to control your own lighting switches in your home.
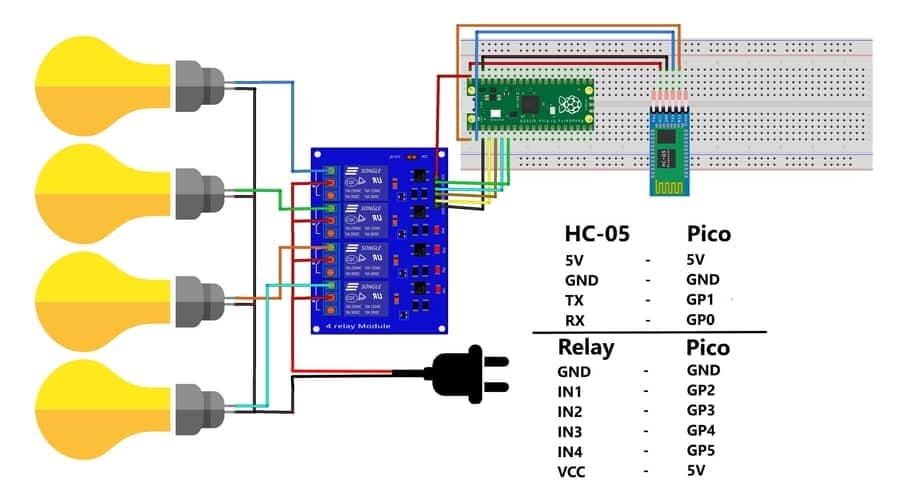
For making a light-controlling device through a pico board, you will first need to make a schematic diagram for the circuit; then, you will need to connect the circuit board to a breadboard or any other Vero board.
Then after you connect all the components to the power supply, you will need to run the right code you have written for controlling your light switches. You can use this Github url to go through the details about this Pico project.
5. Thermometer and Humidity Sensor
Controlling the temperature and humidity of a house is another greatest invention of the home automation system. There are many automation tools for controlling the thermostat of your house, but if you are a robotic enthusiast, you can make your own thermometer with a Raspberry Pi Pico board.
The DHT11 sensor is very popular among modern and young robotic engineers for making thermometers and humidity-controlling modules. This sensor is cheap yet provides an accurate reading.
Here is the list of components that you will need.
- Raspberry Pi Pico
- Display unit
- DHT11 Sensor
Here is the schematic design of this Pico board project.
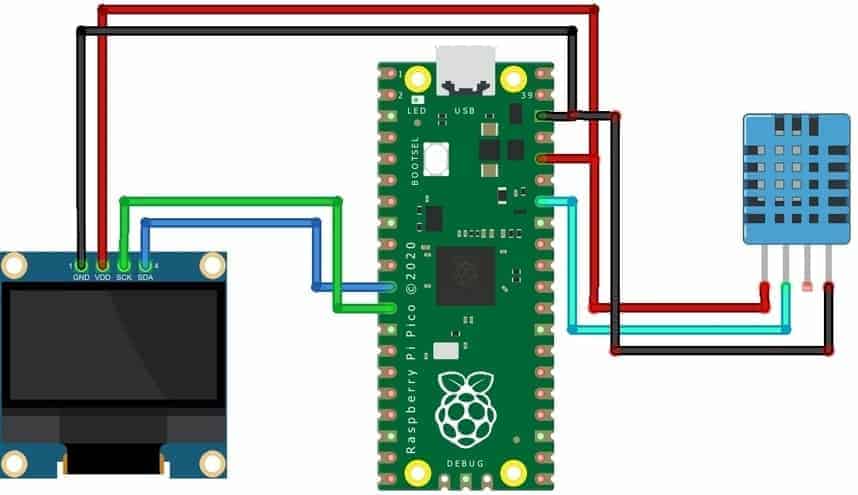
After connecting the components, you will still need to write a code to run all the hardware. You can write the codes in the Python programming language to make your codes better, smooth, and easy to execute. Here, you can see the step-by-step guidelines on how to make this Pi Pico project.
6. Automatic Fan with Pico Board
The automatic fan, a remote control car, and other remote-controlled devices are usually set under the home automation category. The fundamentals of making an automatic fan are simple. It will require the below-mentioned components.
- Raspberry Pi Pico board
- BreadBoard
- Jumping Wires
- General Purpose Transistor NPN
- Standard LCD Display
The automatic fan works with a temperature sensor that keeps monitoring the temperature of your room and adjusts the speed of the fan according to the room temperature. Here you can get an in-depth idea about how to make it.
7. LCD For Pico Board
Interfacing LCD or Liquid Crystal Displays are the most important thing that a robotic enthusiast might need to make the system more interactive and efficient. In most cases, the 16×2 LCDs, 5110 LCD, TFT LCD, dot matrix, and other displays work for the raspberry pi pico boards. You can use the 16×2 LCDs with your Pico board.
Here, you can see the schematic design for the interfacing 16×2 LCD with the Pico board.

8. Raspberry Pi Pico Projects: Line Follower Robot
The line follower robot is one of the best lucrative Raspberry Pi pico projects that any robotic student or engineer would love to build. The line-follower robot works with a simple mechanism of IR Proximity Sensors. The IR lights look for the color-coding lines on the path.
Usually, engineers use the black-and-white path to make the IR readings easy. The IR sensors read the color-coded path and send the signals to the Pi pico board. With this data, you can now use and utilize your code to guide your motor drivers to control the motor drivers and the wheels.
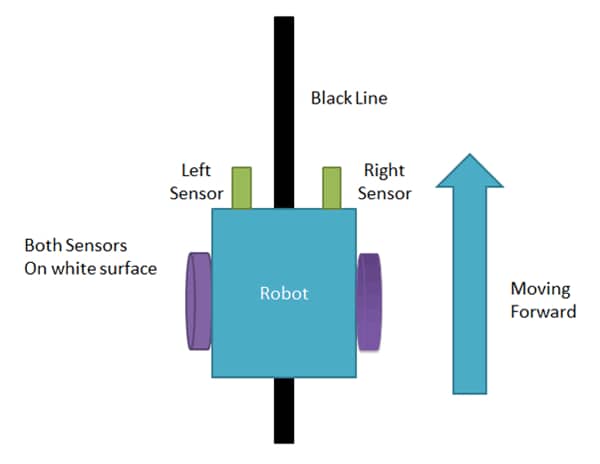
Here is the list of components list of the line follower robot.
- Car Body
- Motor Driver with motors
- Raspberry Pi Pico
- L293D Motor Shield
- IR Proximity Sensors (pair)
- Jumper Wires
- Switch
- 4AA Battery Holder
In most cases, the Arduino UNO is used in the line follower robot. But, there is no harm in using a raspberry pi pico project for doing this project.
9. Long-Range WAN For Pico Board
The Raspberry Pi Pico boards typically don’t have an integrated WIFI system. That’s why making communicative devices with the Pico board may be challenging. Having a module or component that can solve your WLAN issues on the Pico board can solve your WIFI issues.
To fix the WLAN issue, we can use Transceiver tools like LoRa. The LoRaWAN has a 900Mhz antenna and can be powered with the Pico board.
The FRM95W module is built for transmitting WIFI signals for Arduino, Raspberry Pi Pico boards, and other SBCs. You can use adafruit’s FRM95W transmitting tool for a breakout at the 868 to 915 MHz range.
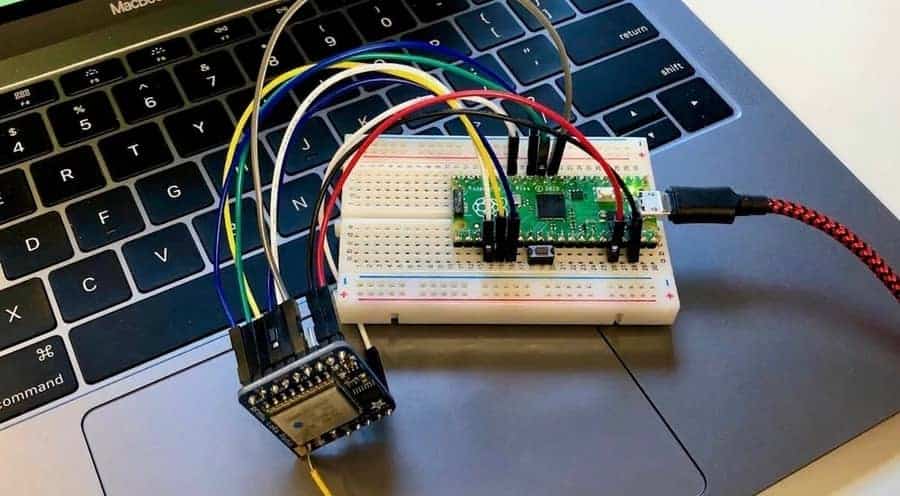
Important features of the RFM95W
-
- It works at the +14dBm PA
- It is highly programmable
- The power consumption s very low that the Pico can effortlessly handle it
- The module has a built-in bit synchronizer
- It supports automatic RF
- You get a built-in temperature sensor
- It has a low battery indicator
- The size of this tool is small and compact; the module size is 16mm x 16mm
- This is perfect for home and building automation
10. Raspberry Pi Pico Projects: Mini Drone
Drone projects are the most attractive robotic projects for engineers. It requires a microcontroller, propellers, batteries, wings, controllers, etc. You can easily make a mini drone project with a Raspberry Pi pico board. Please note that drone making requires very skilled knowledge in coding for flying the drone.
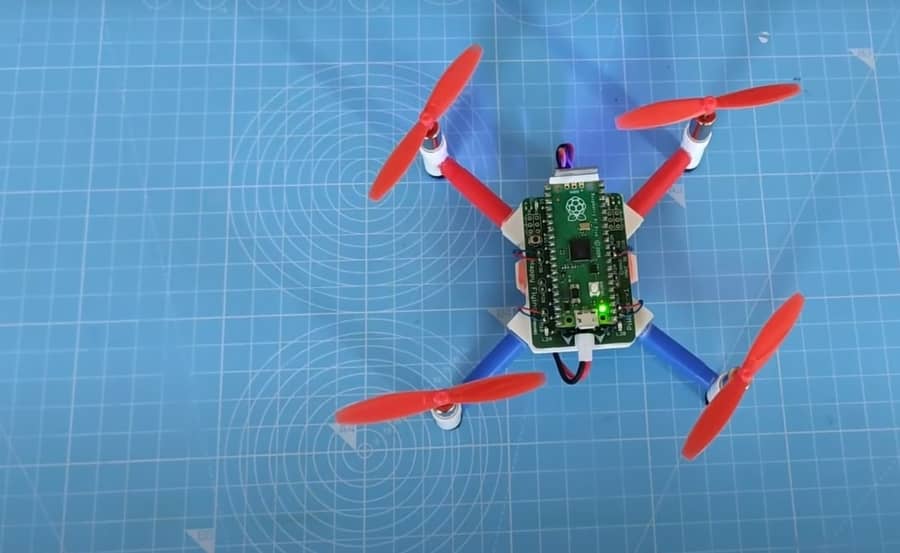
Here is the list of components for making a drone with a pico board.
- Drone Body Frame
- 8520 micro coreless motor
- 55mm propellers
- Lipo battery
- A2SHB Mosfet
- MPU 6050 Accelerometer
- RX-2A receiver
- Flight Controller Section
Here, you can see the design and guidelines of the system to make the drone with a Pico board.
Insights!
Playing around with the Raspberry Pi boards is fun; you can even play Nintendo games on a Pi Pico board. I have reviewed the top ten cool projects you can simulate and run on a Pi board in the entire post.
The digital interface of the Raspberry Pi Pico board is simple and efficient to use. With an RP2040 cheap, the Pico boards can be used to perform both low-level and mid-level projects for engineering.
I hope this post has been valuable and informative for you. You will love all the projects mentioned above if you’re a Pi board lover. If yes, please share this post with your friends and the Linux and SBC community. You can also write down your opinions about this post in the communication section.
