Squid proxy server is an open-source proxy server for Linux distributions. You can install the Squid proxy server on your network to pass all your bandwidth through the proxy server. Now, you may ask why you would use the Squid proxy server? Here is the answer, the Squid allows you to connect your computers without an active internet connection through the proxy server.
You can also enable the DNS cache, web cache, memory cache, and other internet caching to faster load the web pages. You can see that the Squid proxy server can enable caching, increase your server’s efficiency, improve the network performance, reduce bandwidth usages, and make your server secure.
Squid on Linux System
The Squid proxy server was first released in 1996. It is written in C++ programming language and has the GNU GPL privacy license. You can see the repository of the Squid proxy here.
On Linux, you can install the Squid proxy server on your machine and configure your network and web browsers with the proxy setting to enjoy the benefits of the proxy server. In this post, we will see how you can install and configure the Squid proxy server on your Linux system.
1. Install Squid on Debian/Ubuntu Linux
Installing the Squid proxy on Ubuntu and other Debian Linux distributions is a straightforward process. You can install the Squid proxy from the official repository of Linux by using the aptitude package manager. Here, I am using Ubuntu Linux to demonstrate the installation process of the Squid proxy on Debian Linux.
Run the following aptitude commands-lines given below on your terminal shell with root privileges to install the Squid proxy on your system.
$ sudo apt update
$ sudo apt -y install squid
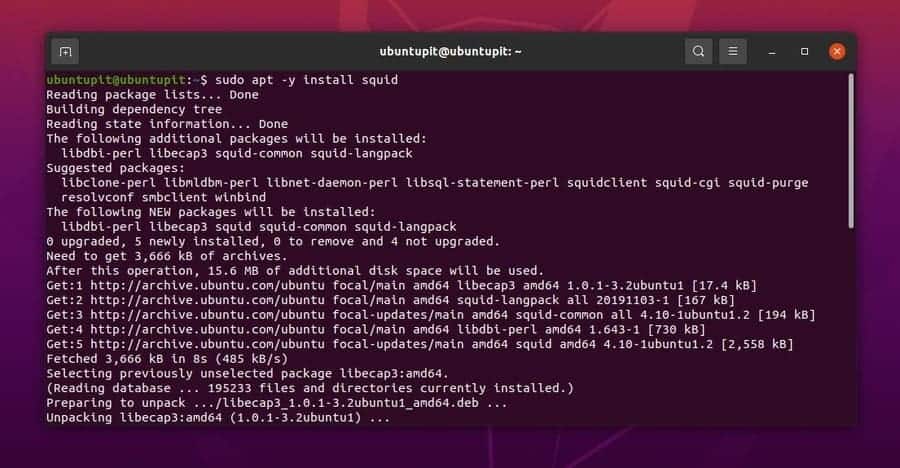
When the installation is finished, you may now run the following system control commands to enable and start the Squid daemon on your system.
$ sudo systemctl start squid
$ sudo systemctl enable squid
2. Install Squid on Fedora and Red Hat Linux
If you are a Red Hat or Fedora Linux user, you can effortlessly install the Squid proxy server on your system. As the Red Hat and Fedora both support the YUM package management tool, I will use the YUM command tool to install the Squid proxy server.
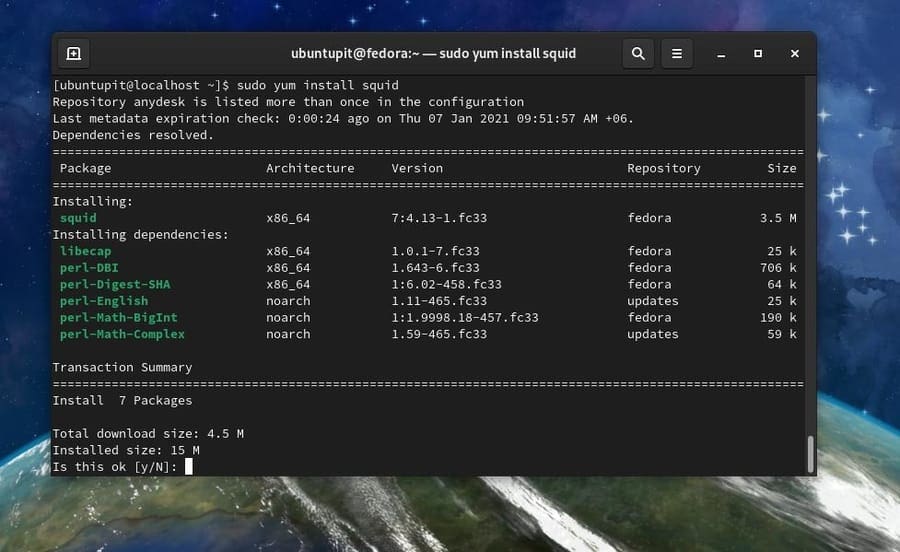
Run the following YUM command given below on your terminal shell with root privileges to install the Squid proxy server on your Red Hat and Fedora Linux.
sudo yum install squid
3. Install Squid on Arch Linux
If you are an Arch Linux user, there are three different methods that you can use to install the Squid proxy server on your system. Here, I am going to show the CLI method, GUI method, and the Snap method of installing the Squid proxy server on an Arch Linux system.
Method 1: Install Squid on Arch by CLI
Installing Suid proxy on an Arch Linux is straightforward with the Pacman commands. You can run the following Pacman commands given below on your terminal shell to install and start the Squid proxy server on your Arch Linux.
Here, I am using the Manjaro Linux to demonstrate the installation process of Squid proxy on Arch Linux, but the Pacman commands will work for all Arch-based systems.
$ sudo pacman -S squid lsof
$ sudo systemctl enable squid
$ sudo squid -z
$ sudo systemctl start squid
Method 2: Download and Install Squid on Arch
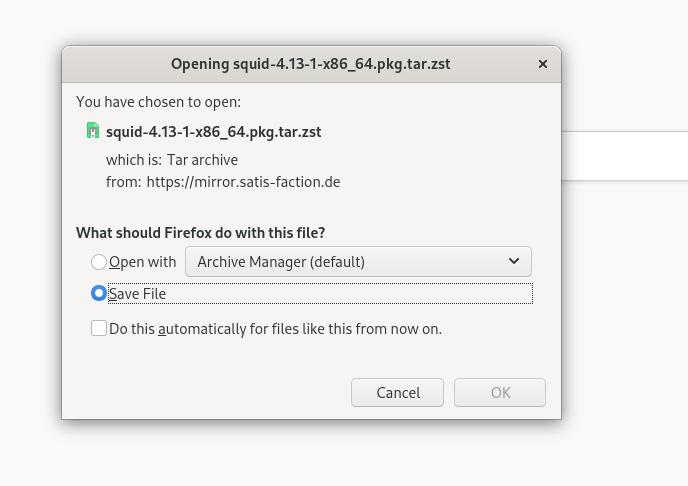
If you are not familiar with the CLI method of installing a package on your Arch system, this method is for you. You can download the compiled ZST package of the Squid proxy for Arch Linux from here. Once the download is finished, open your download directory and open the ZST package with your default software store. Then click on the install button and proceed with your root password.
Method 3: Install Squid on Arch by Snap Commands
Here, I am showing the method of installing the Squid proxy on an Arch system via the Snap package management system. First, you need to install the Snap package installer daemon on your system. Run the following command-lines given below to install the Snapd on your Arch Linux system.
sudo pacman -S snapd
sudo systemctl enable --now snapd.socket
sudo ln -s /var/lib/snapd/snap /snap
Now, run the following Snap command to install the Squid proxy on your Arch Linux.
sudo snap install squid-gary
Configuring Squid Proxy on Linux
Till now, we have seen several methods of installing the Squid proxy server on various Linux distributions. In this step, we will see how you can configure and get started with the Squid proxy on your system. All the command-lines that I am going to show in this step will be executable on all major Linux distributions.
1. Checking Squid Status
After the installation of the Squid proxy is done, you need to check the status to know whether it is working on your system on not. Sometimes, mismatching with the configuration files would be the cause of not functioning the proxy server. I would recommend you copy the default settings on a notepad to fix them if anything goes wrong.
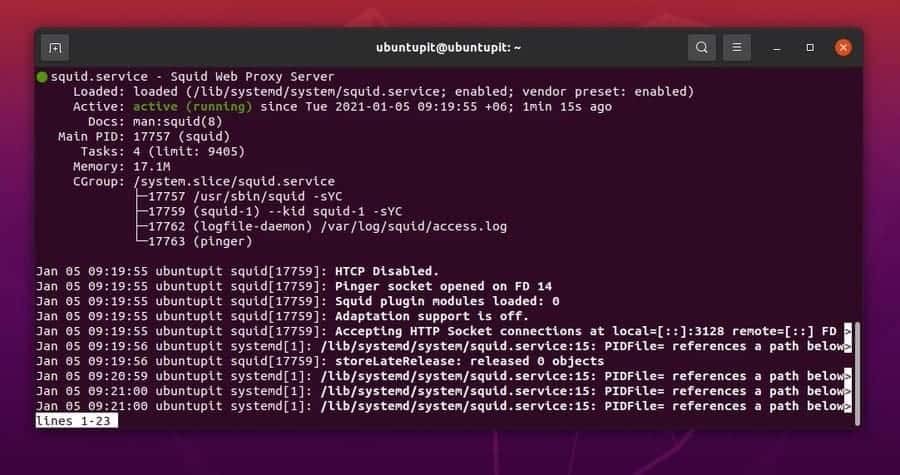
However, run the following system control command on your terminal shell to check the status of the Squid proxy on your Linux system. You would see the PID, tasks, memory usage, and other pieces of information on the shell.
$ sudo systemctl status squid
2. Configure Network on Squid Proxy
Configuring the network of the Squid proxy will allow you to connect your proxy server to other machines. The configuration files are stored inside the etc and the var directory of a Linux filesystem. Here, I am going to give you a note where you can find the configuration file on your system.
Find all the configuration settings inside the etc directory.
/etc/squid/squid.conf
Find the access and log information on the var directory.
/var/log/squid/access.log
/var/log/squid/cache.log
Now, to add your desired IP address and port, run the following command-line on your terminal shell. Here, I am using the Nano script editor; you can use your favorite script editor. Don’t forget to run the command as a root user.
$ sudo nano /etc/squid/squid.conf
Once the configuration script is opened, find the http_port, and put your desired port, and make it uncomment.
http_port 8888 transparent
Now, allow all the HTTP networks to access your server. You can also show your hostname by editing the hostname.
http_access allow all
visible_hostname
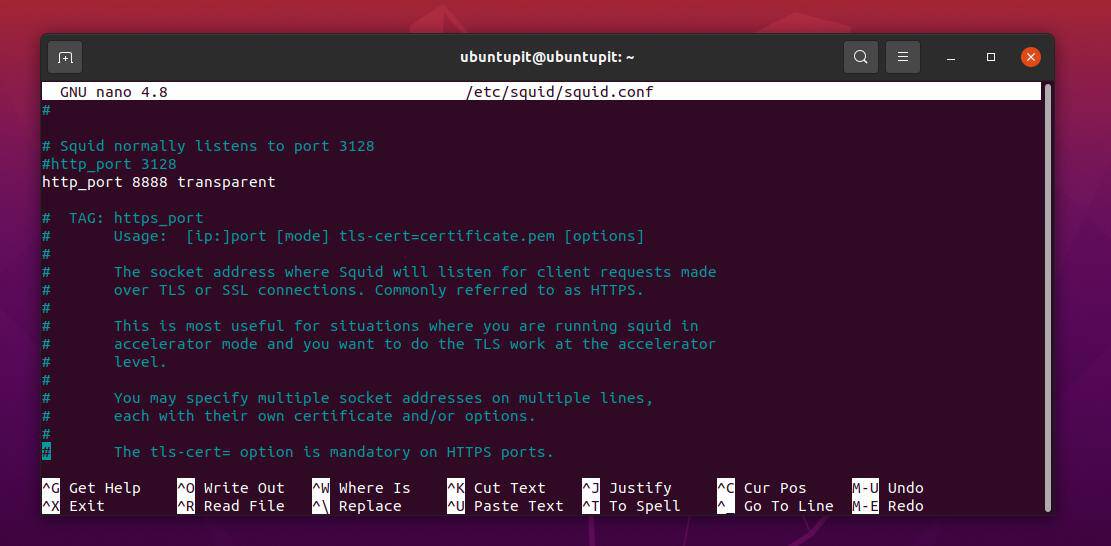
You can now run the following system control command to restart the Squid server on your Linux system.
$ sudo systemctl restart squid
3. Configuring Squid as an HTTP Proxy on Linux
By configuring the localnet settings, you can add your IP address inside the Squid proxy settings. In this way, you will allow only your IP address through your server. Run the following command on your terminal shell to edit the localnet parameter.
$ sudo nano /etc/squid/squid.conf
Now, find the acl localnet syntax and put your IP address, don’t forget to make it uncomment by removing the hash (#). Then save the script and exit the editor.
acl localnet src 192.168.0.101
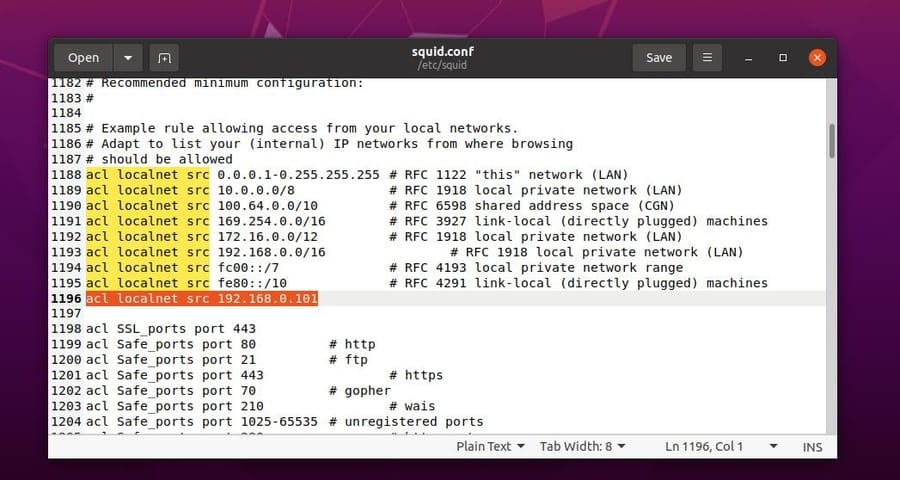
Now, you have to restart the Squid server to load the changes.
$ sudo systemctl restart squid
By default, the Squid proxy server doesn’t allow all open ports for a local network. If you need to add more open ports on your server, you can open the network configuration script and add more ports. Replace the XXX with your port.
acl Safe_ports port XXX
Don’t forget to restart your server after you make a change.
4. Authorization Settings
By enabling the authentication setting, you can ask the users to prove their authorization by logging in to your server. You need to install the Apache utility tools on your Linux system to configure the login approval system. Run the following command-line given below to install the Apache tool.
$ sudo apt install apache2-utils
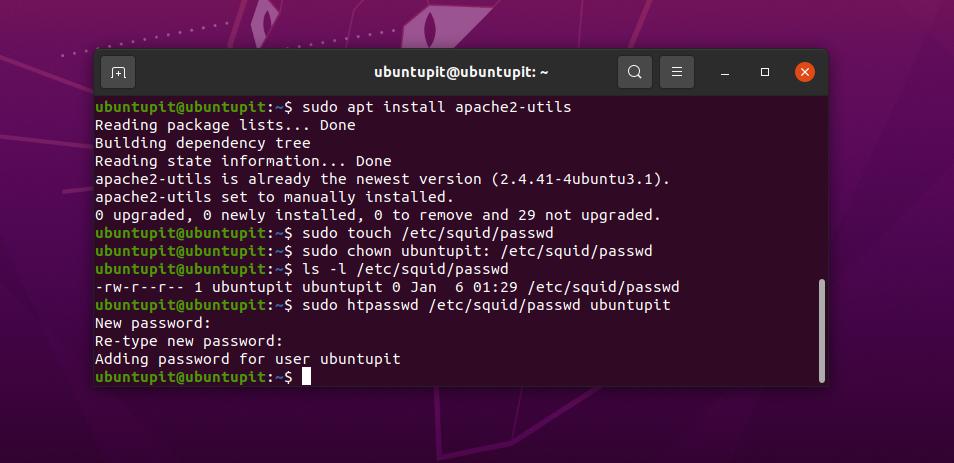
Once the installation is done, you can now create a script to assign a username and password for your network. We are creating the authorization script so that you don’t need to add login information manually on the network configuration of the Squid proxy server. After creating the login script, you just need to set the path of the login file inside the Squid configuration settings.
However, run the following command to create a username and password for your server.
$ sudo touch /etc/squid/passwd
$ sudo chown proxy: /etc/squid/passwd
$ ls -l /etc/squid/passwd
$ sudo htpasswd /etc/squid/passwd ubuntupit
Now, run the following command on your terminal shell to add the path of the login script inside the Squid’s configuration script and to enable the authentication settings.
$ sudo vim /etc/squid/squid.conf
Add the following parameters inside the configuration script of the Squid proxy. You need to add the following lines after the Access Control List (ACL) settings.
auth_param basic program /usr/lib64/squid/basic_ncsa_auth /etc/squid/passwd
auth_param basic children 5
auth_param basic realm Squid Basic Authentication
auth_param basic credentialsttl 2 hours
acl auth_users proxy_auth REQUIRED
http_access allow auth_users
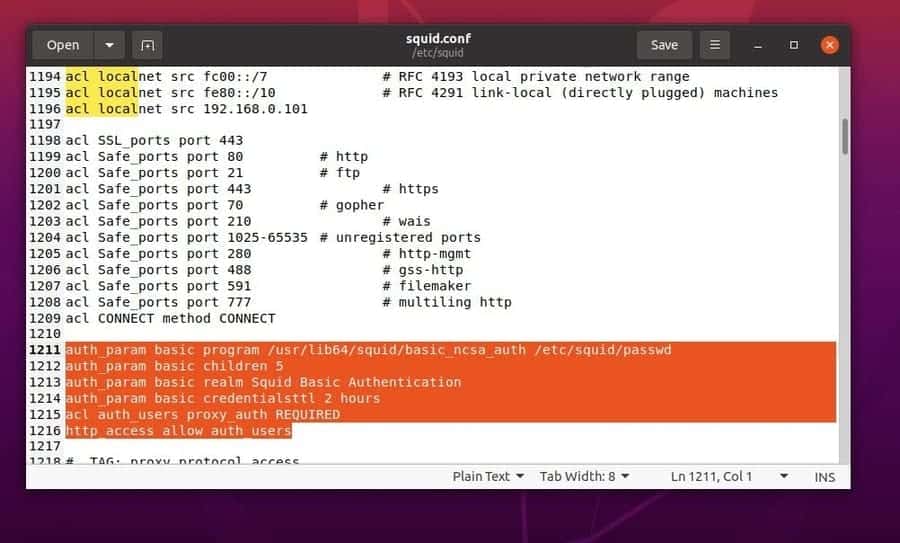
Then restart your Squid proxy server.
$ sudo systemctl restart squid
5. Block Websites Via Squid
If you want to block a few certain websites on your proxy server, you can do that by adding the script inside the Squid’s proxy server settings. First, you need to create a file to store the URLs of the websites that you want to block.
You need to add the URLs after a (.) dot. Let, I want to block Facebook; in that case, I have to put the address as .facebook.com. Here, I am saving the file named blacklisted_sites.
$ sudo touch /etc/squid/blacklisted_sites.acl
You can now write down the URL addresses inside the blacklisted_sites.acl file that you want to block on your proxy server
.badsite1.com
.badsite2.com
Now, open the configuration script of the Squid proxy server, and add the path of the blacklisted_sites.acl file.
$ sudo vim /etc/squid/squid.conf
After that, open the configuration script of your proxy server and add the following lines after the ACL settings.
acl bad_urls dstdomain "/etc/squid/blacklisted_sites.acl"
http_access deny bad_urls
Then restart the Squid proxy server on your Linux system.
$ sudo systemctl restart squid
6. Setup Browser for the Client
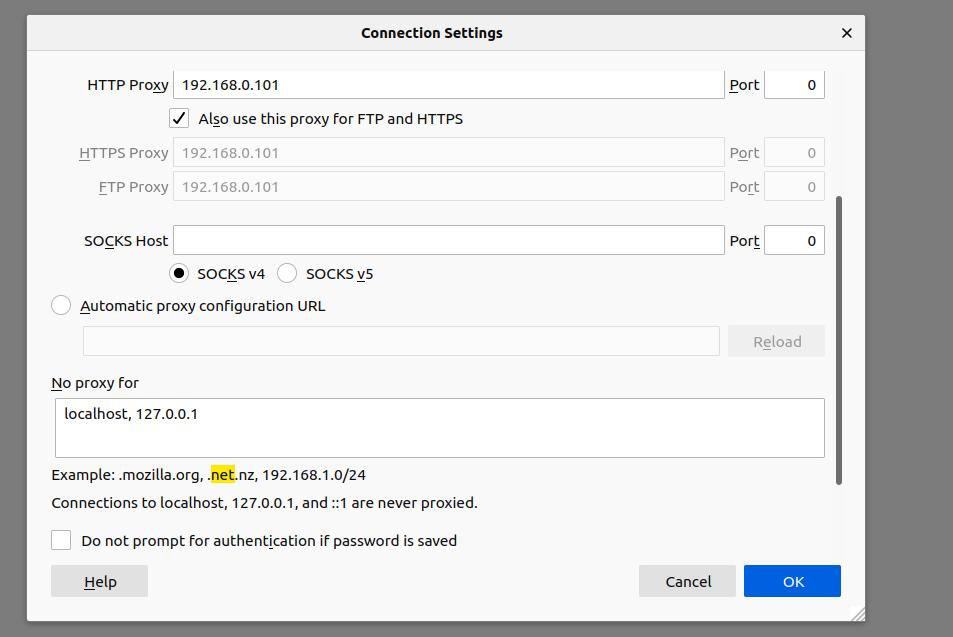
This is the step where you can configure your client to access your Squid proxy server. You need to open your web browser and find the network setting to set up the configuration. Here, I am using the Firefox web browser, and you can use any other browser as well. Usually, the connection settings can be found inside the Preferences setting on a web browser.
After opening the Connection setting, you need to enable the HTTP Proxy and put your proxy server’s IP address inside the HTTPS Proxy and FTP Proxy settings. On the No proxy setting, you can put your localhost address.
If you don’t remember the IP address of your proxy server, you can check it by running the following IP address command on your terminal shell.
ip address
Final Words
The Squid proxy server is an excellent tool for filtering traffic, controlling bandwidth, monitoring user activity, and web caching. In the entire post, I have described the notion of the Squid proxy server and illustrated the installation process of the Squid proxy server on a Linux system. I have also shown the process of how you can configure an HTTP connection with the Squid proxy server.
If you find this post informative and helpful, please share it with your friends and the Linux community. You can also write down your opinions regarding this post in the comment section.

Hi Mehedi Hasan,
I would like if you have a SquidGuard tutorial to complete this one.
Or, if you can give me a web link about a good SquidGuard tutorial.
Thank you for this tutorial and for all your tutorials.
I am a big fun of Linux and i use Kubuntu.
I discover this website (ubuntupit) since a week and i am very happy to learn a lot of things about Linux.
I am french, but i do not find a lot of tutorials in french language about linux like this website.
I am not a administartor but a simple technician support and i learne linux my self (self-trained)
Sorry for my english
Best regards
Haddadi