
A network bridge is a method of connecting computer and network devices to transmit data packets through the network topology that can reduce the network traffic between the source and the destination address. A network bridge works with a combination of the physical address layer (MAC address) and the data link layer. For networking on Ubuntu Linux, the dynamic type of network bridge connections are most popular and the notion is very simple to install.
 When multiple network devices are connected through network topology, it is important to make the connections secure, fast, and private. The functioning method of the network bridge is clear to understand. It works with the MAC (media access control) address and the data link layer recognition method.
Every device has it’s own unique MAC address that is used to choose which data packet is to be delivered from which device to which device. The network bridge works with the segment method where devices are divided into a couple of segments with ports and unique MAC addresses.
Network bridges are mostly used in Linux Containers, Kernel-based Virtual Machines, Xen Cloud Computing, and in Docker or Virtual Machines. The network bridge uses the DDL2 (data link layer) to function where the bridges are used as the junction of the MAC address. Each segment cross-checks the segment, the MAC address, and, the data link layer; then it delivers the data packet to the specific network device.
When multiple network devices are connected through network topology, it is important to make the connections secure, fast, and private. The functioning method of the network bridge is clear to understand. It works with the MAC (media access control) address and the data link layer recognition method.
Every device has it’s own unique MAC address that is used to choose which data packet is to be delivered from which device to which device. The network bridge works with the segment method where devices are divided into a couple of segments with ports and unique MAC addresses.
Network bridges are mostly used in Linux Containers, Kernel-based Virtual Machines, Xen Cloud Computing, and in Docker or Virtual Machines. The network bridge uses the DDL2 (data link layer) to function where the bridges are used as the junction of the MAC address. Each segment cross-checks the segment, the MAC address, and, the data link layer; then it delivers the data packet to the specific network device.
To get the network bridge installed and activated on your Ubuntu Linux, very first, you need to install the bridge utility software inside your Linux machine. As here, we are dealing with Ubuntu so we will be using the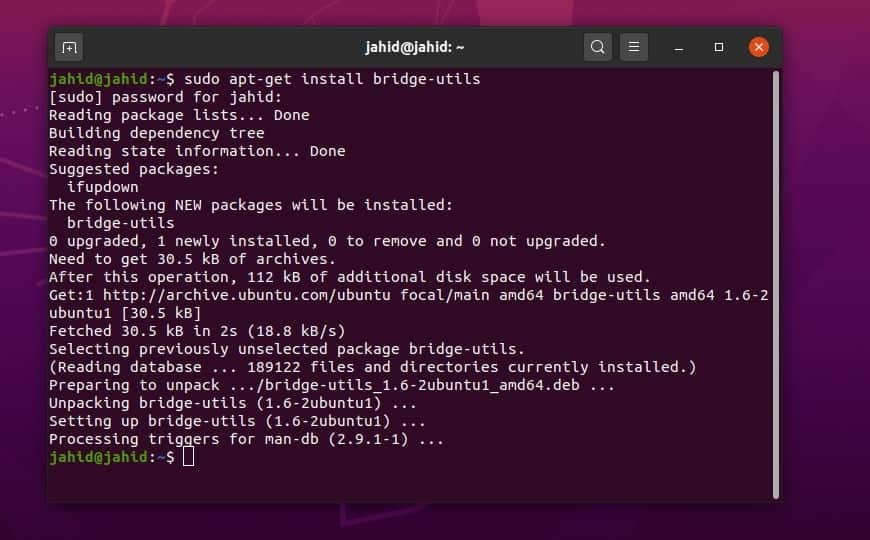 Then, we will check the internet protocol (IP address) and the ethernet connection port settings or configurations of our system by using the basic net-tool commands of Ubuntu.
Step 2: Configure Bridge Connection From the
Netplan is the very primary configuration files that are stored inside the root of the Ubuntu Linux filesystem. The configuration file will be found under the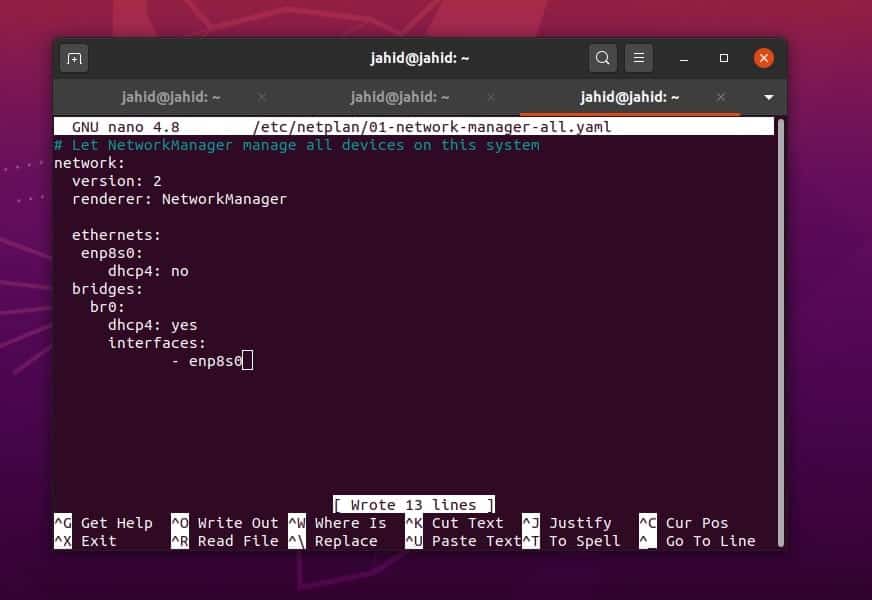 Now, we have to add the basic bridge connection setting and configuration inside the script file. We will get the ethernet ID from the ifconfig command. Here, I am using my ethernet address, be mindful to replace it with your ethernet ID. You can directly copy the configuration settings that I’ve used. Feel free to get that script lines. The Dynamic Host Configuration Protocol (DHCP) settings will help you if you’re trying to configure a wireless bridge connection on your Ubuntu Linux.
Step 3: Configure Network Bridge Using the
The Network Manager Command-Line, or in short the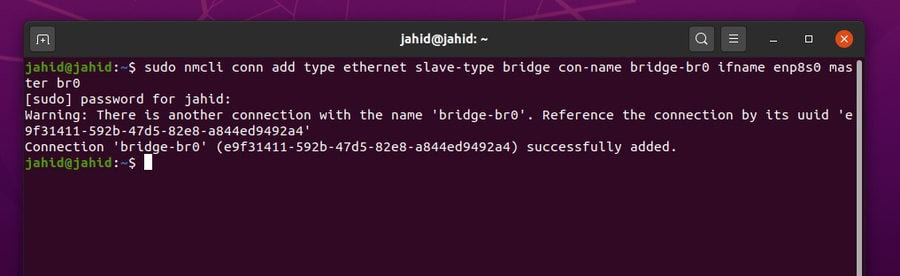 Now we can check the bridge network connections that we have just made on our Ubuntu system. We will be using the Bridge Control (
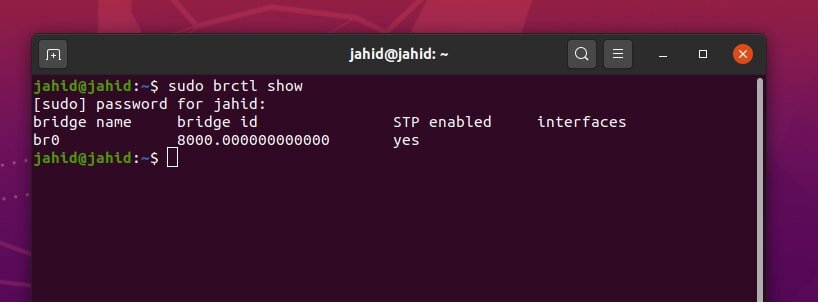 Now, You can use these handy and functional terminal command lines to set the ethernet connection turn on, turn down, and to delete the bridge connection.
 Here we can see that we have got the name of connection type, the UUID of connection that includes the exact device of the connection, and the connection type details. Use the terminal command from your Ubuntu terminal shell to active the bridge connection.
You can use the specific UUID address to turn on or off the specific bridge connection. The same procedure is also applicable to deactivate and activate the conjugated ethernet connections. Just be mindful while you deal with the UUID addresses, don’t mismatch with the UUIDs.
Here we can see that we have got the name of connection type, the UUID of connection that includes the exact device of the connection, and the connection type details. Use the terminal command from your Ubuntu terminal shell to active the bridge connection.
You can use the specific UUID address to turn on or off the specific bridge connection. The same procedure is also applicable to deactivate and activate the conjugated ethernet connections. Just be mindful while you deal with the UUID addresses, don’t mismatch with the UUIDs.
Here comes the graphical user interface (GUI) method of configuring the bridge network connection on Ubuntu Linux. This method is comparatively simple and hassle-free. All you need to do is open up the Ubuntu network-manager tool. You can use either the following terminal command line or you can open the network manager under the Ubuntu Settings.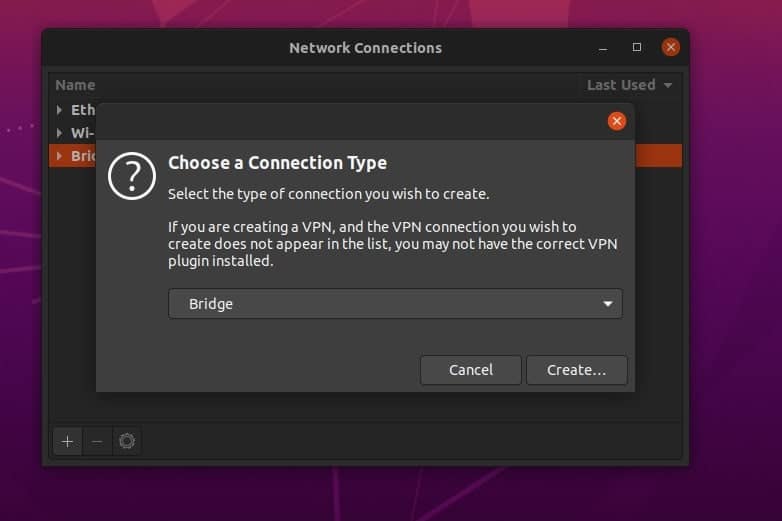 In this step, you will see another new window will pop-up and you will be asked to assign a name to the connection name. You can simply name it as ‘Bridge Connection‘. Leave the rest of the settings as they have appeared. Furthermore, for better understanding, I am going to put my settings here.
Connection Name: Bridge Connection
Aging time: 300
Enable IGMP Snooping: Yes
Enable STP (Spanning Tree Protocol): Yes
Priority: 32768
Forward Delay: 15
Hello Time: 2
Max age: 20
Group forward mask: 0
In this step, you will see another new window will pop-up and you will be asked to assign a name to the connection name. You can simply name it as ‘Bridge Connection‘. Leave the rest of the settings as they have appeared. Furthermore, for better understanding, I am going to put my settings here.
Connection Name: Bridge Connection
Aging time: 300
Enable IGMP Snooping: Yes
Enable STP (Spanning Tree Protocol): Yes
Priority: 32768
Forward Delay: 15
Hello Time: 2
Max age: 20
Group forward mask: 0
 Now, click on the ‘Add‘ button assigned at the right of the window. It will let the system appears a new window. Here you will get a new dialog box to choose the connection type. As I am using the Local Area Network (LAN) and connected through an ethernet cable so I am going to choose the Ethernet option from the drop-down menu. Now, Save the settings.
 At this stage, you are very close to finishing up the configuration of the bridge network settings on Ubuntu Linux. Move to the ‘Ethernet‘ settings, here you have to check if the following configurations are all Okay or not. You can compare it with mine.
Maximum transmission unit (MTU): Default
Link negotiation: Ignore
At this stage, you are very close to finishing up the configuration of the bridge network settings on Ubuntu Linux. Move to the ‘Ethernet‘ settings, here you have to check if the following configurations are all Okay or not. You can compare it with mine.
Maximum transmission unit (MTU): Default
Link negotiation: Ignore
 Now, to active the bridge network connections, use these terminal command lines. Be mindful to write the ethernet connections sockets. In my case, the socket is 1.
Here is an option for you, if in future you face any trouble using the bridge network connection on your Ubuntu Linux, you can remove the bridge connections and start over the entire process. You may also need to purge the configuration files from the root of your Linux filesystem.
At the very beginning of this post, I have described how to configure the bridge connection on Ubuntu through the
The network bridge connections work in the segment by segment method, so it can reduce the traffic of a network system. In this post, I have described what actually the bridge network connection is, and how to configure and remove the bridge network connection on Ubuntu Linux. So dear Linux sysadmin, if you like this post then please share this post on your social media. Also do comment, if you have anything to ask or share with us regarding this post.
Fundamentals of Network Bridge
When multiple network devices are connected through network topology, it is important to make the connections secure, fast, and private. The functioning method of the network bridge is clear to understand. It works with the MAC (media access control) address and the data link layer recognition method.
Every device has it’s own unique MAC address that is used to choose which data packet is to be delivered from which device to which device. The network bridge works with the segment method where devices are divided into a couple of segments with ports and unique MAC addresses.
Network bridges are mostly used in Linux Containers, Kernel-based Virtual Machines, Xen Cloud Computing, and in Docker or Virtual Machines. The network bridge uses the DDL2 (data link layer) to function where the bridges are used as the junction of the MAC address. Each segment cross-checks the segment, the MAC address, and, the data link layer; then it delivers the data packet to the specific network device.
Step 1: Installing Bridge Utilities on Ubuntu Linux
To get the network bridge installed and activated on your Ubuntu Linux, very first, you need to install the bridge utility software inside your Linux machine. As here, we are dealing with Ubuntu so we will be using the
apt-get command to install the network bridge inside the machine.
$ apt-get install bridge-utils
Then, we will check the internet protocol (IP address) and the ethernet connection port settings or configurations of our system by using the basic net-tool commands of Ubuntu.
$ sudo ifconfig
$ sudo ip addr show
$ ip add
Step 2: Configure Bridge Connection From the NetPlan
Netplan is the very primary configuration files that are stored inside the root of the Ubuntu Linux filesystem. The configuration file will be found under the
root/etc/netplan directory on Ubuntu. We can open and edit the netplan configuration file through the Nano script editor. We will open the YAML file on the Ubuntu terminal using the nano script editor tool.
$ sudo nano /etc/netplan/01-network-manager-all.yaml
Now, we have to add the basic bridge connection setting and configuration inside the script file. We will get the ethernet ID from the ifconfig command. Here, I am using my ethernet address, be mindful to replace it with your ethernet ID. You can directly copy the configuration settings that I’ve used. Feel free to get that script lines. The Dynamic Host Configuration Protocol (DHCP) settings will help you if you’re trying to configure a wireless bridge connection on your Ubuntu Linux.
# Let NetworkManager manage all devices on this system
network:
version: 2
renderer: NetworkManager

ethernets:
enp8s0:
dhcp4: no
bridges:
br0:
dhcp4: yes
interfaces:
- enp8s0
Step 3: Configure Network Bridge Using the nmcli Command
The Network Manager Command-Line, or in short the
nmcli is the command-line based interface to setup and configure the network settings on the Ubuntu Linux. Very first we will add the connection type and save the bridge network connection to the network manager through the nmcli command on Ubuntu. We will use the sudo commands in the terminal.
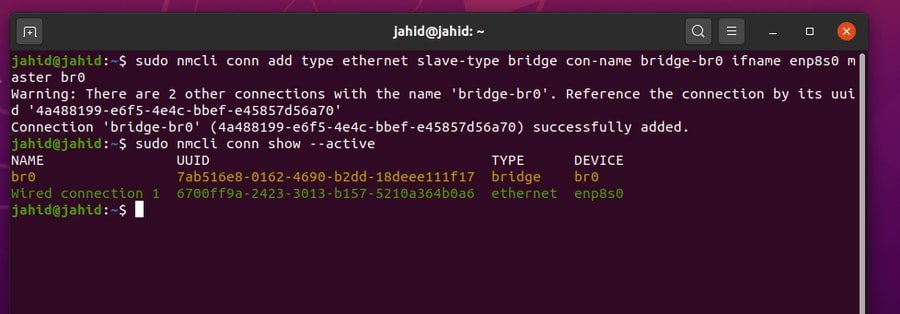
$ sudo nmcli conn add type ethernet slave-type bridge con-name bridge-br0 ifname enp8s0 master br0
Now we can check the bridge network connections that we have just made on our Ubuntu system. We will be using the Bridge Control (brctl) terminal command on Ubuntu. If everything went fine, you will find the name of the bridge connection, bridge connection ID, and the Spanning Tree Protocol (STP) status in the output.
$ sudo brctl show
Now, You can use these handy and functional terminal command lines to set the ethernet connection turn on, turn down, and to delete the bridge connection.
$ sudo ip link set enp8s0 up
$ sudo ip link set br0 down
$ sudo brctl delbr br0
You can also use the
nmcli terminal commands to do the same, but here you need to put the specific ethernet and connection type to make it functional. You can also check all the status of all the active bridge connections form the Ubuntu terminal command shell.
$ sudo nmcli conn add type bridge con-name br0 ifname br0
$ sudo nmcli conn show --active
Here we can see that we have got the name of connection type, the UUID of connection that includes the exact device of the connection, and the connection type details. Use the terminal command from your Ubuntu terminal shell to active the bridge connection.
You can use the specific UUID address to turn on or off the specific bridge connection. The same procedure is also applicable to deactivate and activate the conjugated ethernet connections. Just be mindful while you deal with the UUID addresses, don’t mismatch with the UUIDs.
$ sudo nmcli conn up br0
$ sudo nmcli conn up 7ab516e8-0162-4690-b2dd-18deee111f17
$ sudo nmcli conn down Ethernet\ connection\ 1
$ sudo nmcli conn down 6700ff9a-2423-3013-b157-5210a364b0a6
Step 4: Creating Bridge Network From Ubuntu Network Connections
Here comes the graphical user interface (GUI) method of configuring the bridge network connection on Ubuntu Linux. This method is comparatively simple and hassle-free. All you need to do is open up the Ubuntu network-manager tool. You can use either the following terminal command line or you can open the network manager under the Ubuntu Settings.
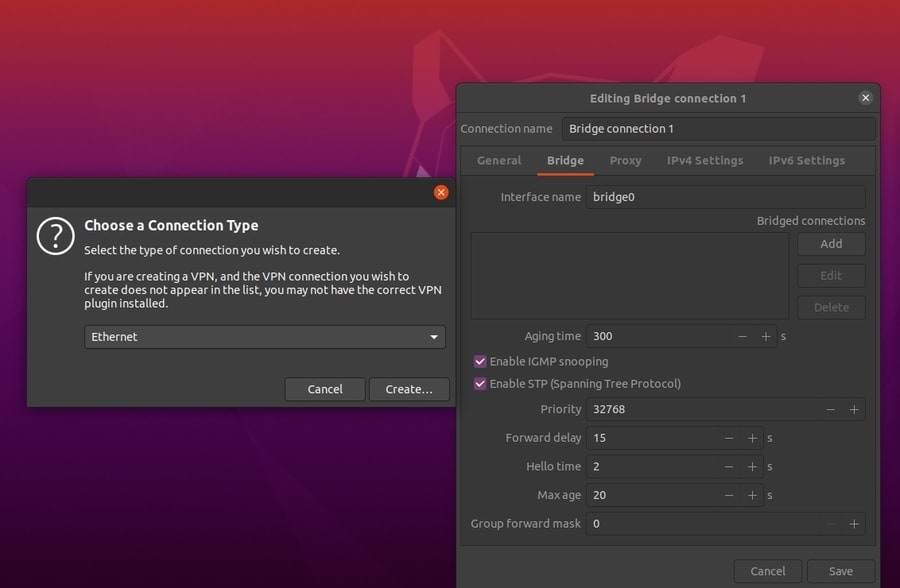
$ nm-connection-editorOnce the ‘Network Connections‘ window is opened, you will find the option to choose the Bridge connection setup. A new pop-up window will open and select ‘Bridge‘ and click on the ‘Create‘ button.
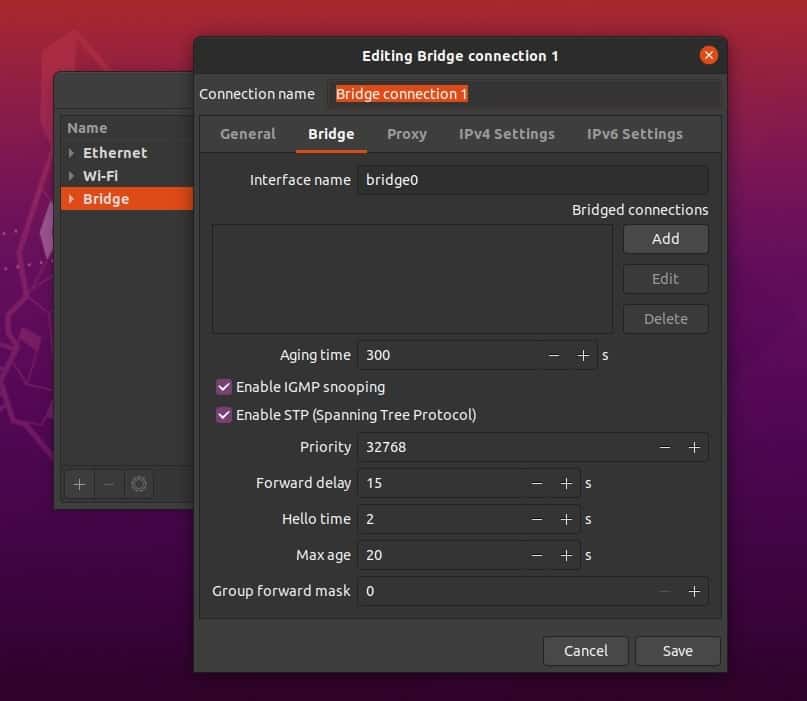
In this step, you will see another new window will pop-up and you will be asked to assign a name to the connection name. You can simply name it as ‘Bridge Connection‘. Leave the rest of the settings as they have appeared. Furthermore, for better understanding, I am going to put my settings here.
Connection Name: Bridge Connection
Aging time: 300
Enable IGMP Snooping: Yes
Enable STP (Spanning Tree Protocol): Yes
Priority: 32768
Forward Delay: 15
Hello Time: 2
Max age: 20
Group forward mask: 0
Now, click on the ‘Add‘ button assigned at the right of the window. It will let the system appears a new window. Here you will get a new dialog box to choose the connection type. As I am using the Local Area Network (LAN) and connected through an ethernet cable so I am going to choose the Ethernet option from the drop-down menu. Now, Save the settings.
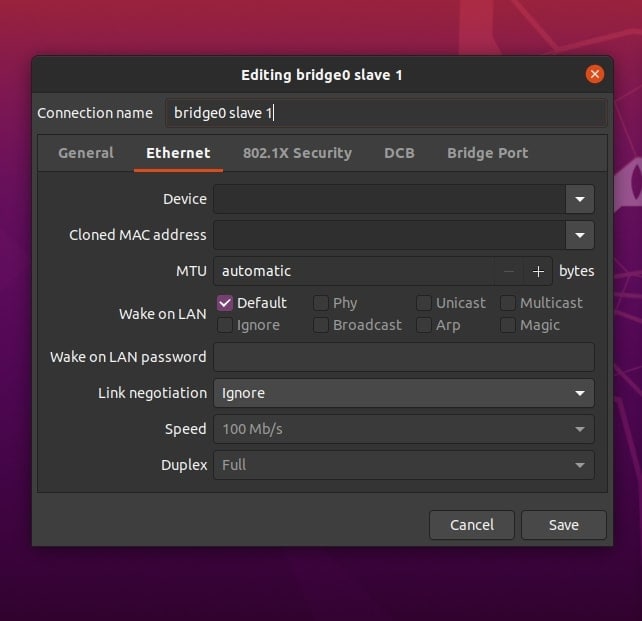
At this stage, you are very close to finishing up the configuration of the bridge network settings on Ubuntu Linux. Move to the ‘Ethernet‘ settings, here you have to check if the following configurations are all Okay or not. You can compare it with mine.
Maximum transmission unit (MTU): Default
Link negotiation: Ignore
Now, to active the bridge network connections, use these terminal command lines. Be mindful to write the ethernet connections sockets. In my case, the socket is 1.
$ sudo nmcli conn up br0
$ sudo nmcli conn down Ethernet\ connection\ 1
Removing Bridge Configurations From Ubuntu
Here is an option for you, if in future you face any trouble using the bridge network connection on your Ubuntu Linux, you can remove the bridge connections and start over the entire process. You may also need to purge the configuration files from the root of your Linux filesystem.
$ sudo apt-get remove bridge-utils
$ sudo apt-get remove --auto-remove bridge-utils
$ sudo apt-get purge bridge-utils
$ sudo apt-get purge --auto-remove bridge-utils
Problems You May Face After Configuring the Network Bridge on Ubuntu
At the very beginning of this post, I have described how to configure the bridge connection on Ubuntu through the
netplan settings. Here it comes, once you are done with the bridge connections and you have no longer access to any other bridge connections, it is possible that you may face the problem of showing that there is no ethernet adapter installed on your Linux device. To solve this problem either you can use a different wifi adapter(USB WiFi), or the best option is to reset the netplan settings from your Ubuntu terminal.
First, you need to get access to edit the netplan script. To get the netplan script access you have the change the ownership of that specific directory. Here, I am going to show how to change the ownership of any directory using the chown terminal command.
Then, you can try editing the script with any notepad, but I will suggest you use the nano editor. Now, remove the configurations from the network-manager-all.yaml file that we made previously. Then save and exit the nano editor. Now run and apply the netplan settings again and restart the system.
$ sudo chown -R jahid /etc/netplan/
$ sudo nano /etc/netplan/01-network-manager-all.yaml
$ sudo netplan apply
Final Thoughts
The network bridge connections work in the segment by segment method, so it can reduce the traffic of a network system. In this post, I have described what actually the bridge network connection is, and how to configure and remove the bridge network connection on Ubuntu Linux. So dear Linux sysadmin, if you like this post then please share this post on your social media. Also do comment, if you have anything to ask or share with us regarding this post.
Bridging to Wifi should be possible using ebtables, see:
wiki.debian.org/BridgeNetworkConnections#Bridging_with_a_wireless_NIC
Ebtables is essentially like iptables but operate on the MAC sublayer of the data-link layer instead of the network layer, It fools the AP into thinking that all at all our forwarded frames come from the machine which authenticated to the AP.
I couldn’t understand… are there many many steps… or are these in fact different options for doing the same thing?
I tried Step 1 and 2.. but step 3 seems redundant and step 4 is like a GUI way of working..?