Do you love Minecraft but don’t quite like the graphics? Well, here’s the good news. You don’t have to stick to it.
By installing shaders on Minecraft, you can drastically enhance the looks and feel of the game. Shaders are Minecraft mods that will improve graphics like your game’s lights, shadows, and texture.
In this tutorial, we’ll use Optifine, a Minecraft optimization mod, to install Minecraft shaders on Ubuntu. Let’s jump right into it.
What You’ll Need
Before you go into the guide, make sure you meet the following requirements:
- Java installed on your system
- Minecraft installed and running on your system
- Optifine mod installed on your system
- Familiarity with the command line interface
- A stable internet connection
Note that you’ll require the exact same version of Optifine as your Minecraft game for this to work. For the purpose of this tutorial, we’re installing Optifine 1.20.1 for Minecraft version 1.20.1 on Ubuntu 22.04.
With that covered, let’s now go into the first step.
Step 1: Install Java on Ubuntu Linux
Since we’ll use Optifine, you’ll require Java on your system to use it. So, first, let’s install Java.
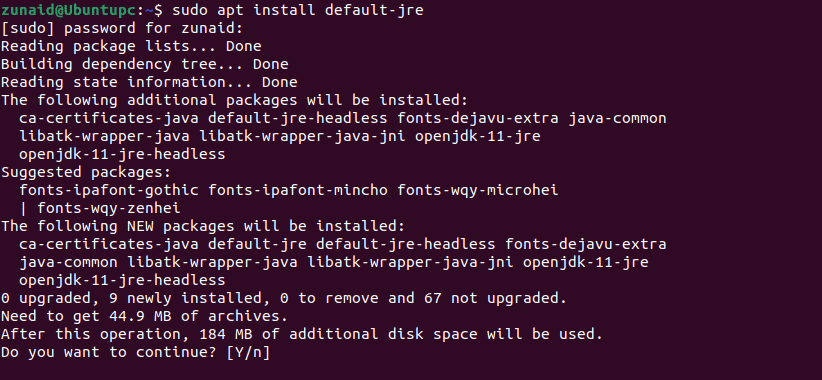
There are several ways you can install Java on Ubuntu. We’ll use the default-jre package for it. Install Java by running the following command:
sudo apt install default-jre

You can check the current Java version to see if the installation was successful. Check the version using the following command:
java -v

If you see a similar output, then the installation was successful. You can move on to the next step.
Step 2: Download and Install Optifine on Ubuntu
With Java installed, we’re ready to use Optifine. Go to the official download page and download your preferred version. We’ll go with the latest one, 1.20.1, as of when writing this.
Once downloaded, head over to the destination where the file is located. In most cases. it’s the ~/Downloads directory. Navigate there with this command:
cd Downloads/
You may have noticed that the file is in JAR format. We need first to make it an executable file. To do that, run the following command:
chmod +x OptiFine_1.20.1_HD_U_I5.jar

Use the proper file name in the command, which can defer depending on your version.
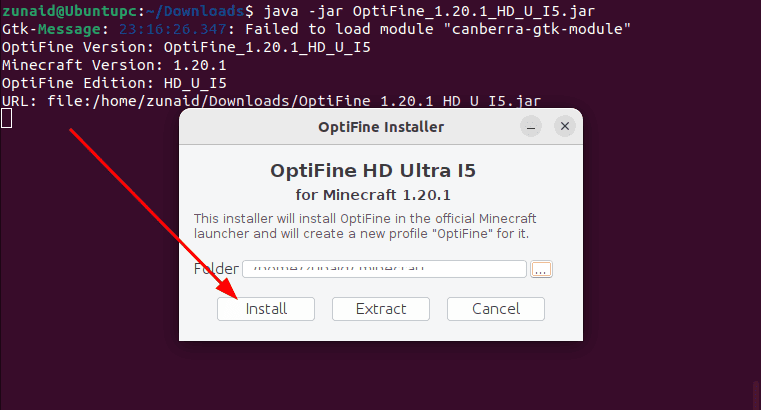
Next, you have to run this JAR file using Java. So run the Optifine file with the below command:
java -jar OptiFine_1.20.1_HD_U_I5.jar

That should deal with the installation process.
Step 3: Download Minecraft Shaders on Ubuntu
With Optifine installed, you can download, install, and apply the shaders to your game.
You should already know that there are a bunch of shaders available. Each shader deals with a different graphical element.
For example, the KUDA Minecraft shaders change the water and leaves for a more photorealistic look. BSL Shaders gives lighting, cinematic effects, and color adjustments.
For this tutorial, we’ll work with the BSL Shaders. You can find the details about this shader here.
Click the Download tab. Then click Download via CurseForge to start the download process.
The last thing you need to do is bring the downloaded ZIP file to the ~/.minecraft/shaderpacks/ directory.
You can either do that from the GUI or use the cp command. To do it with the cp command, go to the directory where you downloaded it. Then run the below command:
cd Downloads/
cp BSL_v8.2.06.zip ~/.minecraft/shaderpacks/
That should bring the file to the right folder.
Step 4: Install Shaders in Minecraft on Ubuntu
After downloading your preferred shaders for Minecraft, you’re ready to install them.
Head over to the game now. Run the Minecraft launcher.
Go to the Installations tab. Click the Play button beside Optifine.
You should see a prompt warning about player safety since this is a modified version. Select the check box and click on the Play button.
This should bring you to the game title screen. Click on the Options button.
Then, go to Video Settings.
You should see a Shaders option. Click on it.
You should see the shaders you downloaded on the left side a while back. Select a shader from the list and click the Done button.
And that should install your desired Minecraft shader on Ubuntu.
Final Thoughts
This tutorial shows you how to install Minecraft shaders on Ubuntu Linux. Now, you can enjoy your favorite game with even better graphics. You can use different shaders for different purposes. But make sure that they are compatible with Optifine.
Interested in more Minecraft tutorials? Check out how to make a Minecraft server on linux distributions.
