Typically, Windows goes to sleep after a specific amount of time by default. Windows configure this feature to save the Power of your laptop’s battery. However, Windows 11 introduces new technology to run your computer in lower Power by shutting down your idle hardware device, including the screen, so that your device can provide a more extended battery. Despite this, if you think turning off sleep mode in Windows interrupt your works, you can stop the sleep issue in Windows. Disabling the sleep feature in Windows 10 and 11 is almost the same.
As you can easily understand, I am writing this tutorial about changing sleep settings for Windows 10 and Windows 11 separately. So no matter which operating system you use, Windows 10 or 11, follow this tutorial and easily manage when your Windows goes to sleep.
How To Turn Off Sleep Mode in Windows 10
To prevent your computer from going to sleep in Windows 10, you should follow the instruction given below:
If you are using a computer, you can disable your computer from going to sleep by following way:
Go to Settings > System > Power & sleep. In the Power & sleep section, click on the drop-down menu under sleep and choose the Never option.
On the other hand, if you are using a laptop, you can fix your laptop sleep mode issue in the following way:
- Like the previous way, go to the Power & sleep section in the Windows settings. If you can not go to the Power & sleep section, first click on the magnifying icon beside the windows icon in the bottom left corner of the screen in the start bar and type Power & sleep settings. In the search result, click on the top result under Best match.
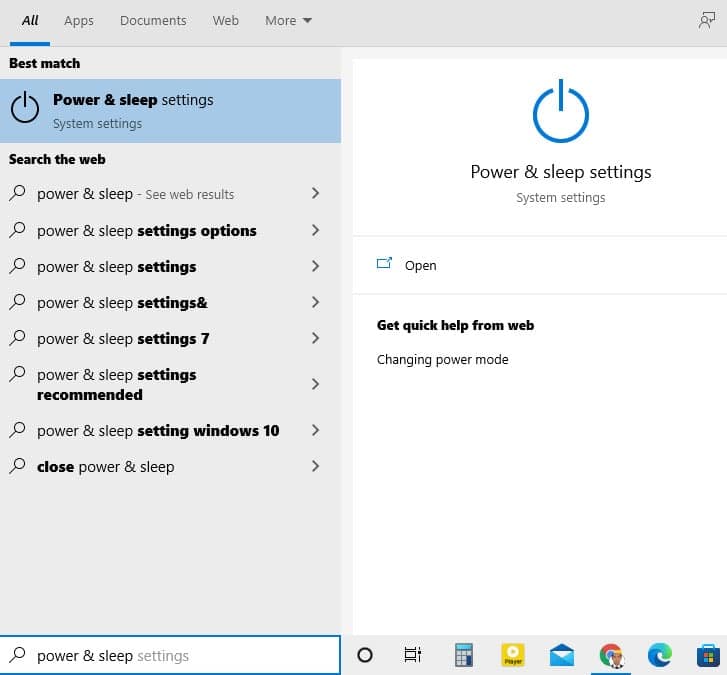
- In the Power & sleep section, click on the drop-down box under On battery power, PC goes to sleep after under the Sleep section. Here you can adjust the amount of time after becoming your laptop idle. You can set sleep time up to 5 hours after becoming your PC idle. However, if you do not want to sleep mode, click on the Never option.
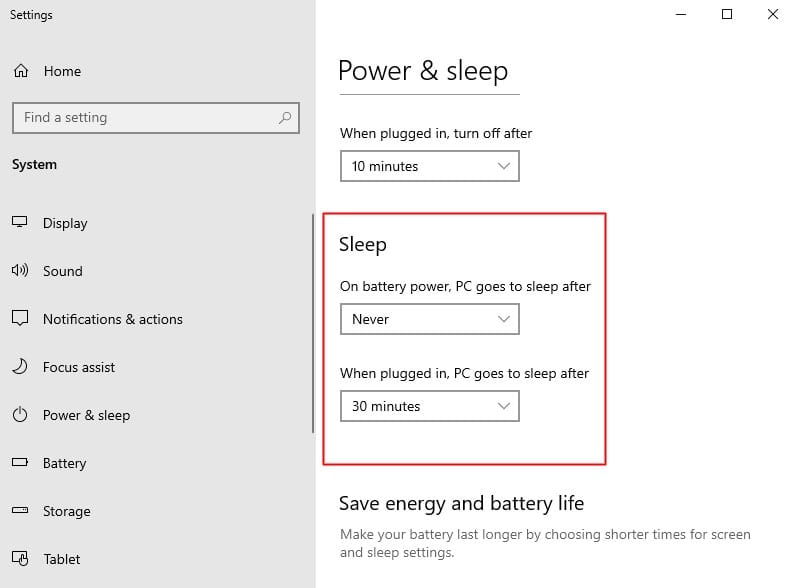
You can only see two options under the sleep section in the Power & sleep settings when you use a laptop.
How To Turn Off Sleep Mode in Windows 11
To manage the sleep feature in Windows 11, you have to follow the given steps below:
- First, launch Windows settings from the start menu. To do this, click on the start menu and click the Settings icon in the pinned list. Alternatively, go to the start menu and type Settings in the search box. And click on the top search result. Another way to launch settings directly is by pressing Windows shortcut keys WIN+I.
- By following any methods, you launch the settings window. In the settings window, by default System tab in the left panel is selected. If the system tab is not selected, click on the System tab in the left panel. Scroll down and click on the Power & battery option on the right side.
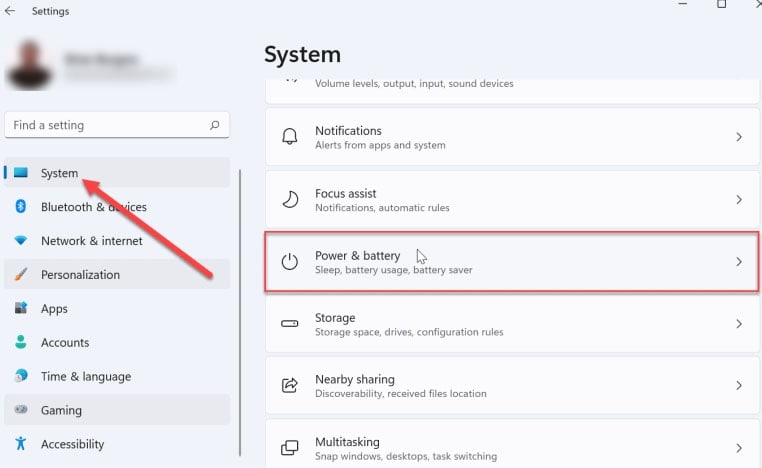
- Here you click on the Screen and sleep option to expand this section. Here, you find several options to manage your device’s power.
- If you are using a laptop, you find four options. If you are using a desktop, you find here only two options.
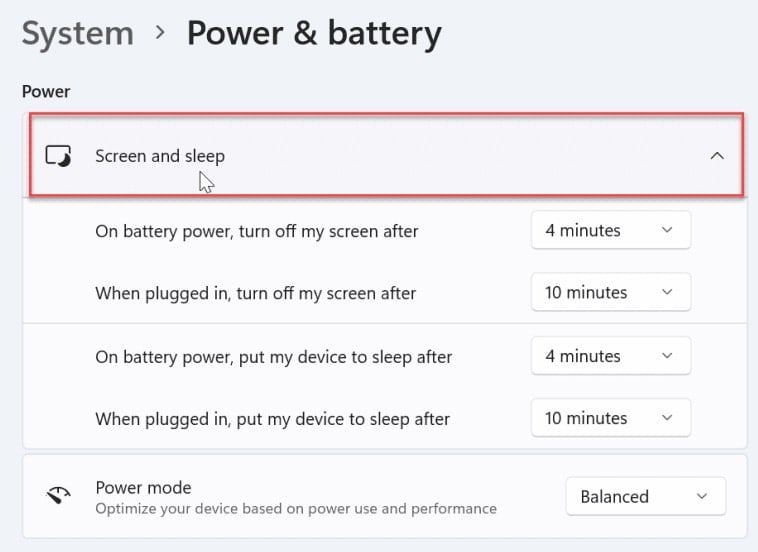
- Now click on the drop-down menu next to On battery power, put my device to sleep after under Screen and sleep option. In this drop-down menu, you have an option to choose the amount of time to wait from 1 minute to 5 hours after idle your device goes to sleep. Or, you disable the sleep mode by clicking on the Never button from the drop-down menu.
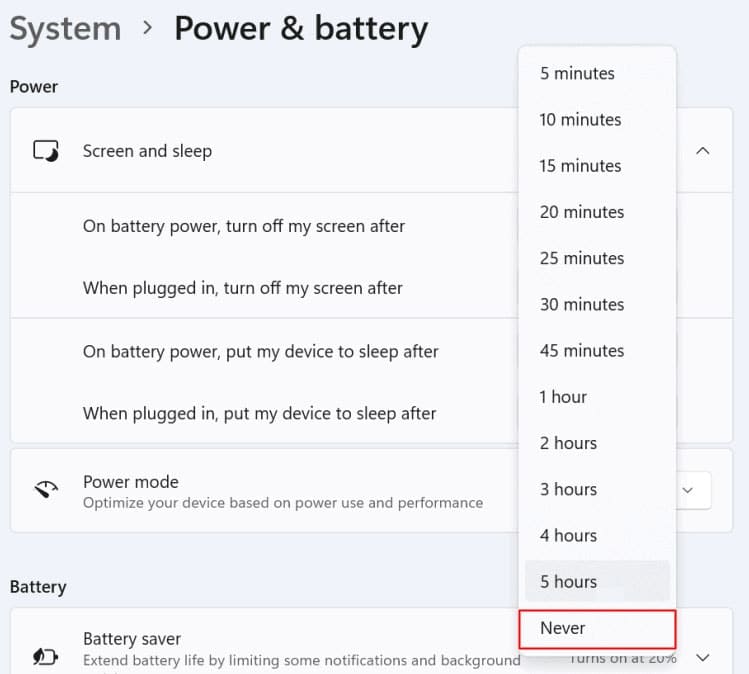
Once you select an option from the drop-down list, the system automatically makes the changes setting will be saved. So, when you choose the Never option from the drop-down list, the system will be saved that never sleeping your device in spite of being idle.
Final Thoughts
Though Windows introduces the sleep feature for power saving of your computer, it seems annoying for someone. So Windows also provide an alternative option to disable sleep mode from settings.
This configuration is almost the same for Windows 10 and 11. In both Windows, you have to launch settings and go to the system. The main difference between the two Windows OS is its Power option name.
In Windows 10, it calls as Power & sleep, and in Windows 11, it calls as Power & battery. Then, the two OS outlooks are little to be changed, but the process is the same.
In this tutorial, I separately explain the tips for managing sleep features in both Windows. So I hope you can easily change your power settings whatever your Windows OS by following this article.
However, if you face difficulties changing power settings, please let us know in this article comment section; our support team will reply soon. Another request is for you to share this in your social media profile so that your circle can manage their power settings and you get a thumbs up.
