
With the advancement of technology, anyone can gather any knowledge or information from internet searching nowadays. And, to do so, we all prefer the Google search engine because of its ease & user-friendliness. You can search for whatever you want in any search engine if you own an Android device and access the internet from it. Speaking of search engines, you might not be aware that Android keeps your Google search history. Regardless of what you’ve searched for, Android keeps an ongoing record of that search. You may not consider it a major issue, but to some people, it is. Thankfully, there is a simple trick by which you can get rid of this permanently. That’s awesome! Don’t you think? Auto-delete of Google search history on your Android is quite easy and simple to do.
And for doing that, you shouldn’t miss a word of the entire post if you are someone who is concerned about keeping their privacy at any cost. So, I would like to draw your full attention to this, and at the end of the post, you might be thanking me, I hope. So, let’s get started with the process.
How to Auto-delete Google Search History on Your Android
As of the latest statistics, 78.39% of desktop and laptop searches worldwide have been conducted through Google. Based on statistics, Google is the popular search engine in the world by far. We regularly search for many things on Google and try to get the information. Among those searches, some might be secured or personal ones which you don’t want to have existed in Google search history.
In short, you might be a user who wants to maintain your own privacy at any cost; searching history is an important consideration. As a result, technology has advanced to the point where you can automatically configure your Android phone to delete its search history.
So, in this post, you’ll be walked through with me to learn how to configure auto-delete of Google search history on your Android by following a simple process. And, without describing any theoretical talks, let’s move into doing some practical work to get all things done.
The Things You Will Need:
It is easy to configure auto-delete of Google search history on your Android; all you need is a Google account connected to your device and to follow the below steps. Once you complete the below steps, you’ll be done and dusted with the process.
Auto-delete Setup of Google Search History on Your Android
Before moving on, please be aware that once you delete search history, you cannot retrieve it anymore. So, you’ve to keep this in your mind. Furthermore, if you set auto-delete for your Google search history, that doesn’t mean you won’t be able to remove it manually.
You also be able to delete your history manually. Auto-delete and manual deletion are both possible simultaneously. But who doesn’t like anything automated? I think everyone does. So, here are the steps below by which you’ll be able to auto-delete Google search history on your Android.
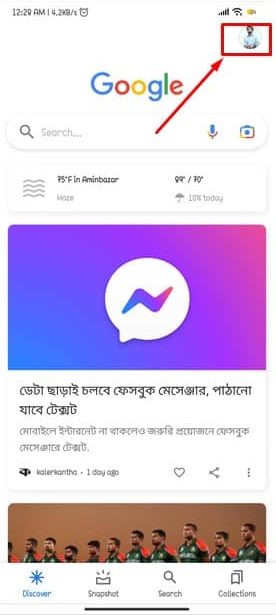
Step 1: Pre-installed Google App on Your Android
In the first place, open the built-in Google app of your Android device, and then you’ll see an icon for your mail, which you’ve connected to your Android, in the top right corner. If you’ve uploaded a profile photo to your email account, it might appear like the attached screenshot. You just need to click the icon to see the further resulting page.
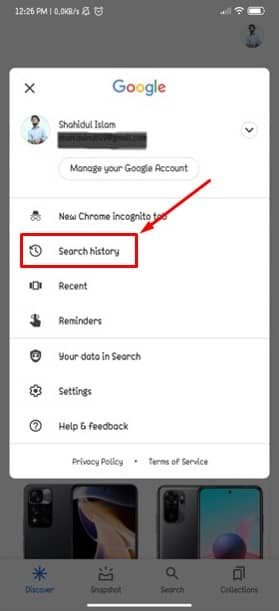
Step 2: Google’s Search History on Your Android Device
As you’ve clicked on the icon, now you can see a window that looks like the image below, and you need to tap on the marked section that says Search history from here. That’s the section where Google keeps the history of whatever you’ve searched for so far. You can delete the history one by one, but it’ll take a huge amount of time. Thus, you need to set up the auto-delete process. Okay, let’s move forward.
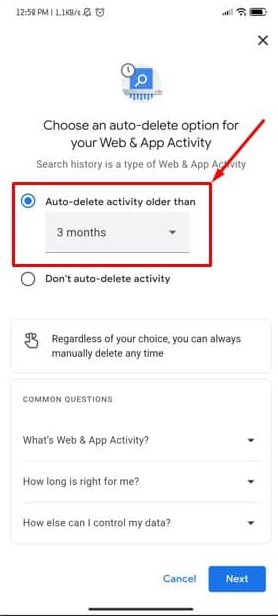
Step 3: Setup the Time Duration of Search History Deletion
If you’ve done so, then you’re almost near to getting all things completed very soon. In this section’s resulting page, tap Auto-delete to find the section called Auto-delete activity older than. And, Google lets you select how long your search history will be deleted. However, some, by default, options will be there. You just need to click on the dropdown.
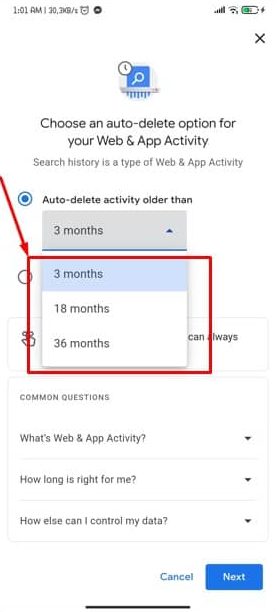
Step 4: Setup of Auto-deleting the Search Activity
Now it’s time to select a duration option 3/18/36 months from the dropdown and tap next for further proceeding. Depending on your duration settings, the search history will be automatically deleted. Don’t you think it’s great? From now onwards, it will be easier to remove your search history from your browser without having to do it manually.
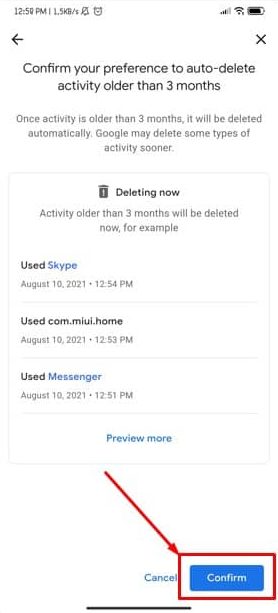
Step 5: The Final Confirmation
Whatever settings you’ve done so far, and now it’s time to confirm all of those. On the resulting page, if you agree with all the sayings of Google, then you’re all set to click the confirm. And you’ll be done and dusted with the process of auto-deleting the Google search history from your Android.
Wrapping Up
So, by following the steps mentioned above, you are done with the setup of auto-deleting Google search history on your Android. From now on, there’s no need to worry about your Google searches, as they’ll be auto-deleted according to your scheduled time.
Either you can with the manual process or the one I’ve mentioned. But, auto-delete would be more convenient and easy than the manual one. The choice is yours, but do choose wisely.
Well, that’s it, and it is time to take leave. I hope this helped! Wasn’t it pretty easy to do? I think it was! Let’s hear your experiences in the comments section below. I hope you will find this article helpful and easy to understand.
Please feel free to share this with your colleagues, friends, and family. Thanks for taking the time to read it. Take good care of yourself, and always stay tuned to the latest tricks and tips.