Normally, we use Google sheets for numbers and text. But you know, Google sheets can contain more than just numbers and text. However, let’s assume you want to display your data in a visual format to your audience, which is more appealing than numbers and text. At exactly this point, insert images in Google sheets come into play. Besides, creating a chart is another way to present your data visually.
In spite of having many features in Microsoft Excel, it sometimes lags behind Google sheets. For instance, Google sheets allow you to insert images directly into a cell which Microsft Excel doesn’t.
On top of this, the images you insert will fit into the cell’s size automatically. It doesn’t even matter where you put it. There is the option to add a new image on top of existing ones or move an existing one into a cell.
Insert Images in Google Sheets is As Easy As Pie
There was a time when users needed to use complex formulas for inserting images in Google sheets. But now, you can insert images within sheets with a few simple clicks. Why is inserting images important? Actually, images provide the visual insights of thousands of rows and cells, which makes your work more effective and appealing than ever.
However, there are several methods/ways available to insert the images in Google sheets. Yet, I’m going to cover the easiest and most convenient ways in this article for you. Let’s start.
1. Google Sheets: Insert Images Into a Cell
In this process, you’ll get familiar with how to insert images into any cell in your Google sheets. Well, you just need to follow the below steps, and you’ll get your desired images in your preferred cell.
i. At first, launch your Google sheets and select any cell you would like to get the image.
ii. Now, find the Insert menu from the top and click the image option. After that, you will find “Image in cell” as a sub-menu.
iii. Now tap on the “Image in cell” to proceed further.
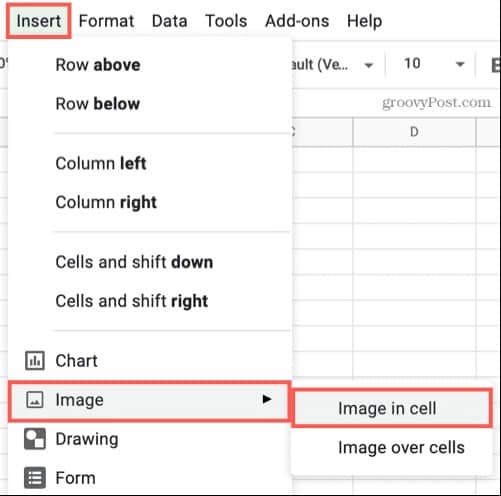
iv. Now you’ll find your hard drive’s images. Well, it’s time to locate and choose the image you want to insert in the cell. The images can be uploaded from different ways and sources (using your camera, Google image search, Google Drive, through URL). Tap on Insert.

Okay, I hope the image you select is now visible in your Google sheets. The image fits according to your cell size, and if you want to increase or decrease your cell size, the image will be fitted accordingly.

2. Google Sheets: Move Images Into a Cell
Sometimes you need to move your images in between different cells. And, Google sheets allow you to do it. You can insert images in any cell of your sheet; similarly, you can move them in any cell you want. However, you’ll need to follow below easy steps for doing so.
i. To move the image, select the cell first in which you wish to move it.
ii. Now select the image, and you’ll find 3 dots at the top right corner of the image. Click on that to proceed further.
iii. After clicking, choose “Put image in selected cell” from the resulting options.
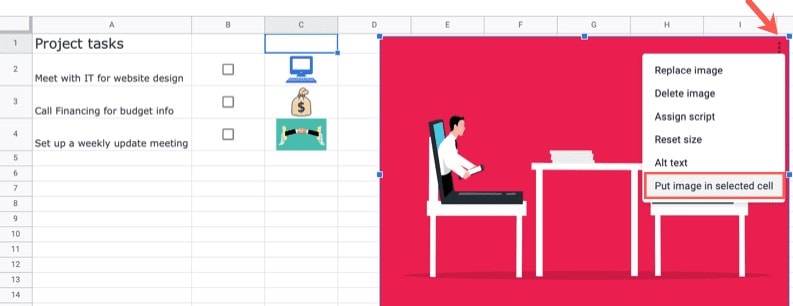
Well, it’s done and dusted. Now the image will move into the cell you select to have it. Moreover, your image will automatically fit with cell dimensions because Google sheets resize it into its system.
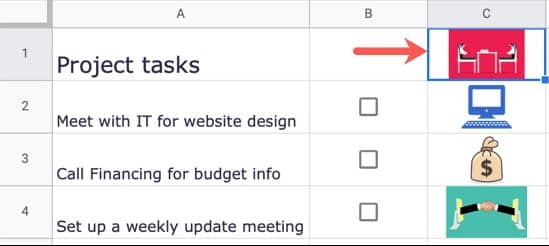
3. Google Sheets: Insert Images Over Cells
So far, I’ve discussed inserting images into a single cell. Well, if you want to place your image over multiple cells in your Google sheets, then you can do that as well. Google sheets have this feature too. And for doing so, follow the below steps.
i. To begin with, click on Insert from the top menu and find the Image section from the resulting options.
ii. A pop-out menu will appear after moving the cursor on the Image section. Now select “Image over cell” instead of “Image in cell”.
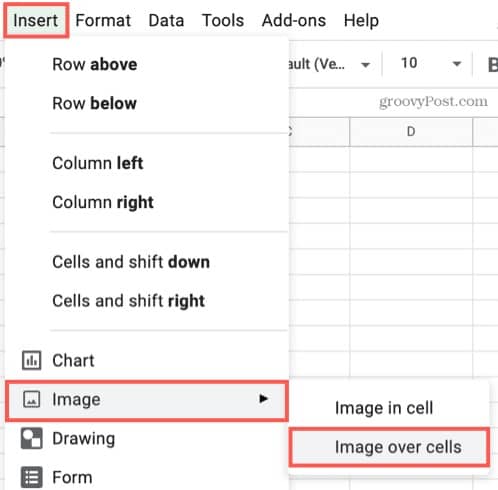 iii. Like before, locate and choose the image you would like to insert in your sheets. Well, if you’ve chosen your image, then tap on Insert.
The process completes here. You’ll find your image in your sheets with its original size. You can notice that this time the image is not attached to any particular cell.

This image is also resizable. For doing so, you just need to select the image and move or drag this from any corner of the image. Lastly, you can place this image wherever you would like to have it within your Google sheets.
Wrapping Up
To conclude things up, it’s very clear that inserting images in Google sheets is a piece of cake. You can insert your images into any particular cell or have the option of inserting over multiple cells. And to make all things complete, you just need to follow the above-mentioned easy steps.
Well, it’s time to take leave for today. I hope you’ll get this article informative and useful as well. If so, don’t hesitate to let me know your feedback on this in the comment box and to share this with people around you. I’ll be back with another Google documents tips and tricks very soon. Till then, take good care of yourself.
