Chromebook is a popular technology not only because they are cheap and small but also because of how they work. It has been proven that a large number of people like Chromebook because it is quick, secure, and easy to use. Chromebooks use ChromeOS, which makes it easy to run applications and access the internet.
Those who have shifted to ChromeOS from another operating system will first have to go through a learning curve because the Chromebook keyboard is a bit different from the traditional one. For example, Chromebook does not have a print button to take a screenshot like the Windows one. So you have to follow a few methods to capture screenshots in a Chromebook.
I write this guide because all of us are looking for a way to take screenshots on ChromeOS. You can learn some simple yet efficient techniques for taking screenshots on your ChromeOS device. So read the entire guide and learn some awesomely useful techniques.
How to Take Screenshot on Chromebook
You can snap a screenshot on ChromeOS in multiple ways. The simple way to take screenshots is by using a keyboard shortcut. But if you are seeking an alternative way to take a screenshot, ChromeOS has the solution.
All ChromeOS device provides a screenshot button in the Quick settings menu. So you can apply this feature to capture a screenshot quickly. Besides, some ChromeOS device has a physical button and stylus support to capture a screenshot. Here I have discussed 7 methods of snapping screenshots on your ChromeOS device.
Method 1: Using Keyboard
A quicker way to snap a screenshot of a Chromebook is by using a keystroke combination. In the below, we have provided the key combinations to take the full or partial screenshot.
1. If you want to capture an entire screenshot of the current window, then press Ctrl + Show windows (![]() ). You will find the show windows key at the top row of the Chromebook keyboard. Show windows resemble a rectangle with two lines.
). You will find the show windows key at the top row of the Chromebook keyboard. Show windows resemble a rectangle with two lines.
2. On the other hand, if you want to snap the particle screenshot of the current window, you have to press the same key combination of the entire screenshot plus Shift. So your keystroke combination to take the partial screenshot of the current window will be pressing Ctrl + Shift + Show windows (![]() ).
).
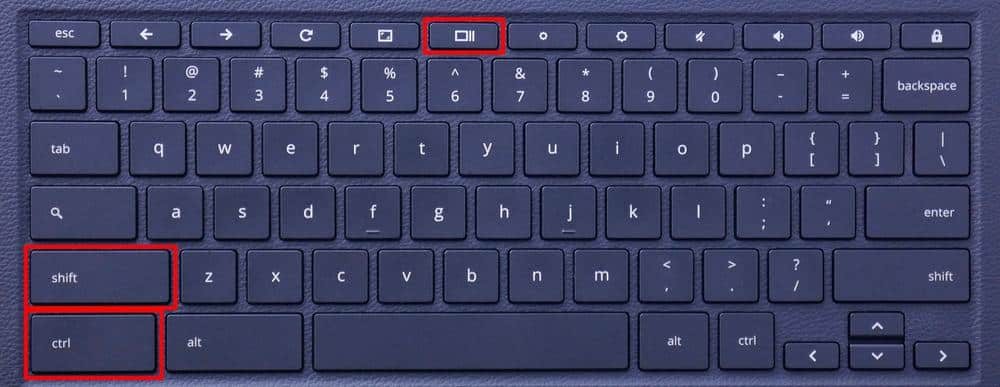
3. If you use a trackpad, then press and hold on the trackpad and drag to show the area of the partial window to take the partial screenshot.
Method 2: Using Quick Settings
Do not worry if you feel uncomfortable using keyboard shortcuts or can not remember keyboard shortcuts. You can snap a screenshot of your device via quick settings.
1. At the bottom right of the screen, click the clock. This brings the Quick Settings menu to the screen.
2. In the quick menu pop-up, you will find many options. One of them is the Screen Capture icon which resembles a circle inside a square.
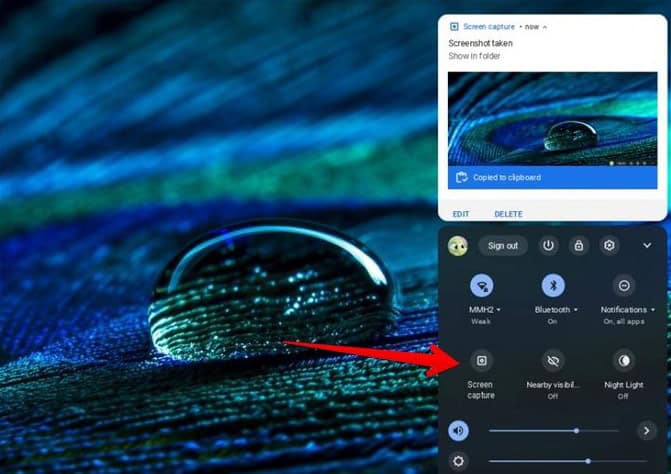
3. When you click on the Screen Capture icon, you will get a small menu at the bottom screen containing several icons.
4. The screen capture menu has two options for taking a screenshot: an image and a screen recording. The first icon from the left side of the menu looks like a camera for image screenshots. The second icon from the left side of the menu, which looks like a video camera, can capture a screen recording.
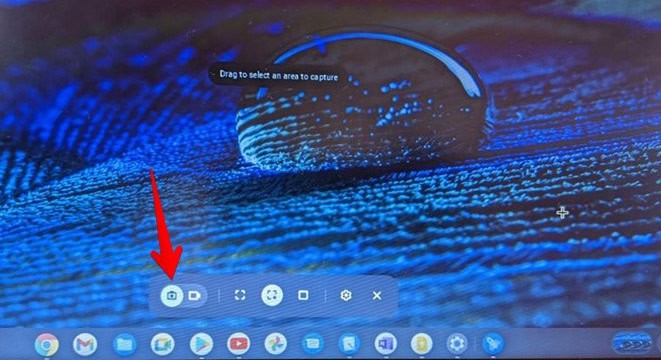
5. The remaining three icons in the middle of the menu are used to take three types of screenshots:
- Full-Screen Screenshot: Capture the entire screen.
- Partial Screenshot: Capture the specific area of the screen.
- Window Screenshot: Capture only the active window.
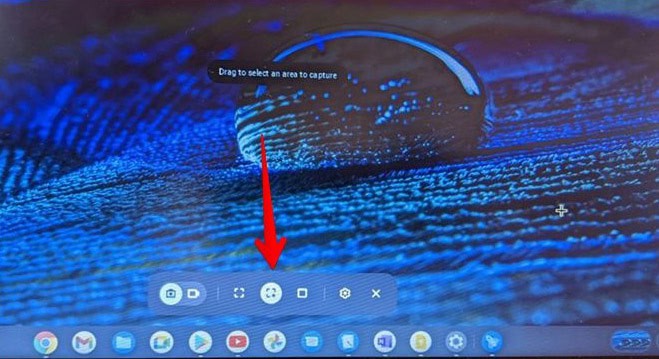
6. Besides, a setting icon on the menu lets you adjust your audio input, add music and select the folder to save your screenshot and recording.
Method 3: Using Physical Buttons
If you are using the Chromebook in tablet mode, you can take a screenshot on your Chromebook by using physical buttons. The method is similar to taking a screenshot on a smartphone device by just pressing and releasing the Power Button + Volume Button at the same time. You do not need to press and hold power and volume buttons.
Keep in mind that the volume keys on your keyboard are not the same as the Volume button. You can find your volume button on your Chromebook on either your device’s right or left side.
However, if you use physical buttons to take a screenshot, you must remember that you only take a full-screen screenshot by following this method. You can not take a partial screenshot by using physical buttons. Moreover, if you need to edit your screenshot, then you need to use a photo editing app after taking the screenshot.
Method 4: Using Chrome Browser
The Chrome browser comes with a built-in screenshot feature that you may use to capture a screenshot of your webpage. The limitation of the method is that you can not take a screenshot outside of the Chrome browser with this tool. However, when you are web surfing and you need to take an immediate screenshot of your webpage, then this method is effective.
Let’s apply this technique by doing the following steps:
1. Open your Chrome browser and click on the browser settings button (three dots) located at the top right corner of the browser.
2. Now click on the More tools and select the Take Screenshot option from the list.
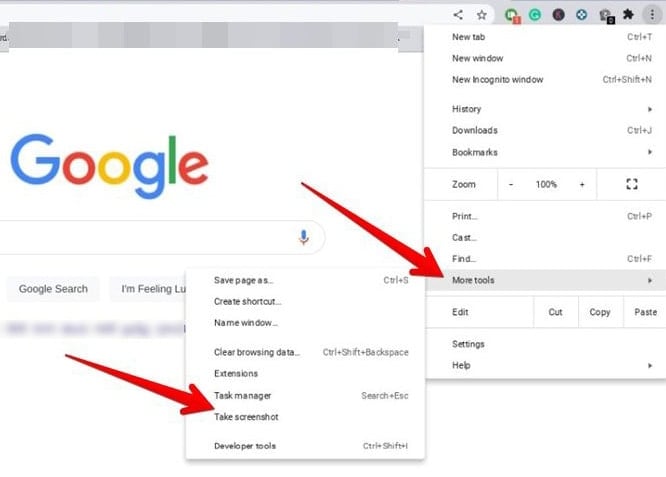
3. The screen turns darker and captures the screenshot of the webpage. When the tool takes a screenshot, it creates a clipboard, and you get a notification of it.
Method 5: Using Stylus
If your Chromebook supports Stylus, you can capture a screenshot using Stylus. To get started, click on the Pen icon on the home taskbar. This pen icon is on the right side of the taskbar beside the WiFi and battery status indicator icon. After clicking on the pen icon, a menu will open where you will find the Screen capture option.
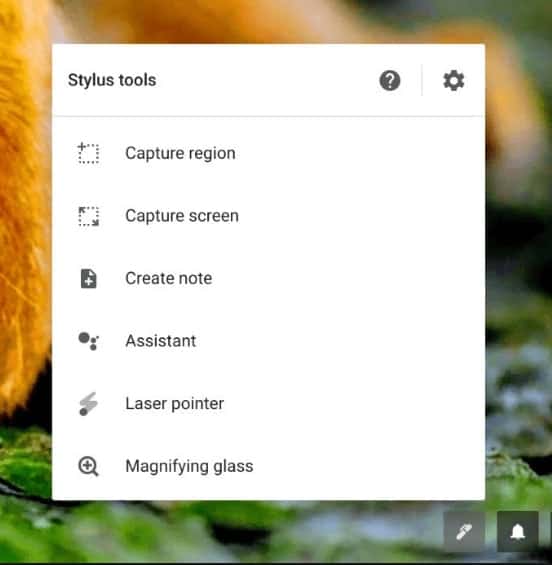
Click on the screen capture option to snap a full-screen screenshot. On the other hand, select the capture region tool if you need to take a partial screenshot.
Method 6: Using Google Assistant
Google Assistant is a real-time virtual helper tool that helps you accomplish basic tasks. You can complete your task by voice commanding. Google Assistant also helps you to take a screenshot.
To open Google Assistant, say Hey Google. When Google Assitant appears on the screen, say again, take a screenshot. Instantly you will receive a notification of capturing a screenshot of your screen.
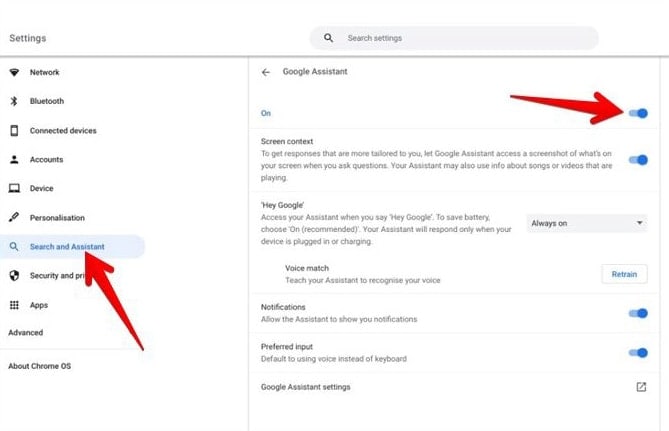
However, to activate the voice commanding of the Google Assistant, you have to set up the functionality on your Chromebook. For this, go to the Chromebook Settings and click on the Search and Assistant where toggle next to enable Google Assistant.
In addition, click on the Hey Google drop-down box and select the Always on option. But you should note that the Hey Google will respond only when your Chromebook is charging.
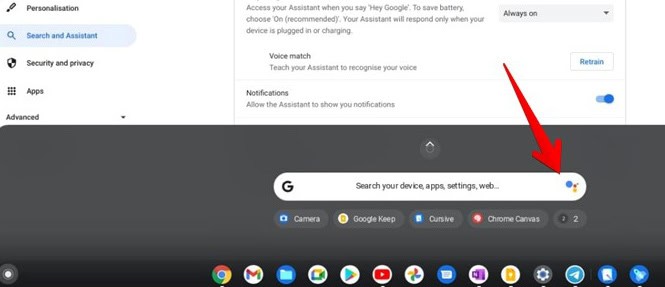
On the other hand, you can also open Google Assistant from the Chromebook search and click on the Google Assistant icon. Now type or voice command in the message box, Take a screenshot. Google Assistant instantly takes a screenshot for you and lets you know via a notification.
Method 7: Using External Keyboard
The Chromebook keyboard pattern is different than other keyboards. For example, the Chromebook keyboard does not have a print screen key. So the keyboard shortcut for Chromebook keyboard and non-ChromeOS keyboard is slightly different. If you need to take a screenshot by using an external non-ChromeOS keyboard, then you have to follow the following keyboard combination:
- To take a full-screen screenshot, press Ctrl + F5.
- To take a partial screenshot, press Ctrl + Shift + F5.
Method 8: Using Chrome Extensions
If you are not satisfied with taking a screenshot by following the above methods, then you can add Chrome extensions to your Chrome browser. You can download the Chrome extensions for free from the Chrome Web Store. Either you can find the screenshot extension by searching on the Chrome Web Store or download anyone from our best picks, such as:
- Lightshot
- FireShot – Take Webpage Screenshots Entirely
- Nimbus Screenshot & Screen Video Recorder
- Awesome ScreeAwesome Screenshot and Screen Recordernshot
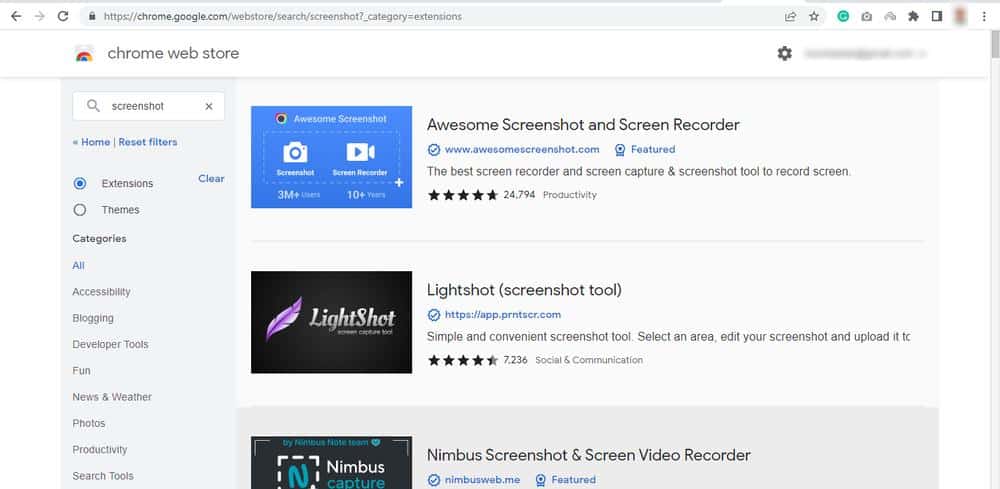
However, all screenshot extensions can capture screenshots in the Chrome browser, some extensions also help you to capture the scrolling areas on web pages. Besides, you can share the screenshot instantly and save it in different formats.
Find Your Chromebook Screenshots
After taking a screenshot, a copy of the screenshot will pop up just above the Quick settings menu. Hit on the pop-up window to go to the saving folder. Usually, all ChromeOS screenshots are saved in the Downloads folder. You can locate this by opening up the Files. If you do not know where Files is located, then go to launcher and search for it.
However, you can change the location of your screenshot save by going to the settings option in the Screen Capture menu. Press Ctrl + Shift + Show windows (![]() ) or click on the Screen Capture icon to get a Screen Capture menu. After that, click on the Settings > Select folder to define the folder where you can save your screenshot image or video.
) or click on the Screen Capture icon to get a Screen Capture menu. After that, click on the Settings > Select folder to define the folder where you can save your screenshot image or video.
Besides, when you capture a screenshot, it automatically creates a clipboard. This clipboard lets you back up your screenshot images or recordings to Google Photos, Google Drive, or other platforms. However, the Chromebook has limited hard drive space. So the better solution for you is to make back up the screenshot images and recordings to the cloud storage platform.
Edit Your Chromebook Screenshots
The ChromeOS Screenshot apps also provide a screenshot editing option. When you capture a screenshot, a pop-up window appears just above the Quick settings menu. You will find the edit and delete option at the bottom of the window. You can perform basic editing using this app. With this app, you can crop, rotate, annotate and adjust the lighting of your screenshot.
One Last Thing
I think you have now learned how to take a screenshot on Chromebook. I request you bookmark this guide in your Chrome browser so that you can easily retrieve it when you need to reference it again in the future. If you know any additional techniques to snap a screenshot in Chromebook, please share your knowledge in the comments below.
Thank you for taking the time to visit us today. I regularly publish new content about Chromebook. So I hope you visit my site frequently and learn more about the Chromebook.
didnt work for me
Thank You!! for years I have not been able to do screen shots with my Chromebook, So finally searched it and found your lesson! And it worked!
NICE POST, IT IS VERY HELPFUL, THANKS FOR SHARING THIS KNOWLEDGE