Did you know that you can set Dark Mode on your Chromebook? Dark Mode has become popular day by day among all computer users because dark mode makes it easier to read webpages at night and can prevent eye strain. Many people have used it to increase their productivity, but more importantly, it improves overall reading.
Although most operating systems have this dark mode, Chrome OS does not have the feature. But the good news for Chrome OS users is that Google is finally preparing to add this new feature. With the launch of the latest Canary channel update, Dark Mode is ultimately available for users to test.
In this guide, we will guide you step-by-step on how to enable Dark Mode on your Chromebook. This article describes some features and tweaks that can help your eyes feel less strained and improve your Chromebook computing experience. This write-up will make you happy to read since you will discover how it may boost your productivity.
Steps to Enable Dark Mode on Chromebook
The Chromebook can currently only be operated in light mode. As Google is always advancing and experimenting with features, it has made the dark mode available in the Chromebook’s Beta Channel.
There are three channels available on your ChromeOS: the Stable Channel (the default), the Beta Channel, and the Dev Channel. Only the Beta Channel has dark mode right now. You must thus switch to the Beta version to use dark mode on your Chromebook.
In addition, setting dark mode on your Chromebook is divided into three steps that must be carried out to avoid unexpected and undesirable effects. So, carefully follow the instructions provided in each step.
Setting up Dark Mode on Chrome OS is pretty straightforward. However, it requires a bit of technical knowledge – how to get it working. We will show you a step-by-step procedure for turning on Dark Mode on your Chromebook.
Step 1: Switching to Beta Mode
When you switch to the Chrome OS beta version, you will lose all the previous version’s data. Because switching between channel wipe out all system data. So before switching the channel, you must back up all your important data. Besides, you must remember that you can switch your Chrome OS channel if authorized to do it. So you have to log in with your authorized account to switch your Chrome OS channel.
1. Firstly, open your Chrome browser by signing in Google account.
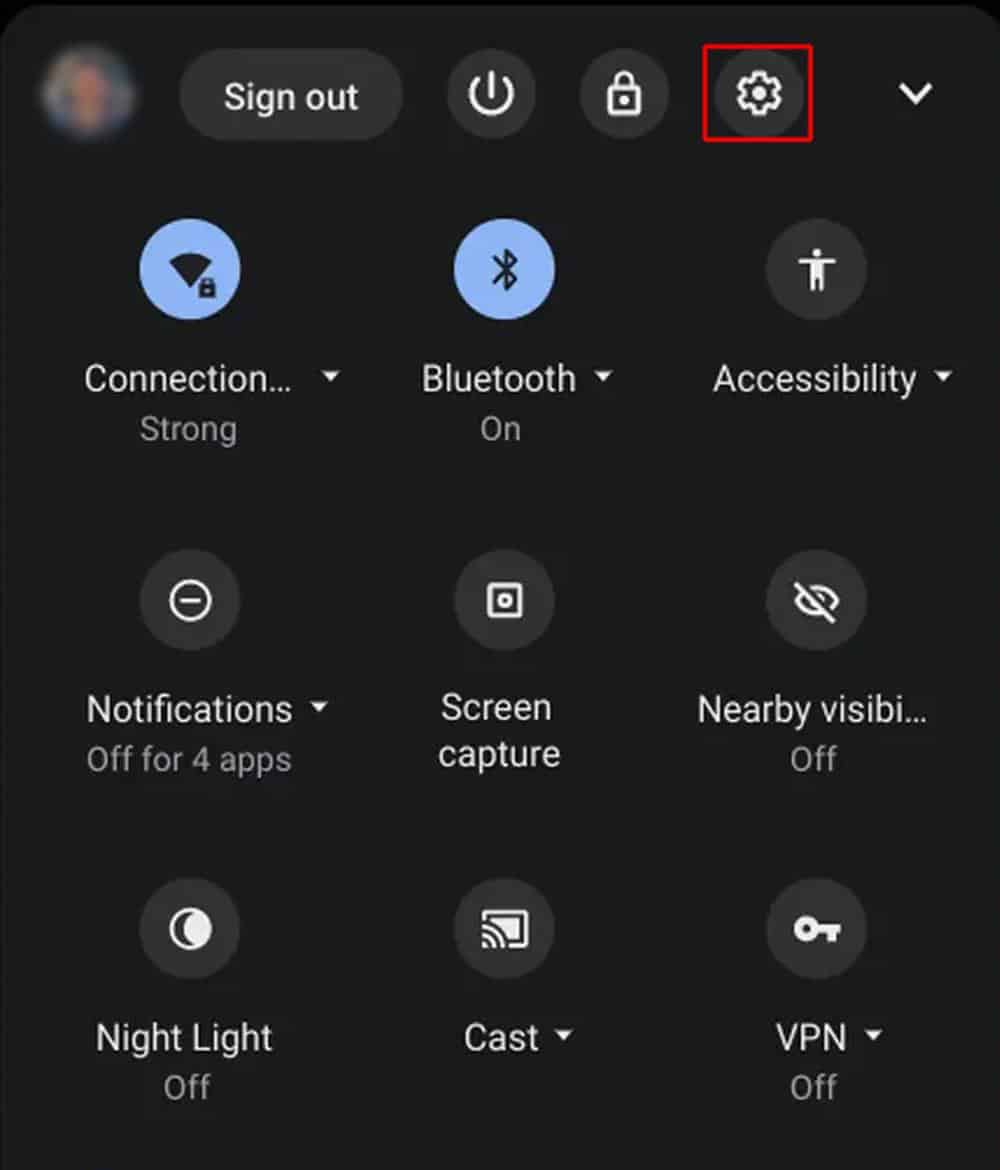
2. Next, click on the Quick Menu, which is located bottom right corner of the Chromebook screen.
3. In the menu, click on the Chromebook settings icon (cogwheel) located at the top of the quick menu.
4. Now select the Detailed Build Information under About the Google Chrome OS section.
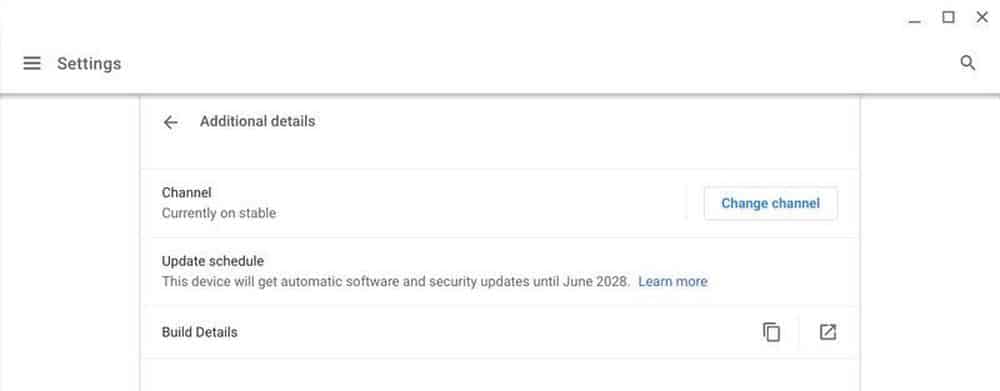
5. In the Detailed Build Information, hit on the Change channel in the Channel section.
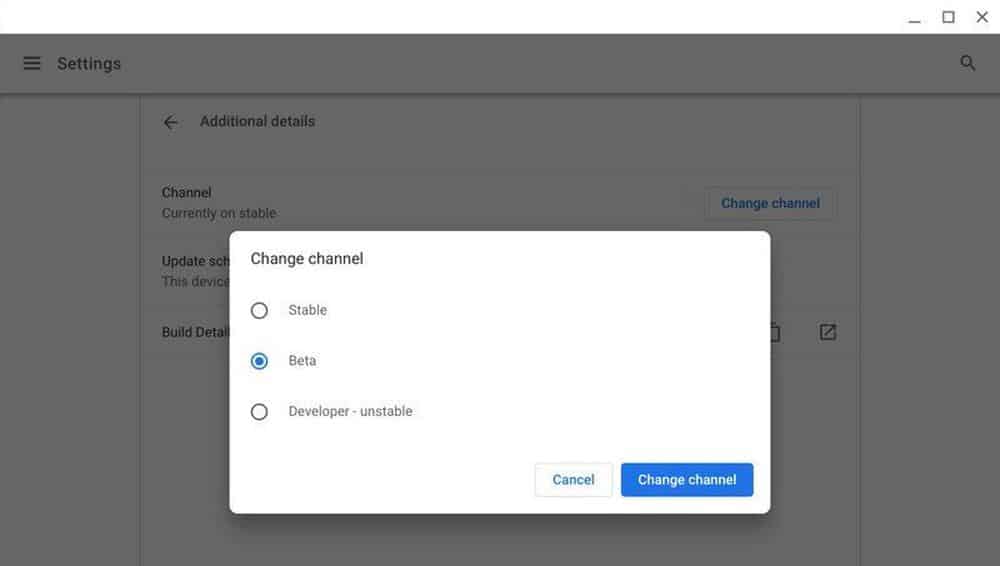
6. Select the Beta radio button and then hit on the Change channel button in the change channel box.
7. After that, wait for a whole to complete the download of Beta files and reboot your computer after download completion.
8. After rebooting your computer, you have to again sign in to ChromeOS with your Google account.
Step 2: Enable Dark Mode on System UI
To enable dark mode on your Chromebook after switching to the beta version, go through these steps below:
1. First, launch the Chrome browser on your Chromebook.
2. Then, type chrome://flags into the URL of your Chrome browser.
3. Next, navigate to the Experiments page and put down “dark” or “dark mode” in the search bar.
4. Therefore, you will find the Dark/Light Mode of System UI label where you hit the Default button to move on to the next step.
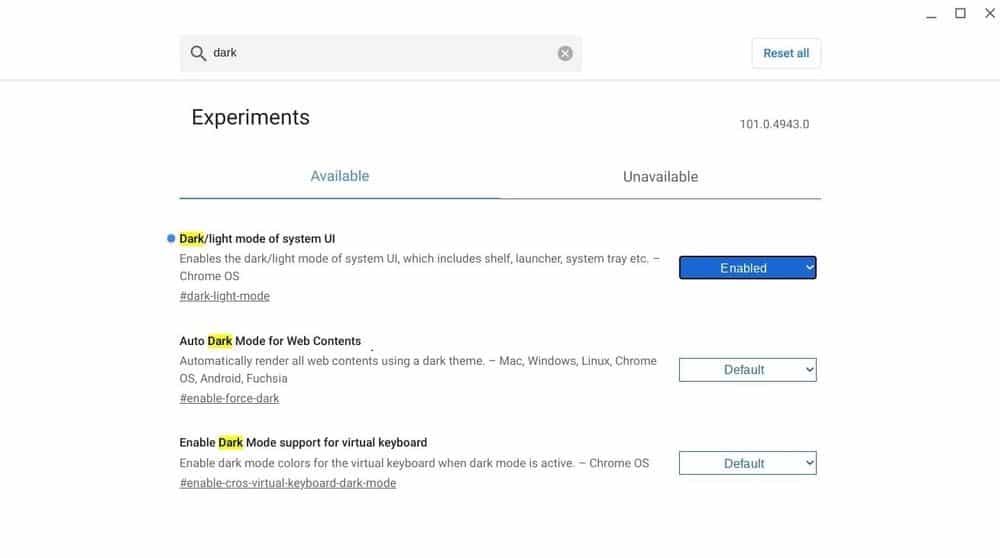
5. Select Enabled from the list by clicking on it.
6. You will see the label Force Dark Mode for Web Content here. Hit on the Default button once more, then choose the Enabled option from the list.
7. Restart your device after the process is done.
Step 3: Turning on the Dark Theme
To enable the dark theme after restarting your computer, follow the steps given below:
1. Select the Quick Menu panel again, located at the bottom right corner of the Chromebook screen.
2. When you enter the menu, you will find a Dark theme icon. To reach the next, click on the icon.
3. Next, click on the Dark theme toggle button to turn on dark theme mode.
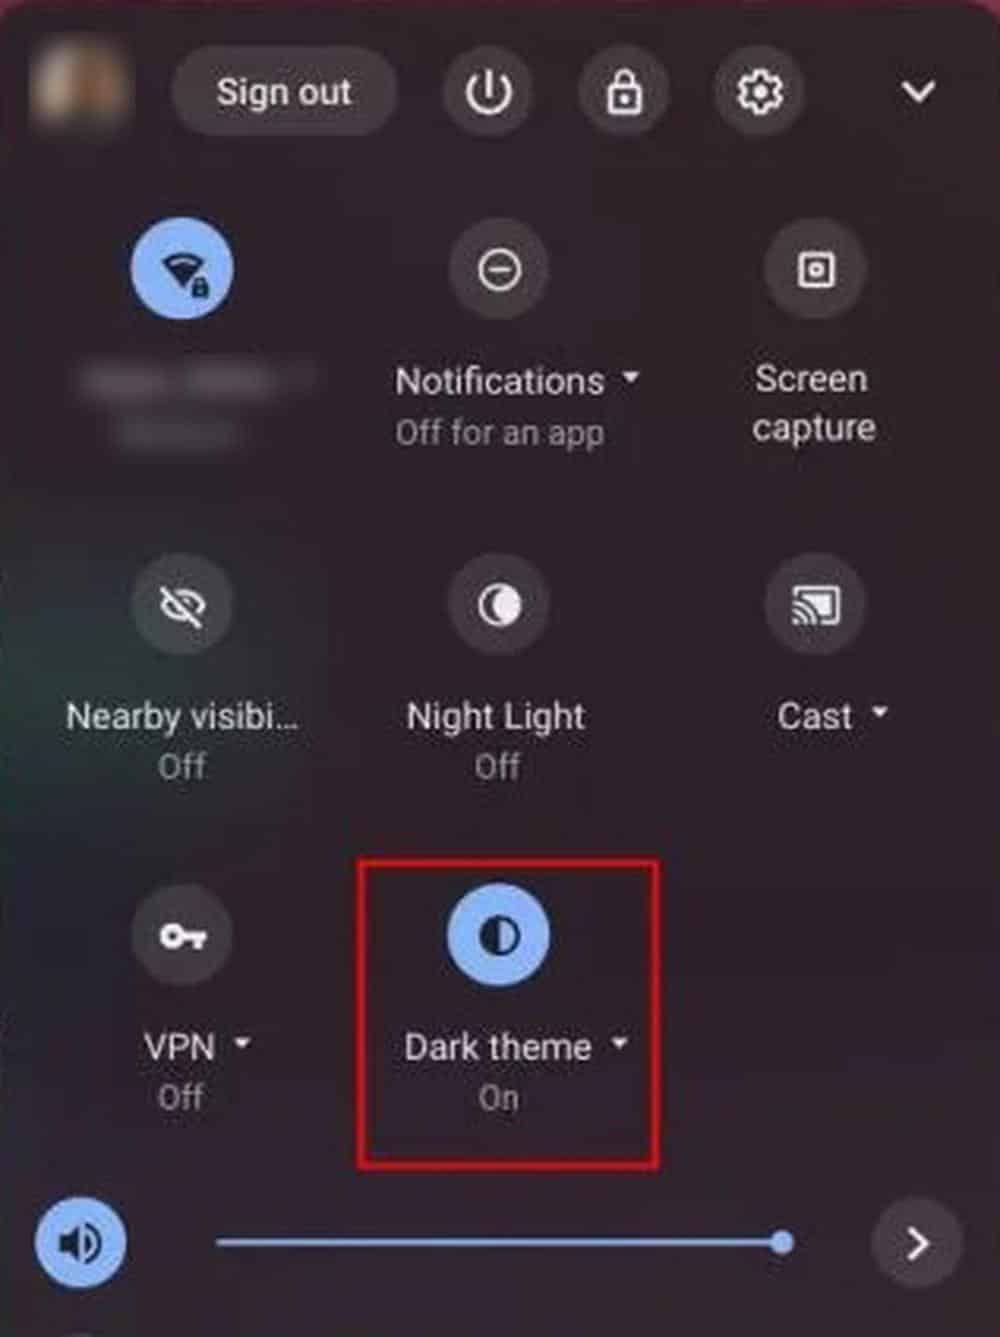
4. Under the Dark theme mode, you can choose between two options Themed and Neutral. When you select the themed option, the system takes the colors from your screen wallpaper and uses them as the system color. On the other hand, the neutral option employs a neutral color scheme.
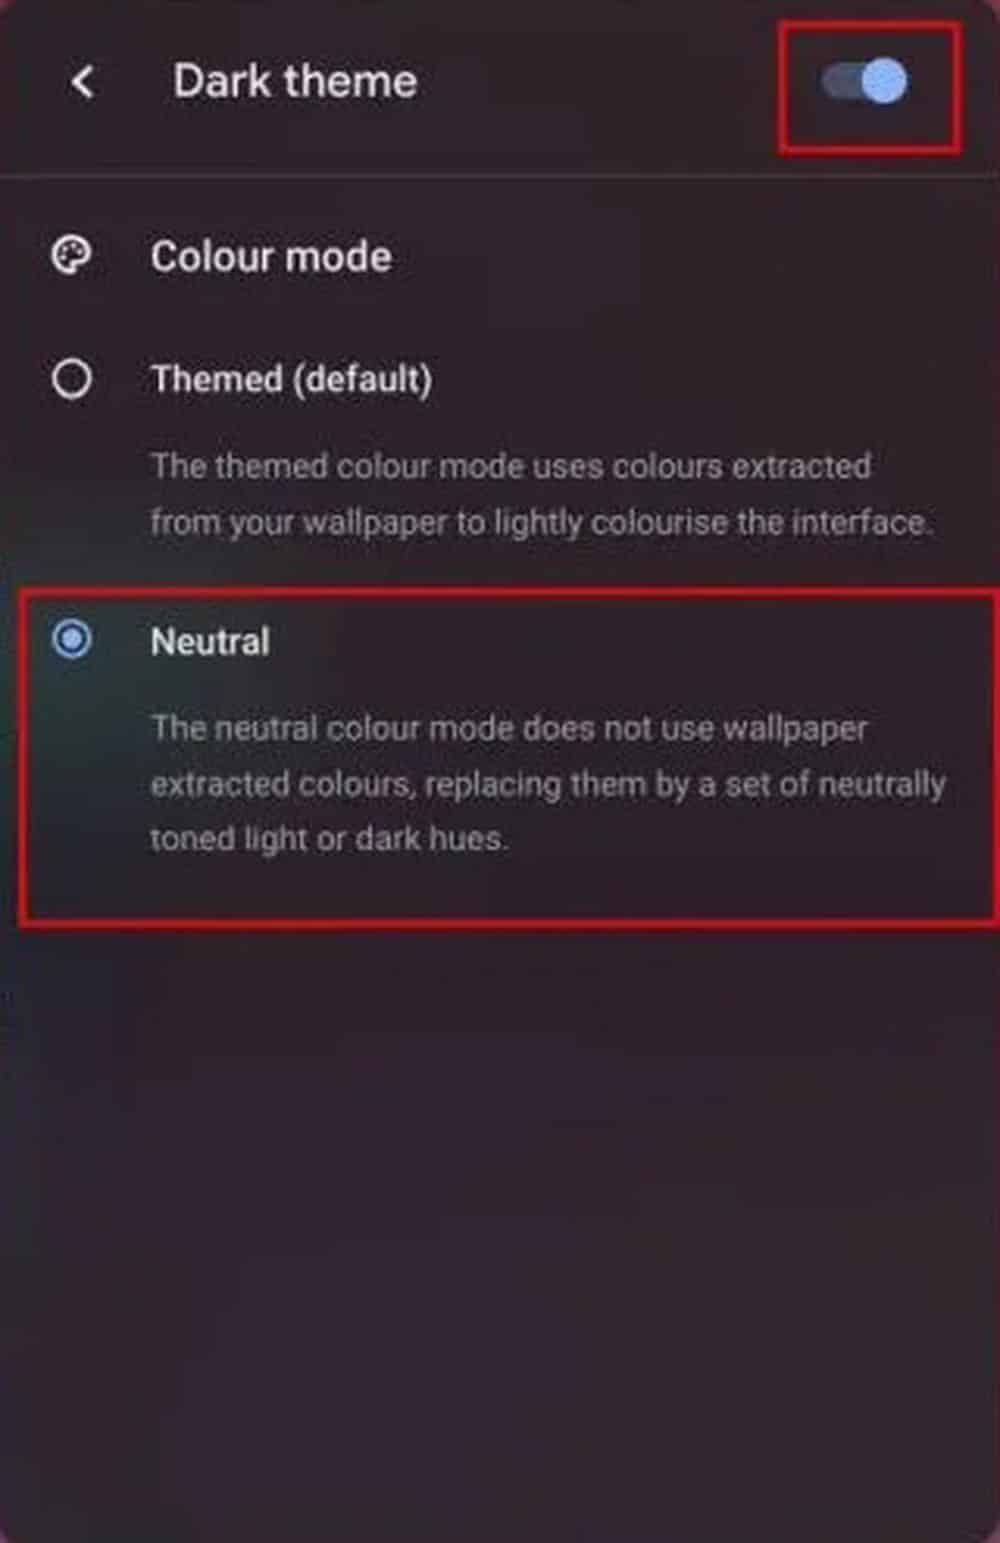
5. You can turn on dark mode on your Chromebook by choosing from the above two dark theme options. However, Chromebook dark mode is still in the experimental stage, so when you switch it on, you can experience bugs and system lag.
When you enable dark mode on your Chromebook, several applications do not function properly. Besides, many applications do not run in your Chromebook when you turn on dark mode. Therefore, switching to stable mode on your Chromebook is better if you face several difficulties using ChromeOS beta.
Check Out the Chromebook Night Light Feature
In the above section, you will notice a lot of warnings to switch Chromebook beta version and turn on Chromebook night mode. But if you have not done so, you need not worry!
The Chromebook now gives you a better alternative if you wish to go to the dark mode because the bright theme strains your eyes when working for a long period or in low light. The feature is called Night Light.
The Google developer unveils the Night Light feature, which promotes warmer and redder colors while emitting blue light. This color scheme will less harm your eyes.
So you can turn on the Night Light feature on your Chromebook instead of turning on night mode. To enable this feature follow the following steps below:
1. Launch the quick menu by clicking on the quick menu icon from the bottom right corner of the system screen or pressing the keyboard shortcut Alt + Shift + S.
2. The next step is to select the Settings icon from the menu window’s top bar.
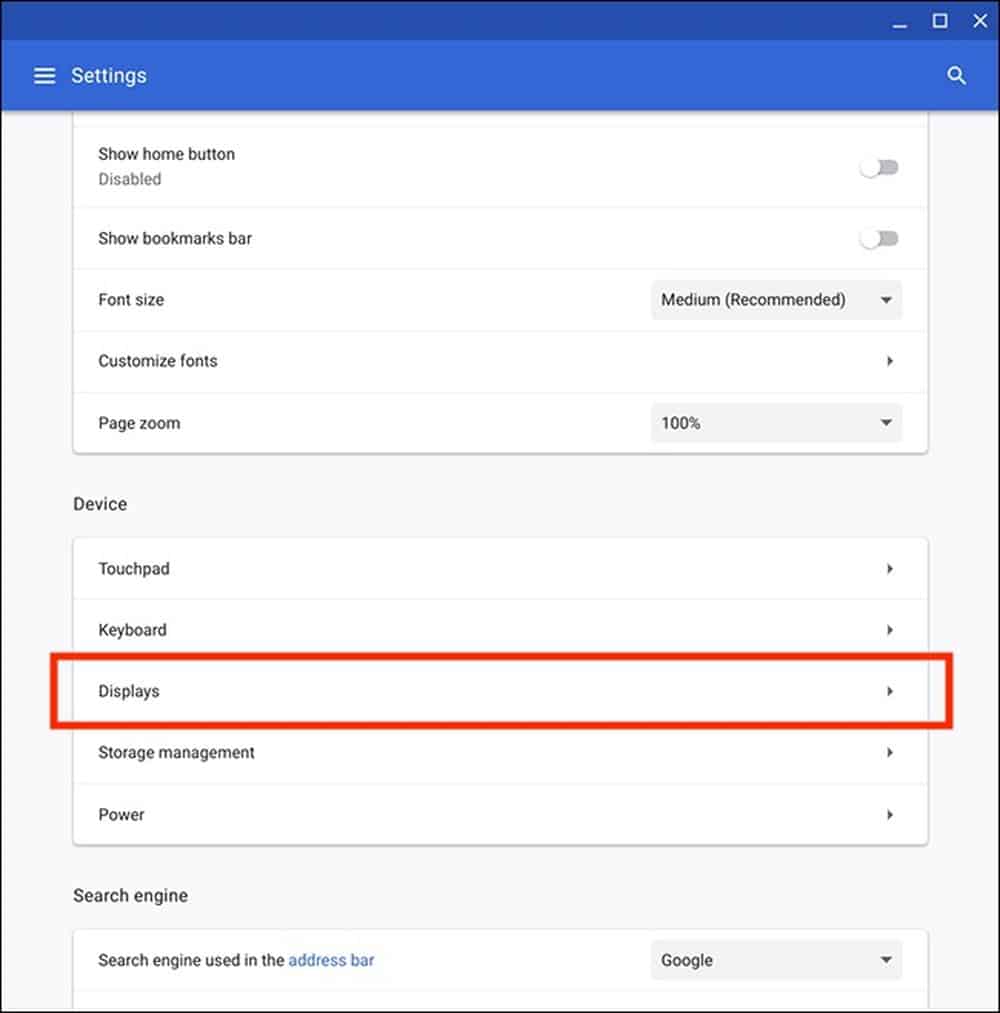
3. Select the Displays option under the Device section in the following step.
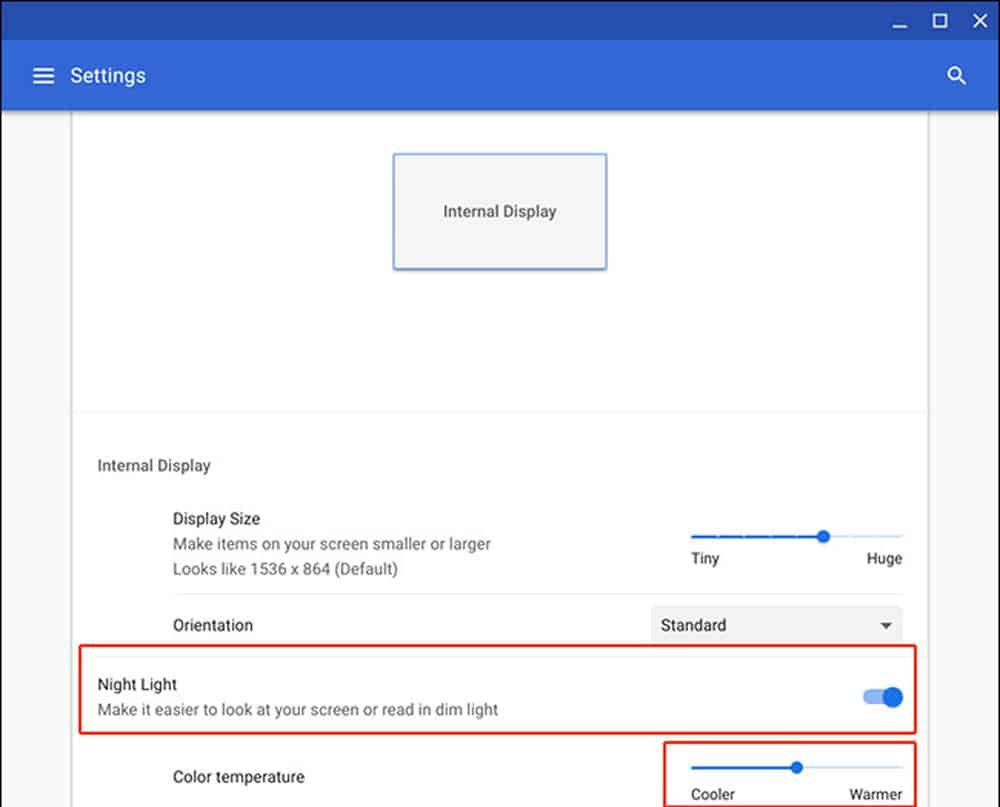
4. After that, scroll down to the bottom to find the Night Light option and activate it by clicking on the toggle.
5. Under the Night Light section, you can adjust the intensity of the color by changing the color temperature.
Schedule Chromebook Night Light Feature
The drawback of the Chromebook Night Light feature is that after enabling this, it is always activated till turned off. So you can set a time schedule for when the Chromebook Night Light feature is turned on and when it will be turned off. To use this feature, you have to follow the previous settings of the Chromebook Night Light feature.
1. Go to Settings > Displays > Device and turn on the Night Light feature.
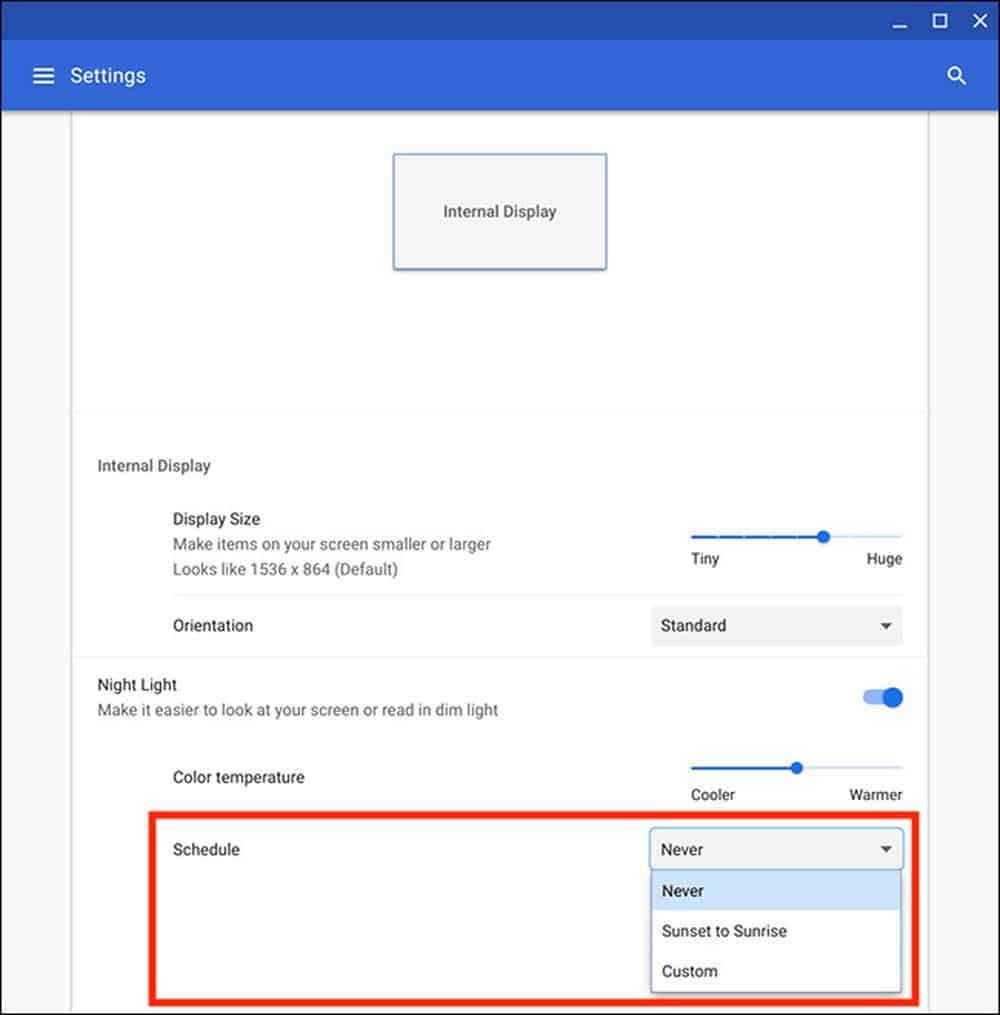
2. To schedule Night Light automatically, click on the Schedule option under Night Light.
3. When you click on the schedule option, a drop-down appears with three options Never, Sunset to Sunrise, and Custom. Here Never means the Night Light schedule will not activate unless you select the time schedule.
Therefore, Sunset to Sunrise means Night Light features will be enabled in the evening and remains for the whole night. On the other hand, the Custom option allows you to set the Night Light feature to activate the time period.
So the Chromebook Night Light feature is more powerful in controlling the screen’s lighting. You can apply this feature as an alternative to dark mode. From our point of view, the Night Light feature is better than the dark mode.
Enable Chromebook Dark Mode Theme
If you are passionate about the dark mode but do not interested in taking the risk of switching to the buggy beta version to get a dark mode on your computer, then you can turn on a dark mode theme on your device.
However, applying a dark mode theme does not enable entirely dark mode. It brings your system closer to giving the feel of dark mode. To enable a dark mode theme, follow the following guide below:
1. Right-click on the ChromeOS screen and select the Wallpaper Picker option.
2. Therefore, select the Set Wallpaper option from the next page.
3. The next step is to select Solid Colors from the left sidebar. The color panels appear on the screen, and select the Choose the black color.
4. When you choose the color black, your computer screen will choose shades of black as your background color.
The overall process is simple, and you feel dark mode on your Chromebook without switching to the beta version to enable dark mode.
Final Thought
In this guide, we have covered how to activate dark mode on a Chromebook, as well as how to apply an alternative to dark mode and enable the dark mode theme to experience dark mode’s effects. The dark mode on Google Chromebooks is currently experimental and contains a few security bugs. So our recommendation for you is to apply the alternative of dark mode.
Once you apply dark mode on your Chromebook, all of your applications, system files, and webpages will be in dark mode. The low light level makes your eyes more comfortable to work more efficiently.
Have you ever turned on your Chromebook’s dark mode? Did you follow these guides? If you have benefited from this guide, you can share it with your friends so that they can also get help. Comment below with your thoughts, and let us know.
